Intentions
An experiment in Ultralight View Controllers
I’m a big fan of lighter view controllers. In the first issue of objc.io, I wrote an article about it. Since then, I’ve given a couple of talks about it. Most of the things you can do are very straightforward once you know them, and people seem to generally like it. However, a couple of months ago, I read a great blogpost explaining how to take the notion of ‘lighter view controllers’ up a notch. I tried to take the idea, and apply it to a very simple example app.

The Application
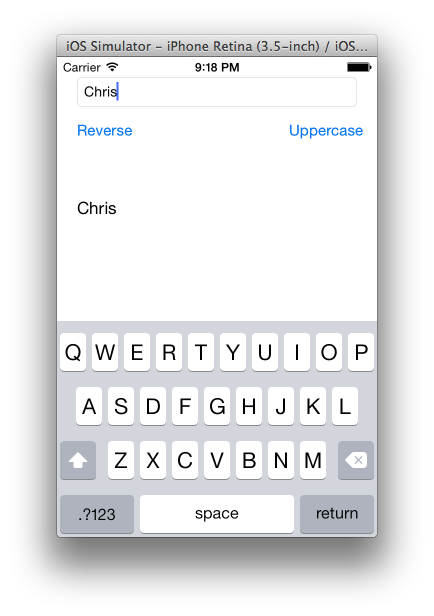
The app is simple: it’s an editor for a Person object, and currently the only editable field is the person’s name. There are two buttons: Reverse
reverses the person’s name, and Uppercase
makes it all uppercase. If you edit the person’s name, and then press Return
, the keyboard should dismiss.
A regular implementation of the View Controller
I created the view controller’s view in Interface Builder. The text field is hooked up as an IBOutlet, and the view controller is also the text field’s delegate:
@interface ViewController () <UITextFieldDelegate>
@property (nonatomic) IBOutlet UITextField *textField;
@end
Then, in the implementation, we create a person and update the text field’s text to reflect the newly created person’s name:
- (void)viewDidLoad
{
    [super viewDidLoad];
    self.person = [Person new];
    self.person.name = @"Chris";
    [self updateTextField];
}

- (void)updateTextField
{
    self.textField.text = self.person.name;
}
Each of the buttons is connected to an IBAction. For example, the reverse button’s action takes the name, reverses it (using the category method reversedString, and updates the person’s name. Then it updates the text field accordingly:
- (IBAction)reverse:(id)sender {
    self.person.name =
       self.textField.text.reversedString;
    [self updateTextField];
}
Uppercase works in exactly the same way. Simple enough:
- (IBAction)uppercase:(id)sender {
    self.person.name =
      self.textField.text.uppercaseString;
    [self updateTextField];
}
The text field’s delegate is implemented in a simple way: it checks if the replacement string is a newline (i.e. the return key was pressed) and if yes, it resigns first responder, which dismisses the keyboard.
- (BOOL)textField:(UITextField*)textField
   shouldChangeCharactersInRange:(NSRange)range
               replacementString:(NSString*)string
{
    if ([string isEqualToString:@"\n"]) {
        [textField resignFirstResponder];
        return NO;
    }
    return YES;
}
Now, all of this is very simple. The view controller is just under 50 lines. However, as you add more and more logic, the view controller obviously becomes larger.
Moving to Intentions
The idea of the article mentioned in the introduction is to take lighter view controllers to a whole new level. A view controller should only do work in the viewDid* methods, not implement any extra protocols, and not have any IBActions. That sounded pretty extreme to me, but I wanted to give it a try and see what it feels like.
I created a sample project of the things below, and put on github.
Dismiss on Enter
The first thing we can do is to take out the dismiss on enter logic. To do this, we create a new object, which does only this:
@implementation DismissOnEnterIntention

- (BOOL)textField:(UITextField *)textField
    shouldChangeCharactersInRange:(NSRange)range
                replacementString:(NSString *)string
{
    if ([string isEqualToString:@"\n"]) {
        [textField resignFirstResponder];
        return NO;
    }
    return YES;
}

@end
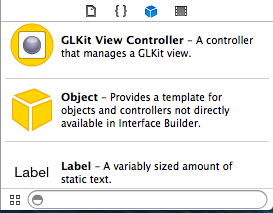
To use this object, we can go to the Object library in Interface Builder, and add a new object to our scene.

We set its class to DismissOnEnterIntention:

Now, we can go to the textfield, and change its delegate and drag it to our new class (we have to make sure that the class declares that it implements the UITextFieldDelegate protocol, for example in the class extension).
And that’s all there is to it. When the view controller is loaded, the storyboard will create a DismissOnEnterIntention object and hook it up. Of course, having an extra object just to dismiss on enter seems a bit tedious. But think about it: how often have you implemented this yourself in a view controller? If you put this object in your own standard library, you never have to implement it again, but can instead just reuse it.
Update
: Several people on Twitter point out you can use textFieldShouldReturn: instead, which is of course a lot better.
Uppercase a Name
Uppercasing a name is a bit more difficult. We can start by creating a new object, UppercaseIntention. It will have an outlet called textField, and an IBAction, uppercase, which we just copy over from the view controller:
- (IBAction)uppercase:(id)sender {
  self.person.name =
    self.textField.text.uppercaseString;
}
We can add a custom object to our view controller scene, hook up the text field and the action, but now we face a problem: how do we connect the person object? It turns out we can’t: we don’t know yet which person to edit. Instead, we first have to take a small sidestep and introduce an indirection: we create a container class that contains the person object. At first sight, this might seem to only complicate matters, but bear with me.
Creating a Person Container
We create a custom object called PersonContainer, which doesn’t do anything, except for having a Person property:
#import "Person.h"
@interface PersonContainer : NSObject
@property (nonatomic) Person *person;
@end
We can add a new custom object of this class to our Interface Builder scene, and when the view loads, we can use the view controller and set the container’s person property to the person we are currently editing. Then our UppercaseIntention can use that person container to access the person. In our view controller, we do the following:
- (void)viewDidLoad
{
    [super viewDidLoad];
    Person *person = [Person new];
    person.name = @"Chris";
    self.personContainer.person = person;
}
In the UppercaseIntention class, we can add an outlet for the person container, hook it up, and finally we can write our uppercase action:
- (IBAction)uppercase:(id)sender {
  self.personContainer.person.name =
    self.textField.text.uppercaseString;
  self.textField.text =
    self.personContainer.person.name;
}
For the reverse action, it’s almost exactly the same code.
Our view controller is now lighter (it only has the viewDidLoad method left), but the question is: what have we gained? Is this really simpler to read? At this point, I think we have only complicated matters. There is a more clear separation into classes, but it’s now harder to understand, and the new classes that we have made are very specific to our view controller. We can do better, and make our classes more reusable.
Moving to a Generic Text Field Uppercase Intention
Let’s say we want to reuse our uppercase intention in a different place, where we don’t have a Person as the model, but a different class. First, we can change our PersonContainer to hold any kind of model, and rename it to ModelContainer:
@interface ModelContainer : NSObject
@property (nonatomic) id model;
@end
Now, in our uppercase intention, we can change the code like this. It still knows that we’re editing a person’s name:
- (IBAction)capitalize:(id)sender {
    [self.modelContainer.model
         setValue:self.textField.text.uppercaseString
       forKeyPath:@"name"];
}
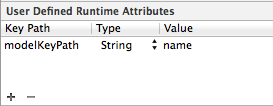
However, we can use a really cool feature of Interface Builder: User Defined Runtime Attributes. We can take the key path @"name", and make it a runtime attribute. First, we create an extra property in our UppercaseIntention:
@property (copy, nonatomic) NSString* modelKeyPath;
Then, we change our code like this:
[self.modelContainer.model
     setValue:self.textField.text.uppercaseString
   forKeyPath:self.modelKeyPath];
Finally, in Interface Builder, we select the Reverse Intention object, and add a runtime attribute:

This is quite cool: now, our uppercase intention doesn’t know anything about the Person anymore. The only thing it does: it takes a model object and a text field, and whenever its action is fired, it updates the model with the uppercased string of the text field.
Observe intention
If you paid close attention, you noticed that we removed the following line in our uppercase intention:
  self.textField.text =
    self.personContainer.person.name;
How do we get that behavior back? Instead of updating the text field, let’s do it with KVO, and create an observer object. We will make it very generic: it is configured with an object to observe and a key path, and also with a target to update, and a key path. For example, the object to observe might be a Person and the key path might be name, and the target object might be a UILabel and the key path might be text, which will update the label’s text whenever the person’s name changes.
First, we need to create properties for the source, target and the two key paths:
@interface ObserveIntention ()

@property (strong) IBOutlet id sourceObject;
@property (strong) IBOutlet id target;
@property (copy) IBOutlet NSString *sourceKeyPath;
@property (copy) IBOutlet NSString *targetKeyPath;

@end
Then we need to register for KVO notifications. We do this in awakeFromNib, which is called by the framework after the outlets and the runtime attributes are set.
 - (void)awakeFromNib
 {
     [super awakeFromNib];
     [self.sourceObject addObserver:self
                         forKeyPath:self.sourceKeyPath
                            options:0
                            context:nil];
 }
To handle the change notifications, we implement the standard KVO method:
- (void)observeValueForKeyPath:(NSString *)keyPath
                      ofObject:(id)object
                        change:(NSDictionary *)change
                       context:(void *)context
{
    if ([keyPath isEqualToString:self.sourceKeyPath]) {
        [self updateValue];
    }
}
The updateValue method does the real work, and looks like this:
 - (void)updateValue
 {
     id value = [self.sourceObject
                  valueForKeyPath:self.sourceKeyPath];
     [self.target setValue:value
                forKeyPath:self.targetKeyPath];
 }
And that’s all there is to it. We can now create this object in Interface Builder, hook up the source to the model container, the target to the text field, set both key paths using runtime attributes, and the textfield automatically updates whenever the model changes.
Adding an extra label
It might still feel like we have done a lot of work for nothing. But to show how simple some things now get: we can add another label in our view controller’s scene, duplicate our observe intention, but change the target to be our label. Now our label also automatically updates its text whenever the Person changes.
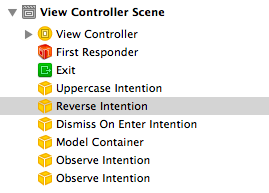
It is interesting to now have a look at our final view controller scene, it’s very different from most view controllers:

Conclusion
I think this might become a very powerful technique. It comes at a cost: instead of having one complicated view controller, you will have a more complicated storyboard. For me, however, the main attraction is the reusability: I can reuse the observe intention in every project. The same holds for the dismiss on enter intention. I can imagine a whole library of these intentions slowly emerging.
In my next project, I will probably start using intentions, maybe not for everything, but where I see them fit. Building an example project with them was a lot of fun and really opened my mind.