A Day in the Life of a SwiftUI View
August 12th, 2023 • Toronto, Canada • SwiftConf.to
Here’s the video of my talk. Scroll down for an annotated transcript. The video contains some animations that I didn’t replicate in the annotated slides.
This talk is about understanding the mental model behind SwiftUI, or at least, my mental model. I want to share with you how I think this stuff happens. And I learned this by teaching workshops, writing about this, and actually re-implementing large parts of SwiftUI. I tried to re-implement the state system and the layout system. When I say I, I actually mean we. I did a lot of this work together with Florian, who’s my collaborator. I want to focus on how the code we write translates into view trees. And then how these view trees translate into render trees. And I’ll define this a little bit better as we go about it.
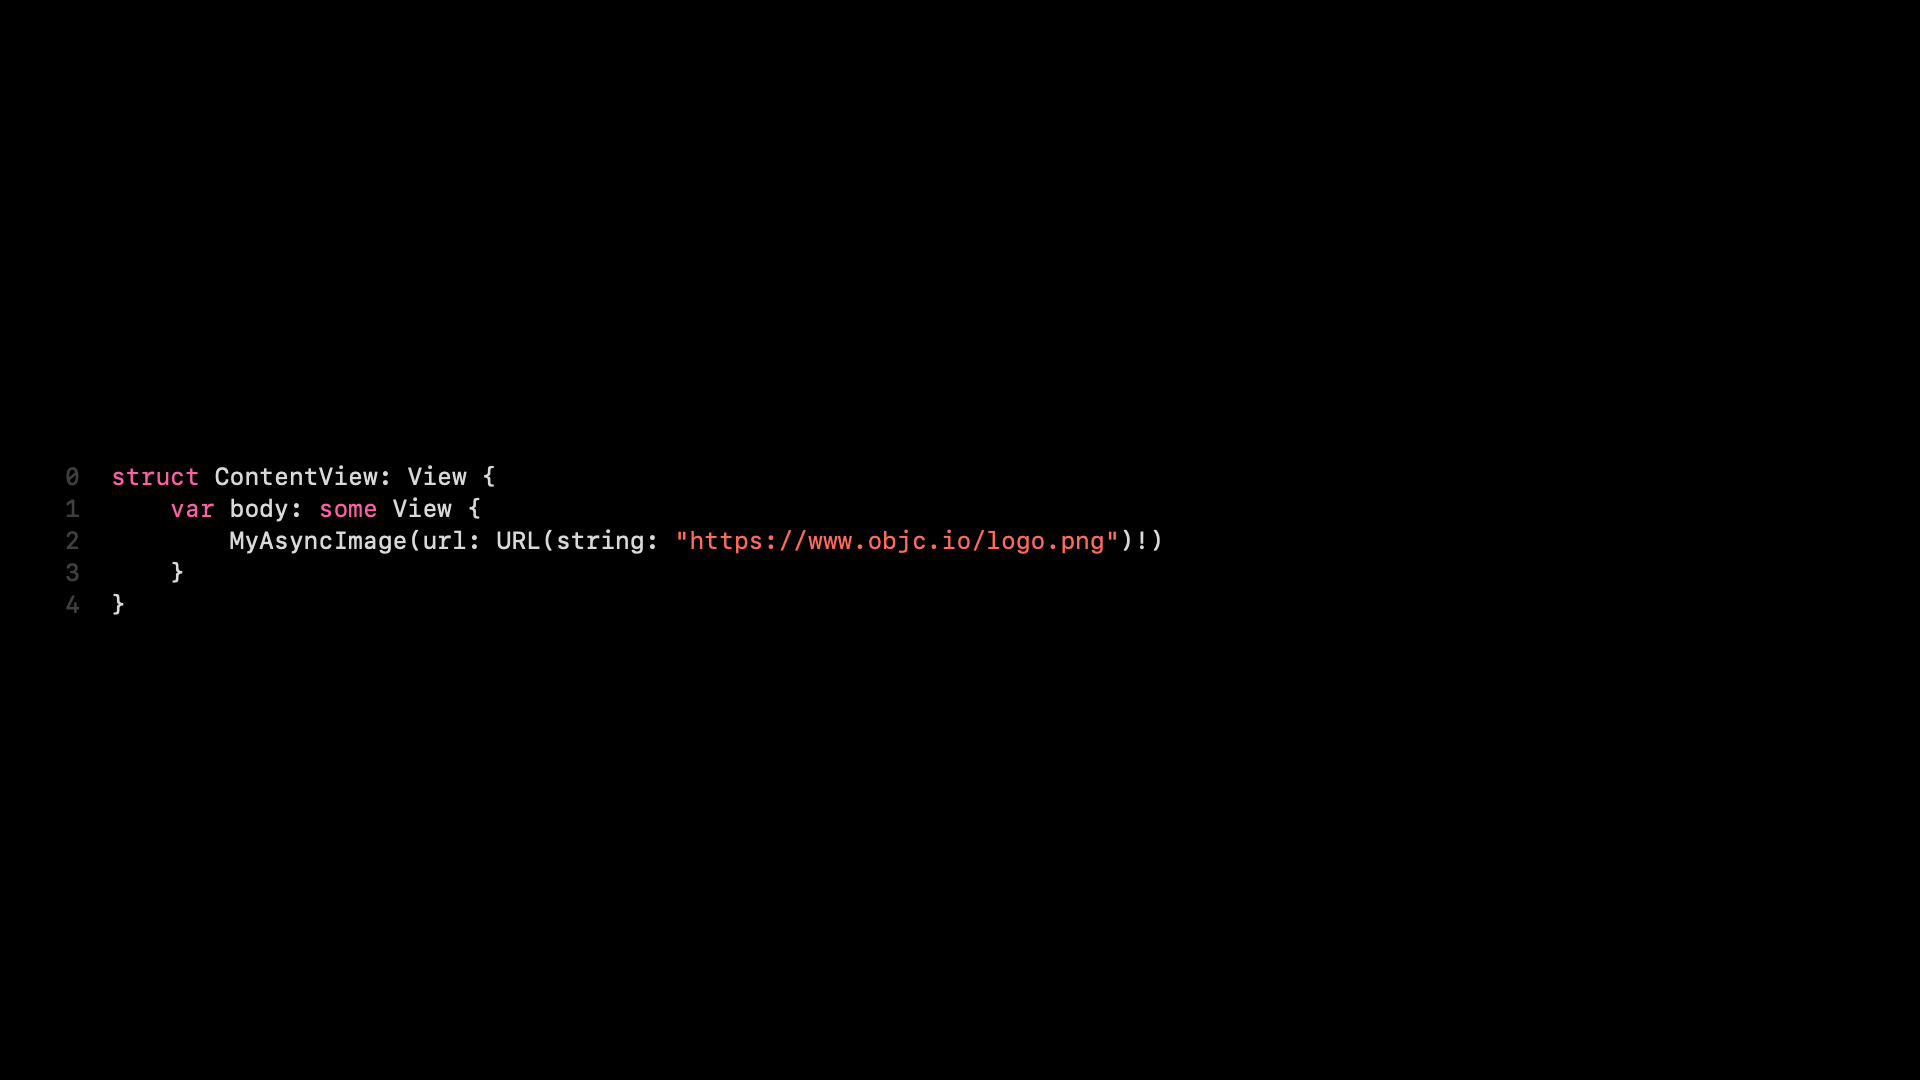
Let’s imagine we have this kind of content view that we wrote. And actually, we’re going to be writing this MyAsyncImage ourselves today. Now, what happens when we render a view like this?
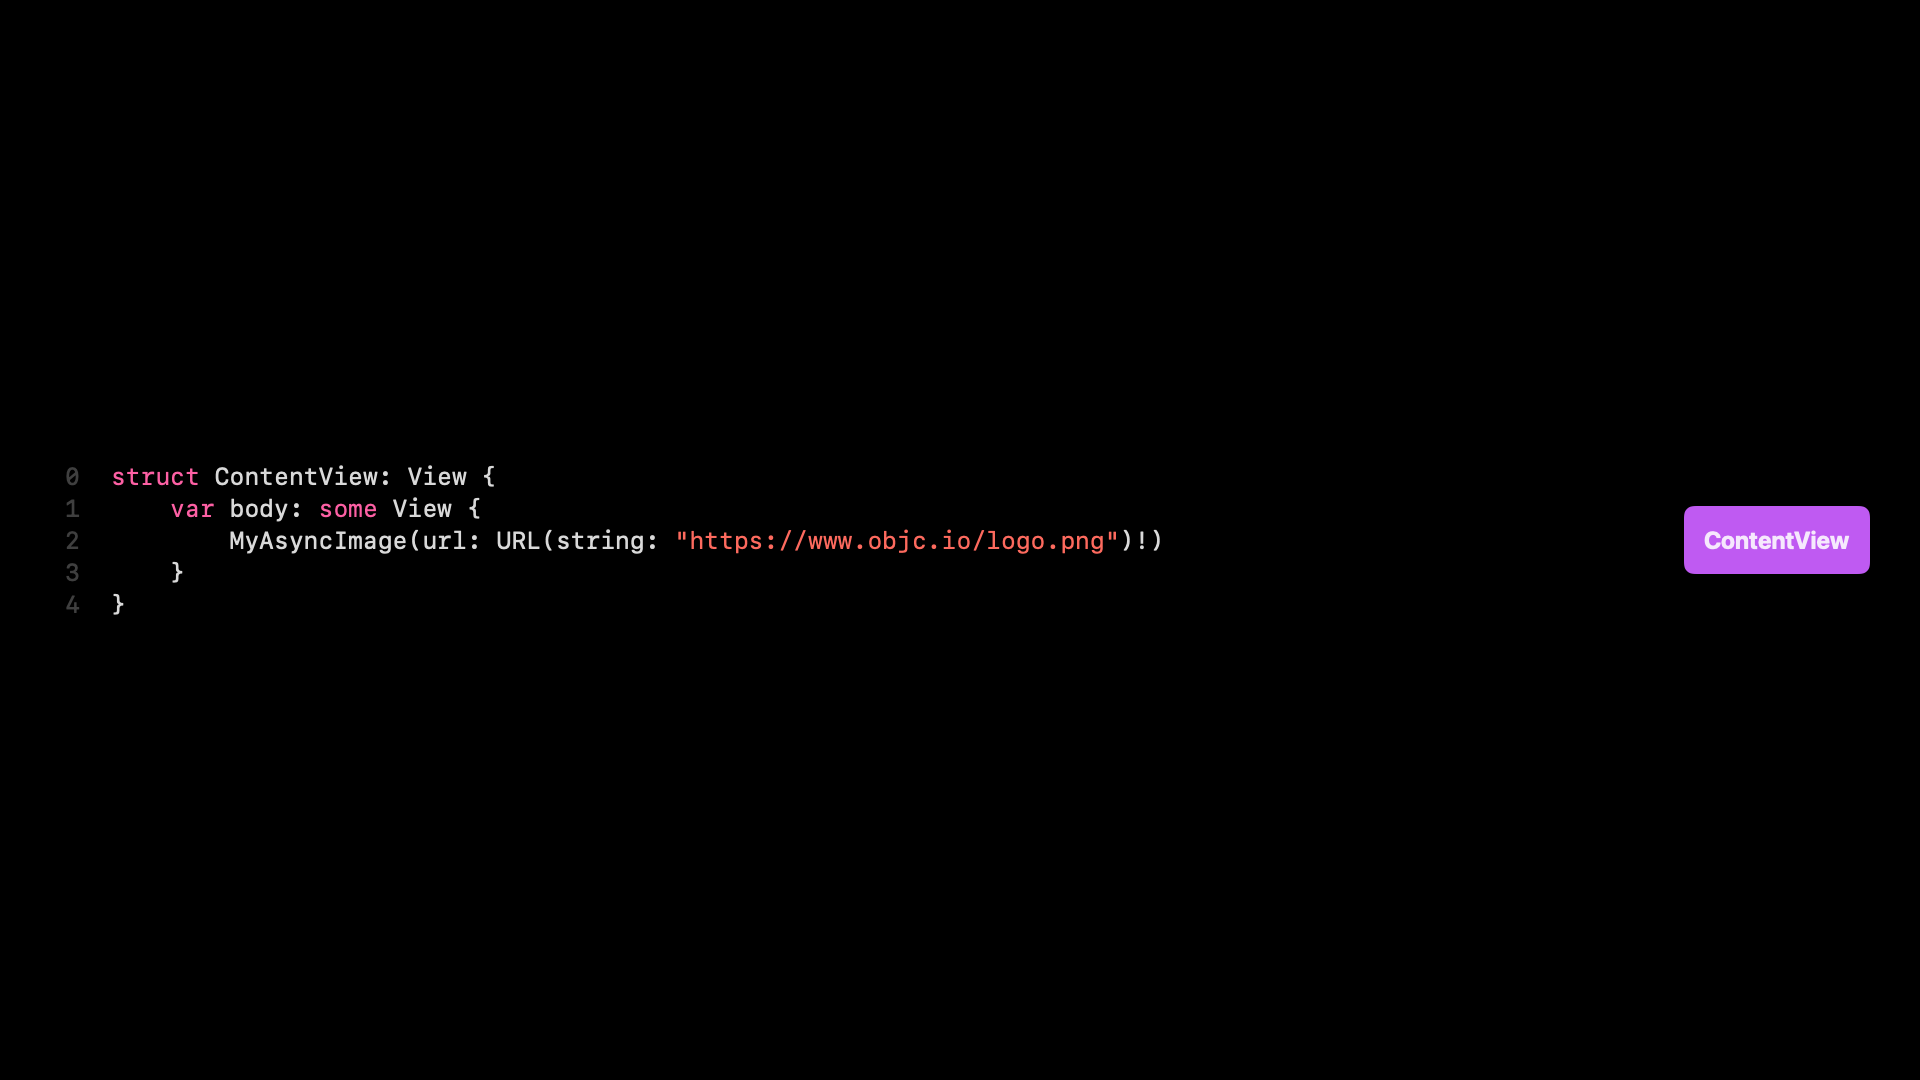
The first thing that happens is a render tree node is created. And the render tree is something that doesn’t exist. SwiftUI internally calls this the attribute graph. I call it the render tree because I think it feels a little bit simpler. And I think of it as a tree, even though it is a graph. Now, the attribute graph is something we never deal with directly. This is hidden from us. There is no way to deal with this, at least not currently, and I don’t think there will be ever. But it is essential to understanding how SwiftUI works and how to be effective with SwiftUI. OK, so this looks simple.
There is a node in a render tree, and we have this body that we need to expand in order to render a view, right? And SwiftUI does this.
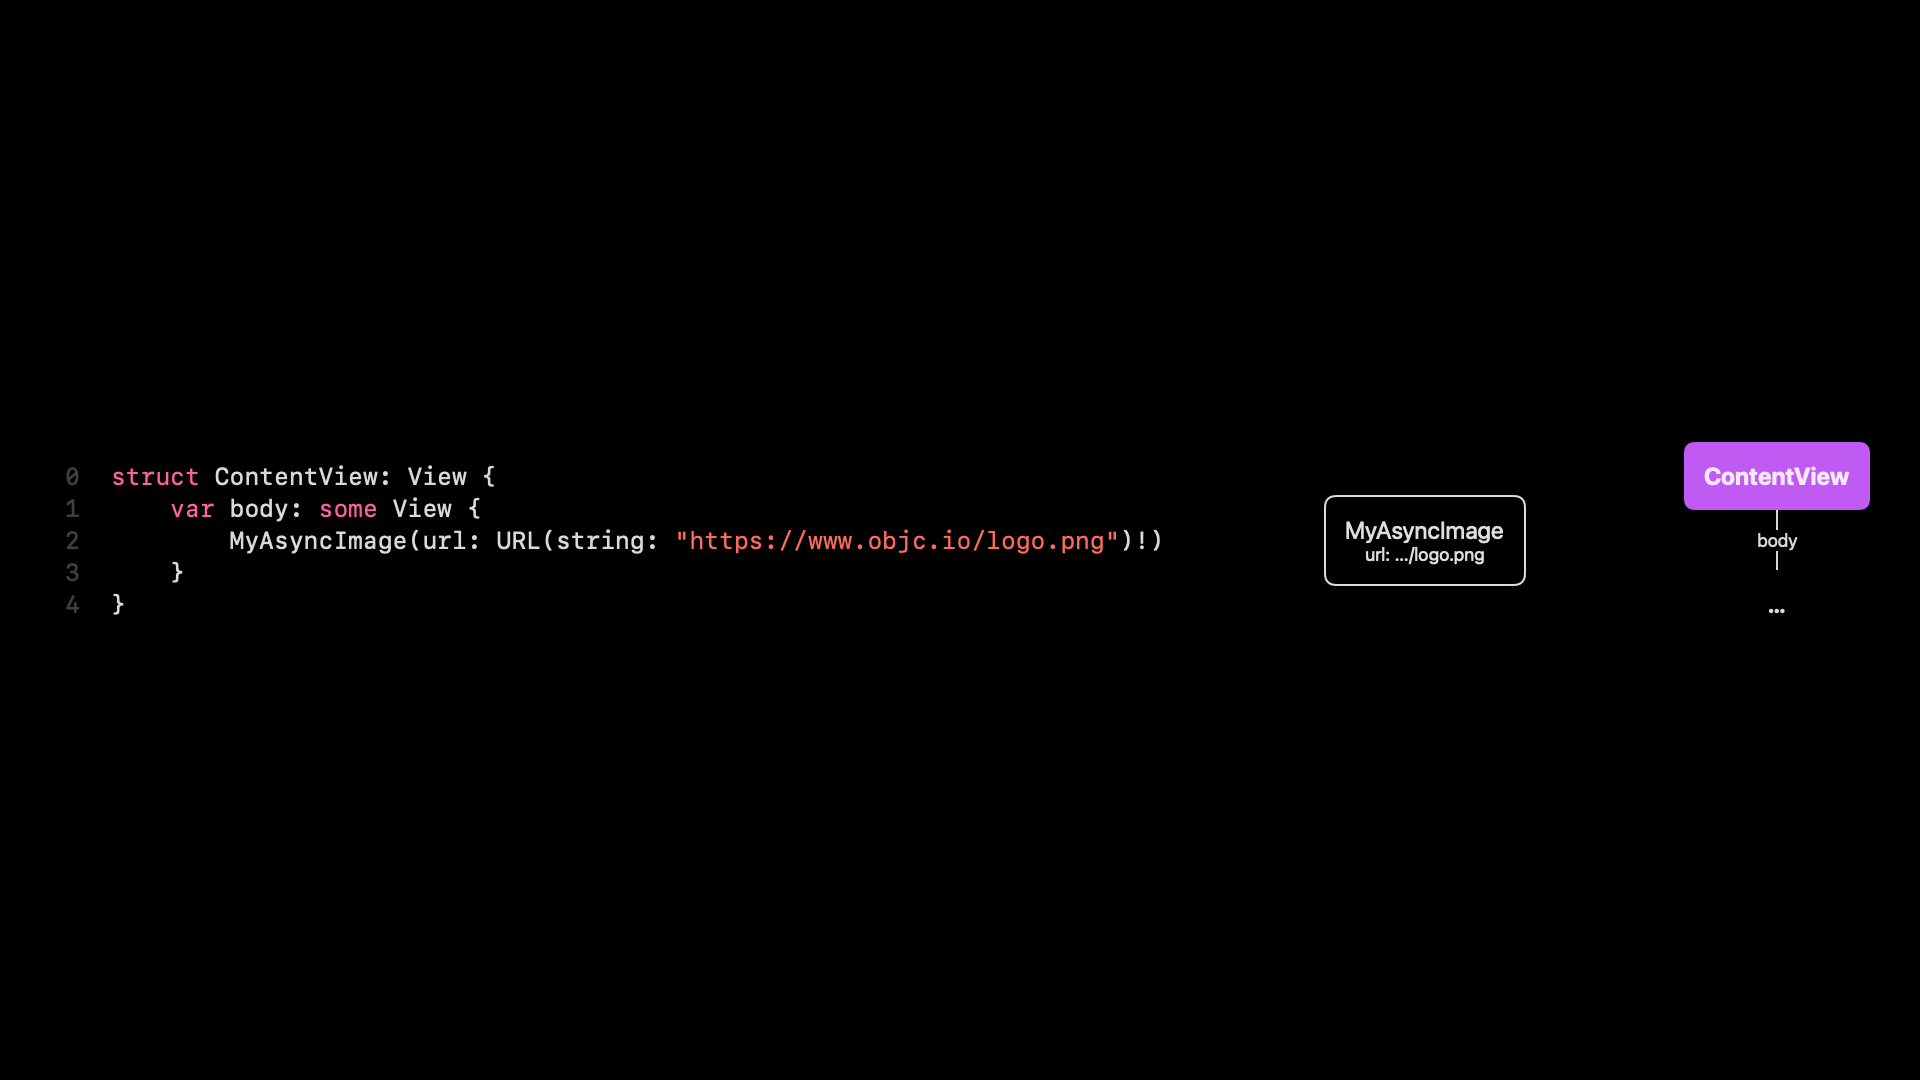
It runs the code in the body property, and it creates a view tree with a single node. And there’s the logo.png in that view tree. The view tree is something that we write. I displayed it here as a tree, but this is just a struct value or multiple struct values. View trees are ephemeral. They go away very quickly. They’re used to render a view, and then they go away. The render tree is different. This behaves feels more like an object. The render tree is persistent. It’s going to be around even when your body re-executes. It’ll be there. And so the view trees are ephemeral, and the render trees are persistent. That’s very important to keep in mind.
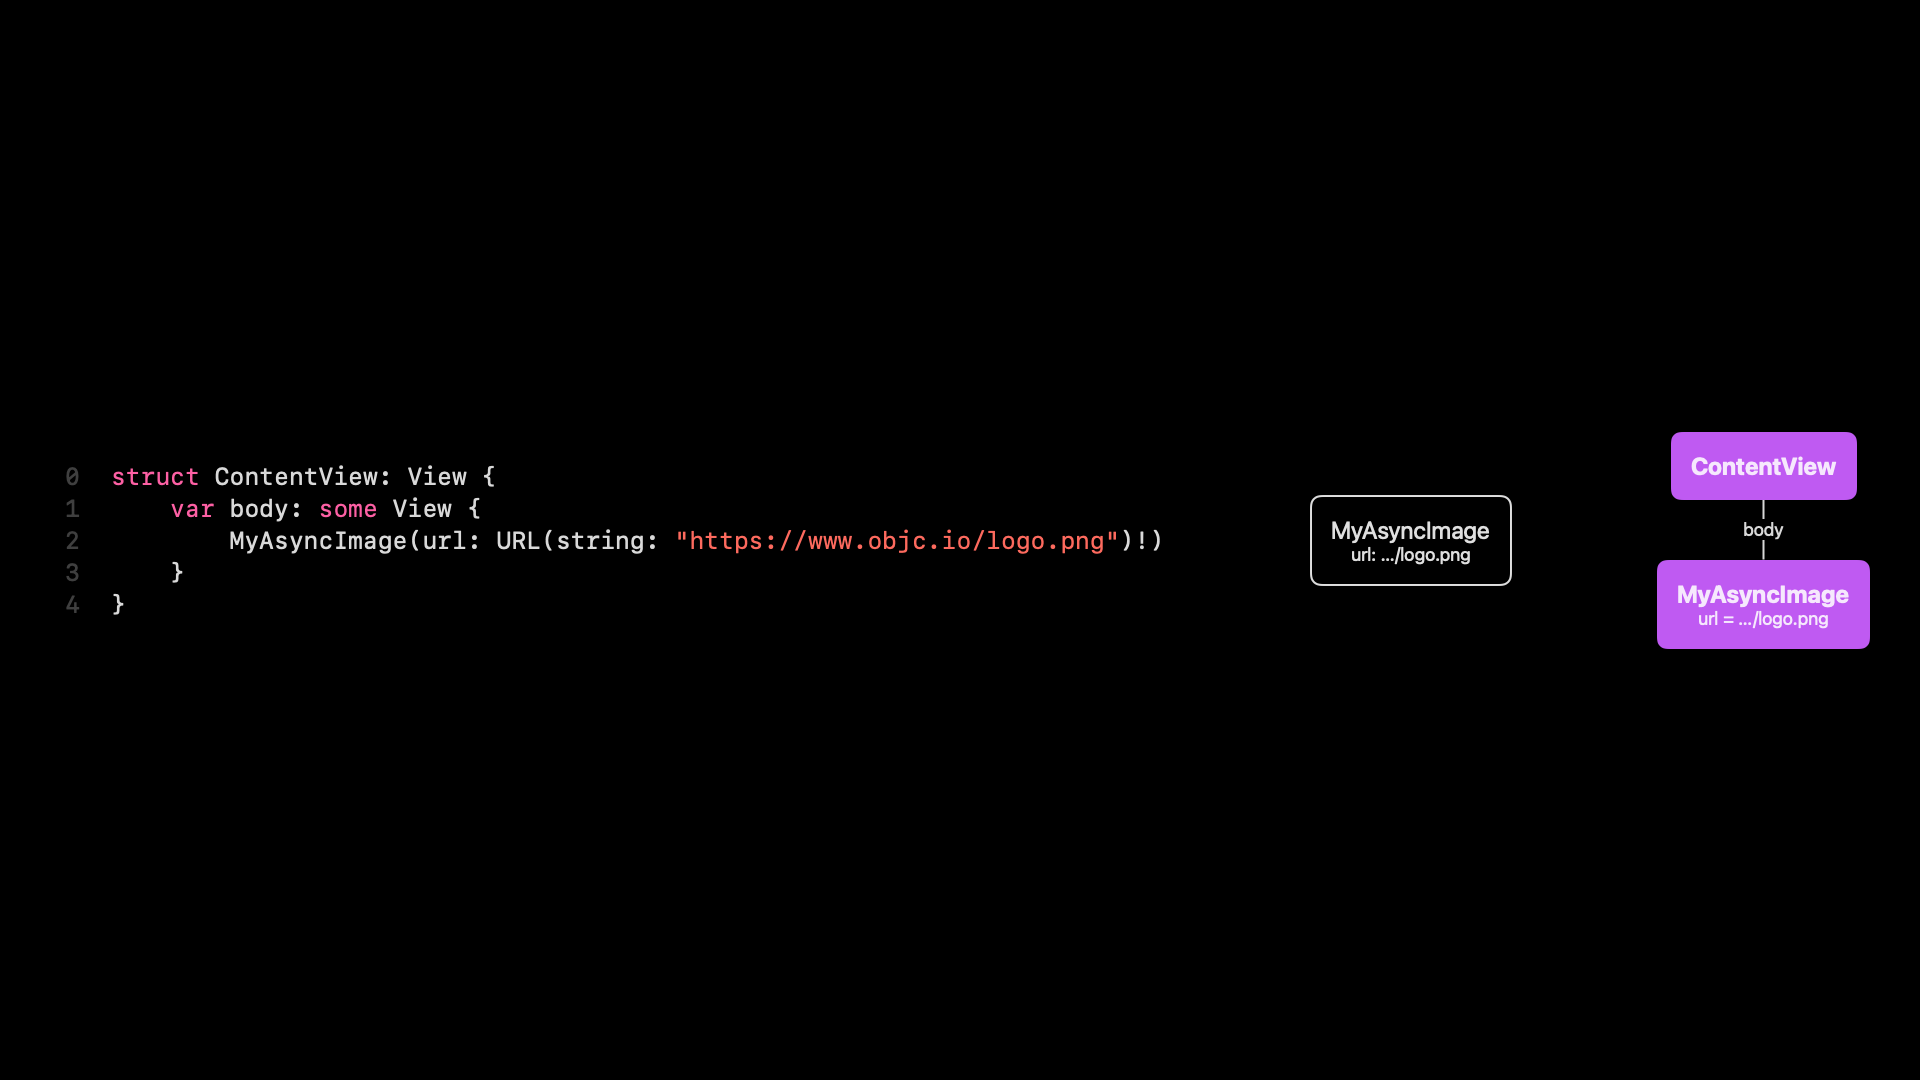
Now, what happens is once we have this view tree node, the corresponding node in the render tree gets created. This is a one-to-one translation. That’s pretty simple, so far.

Now, the next thing that we need to do is expand the body of MyAsyncImage. The content view is done rendering. It can throw away and discard that entire view tree.

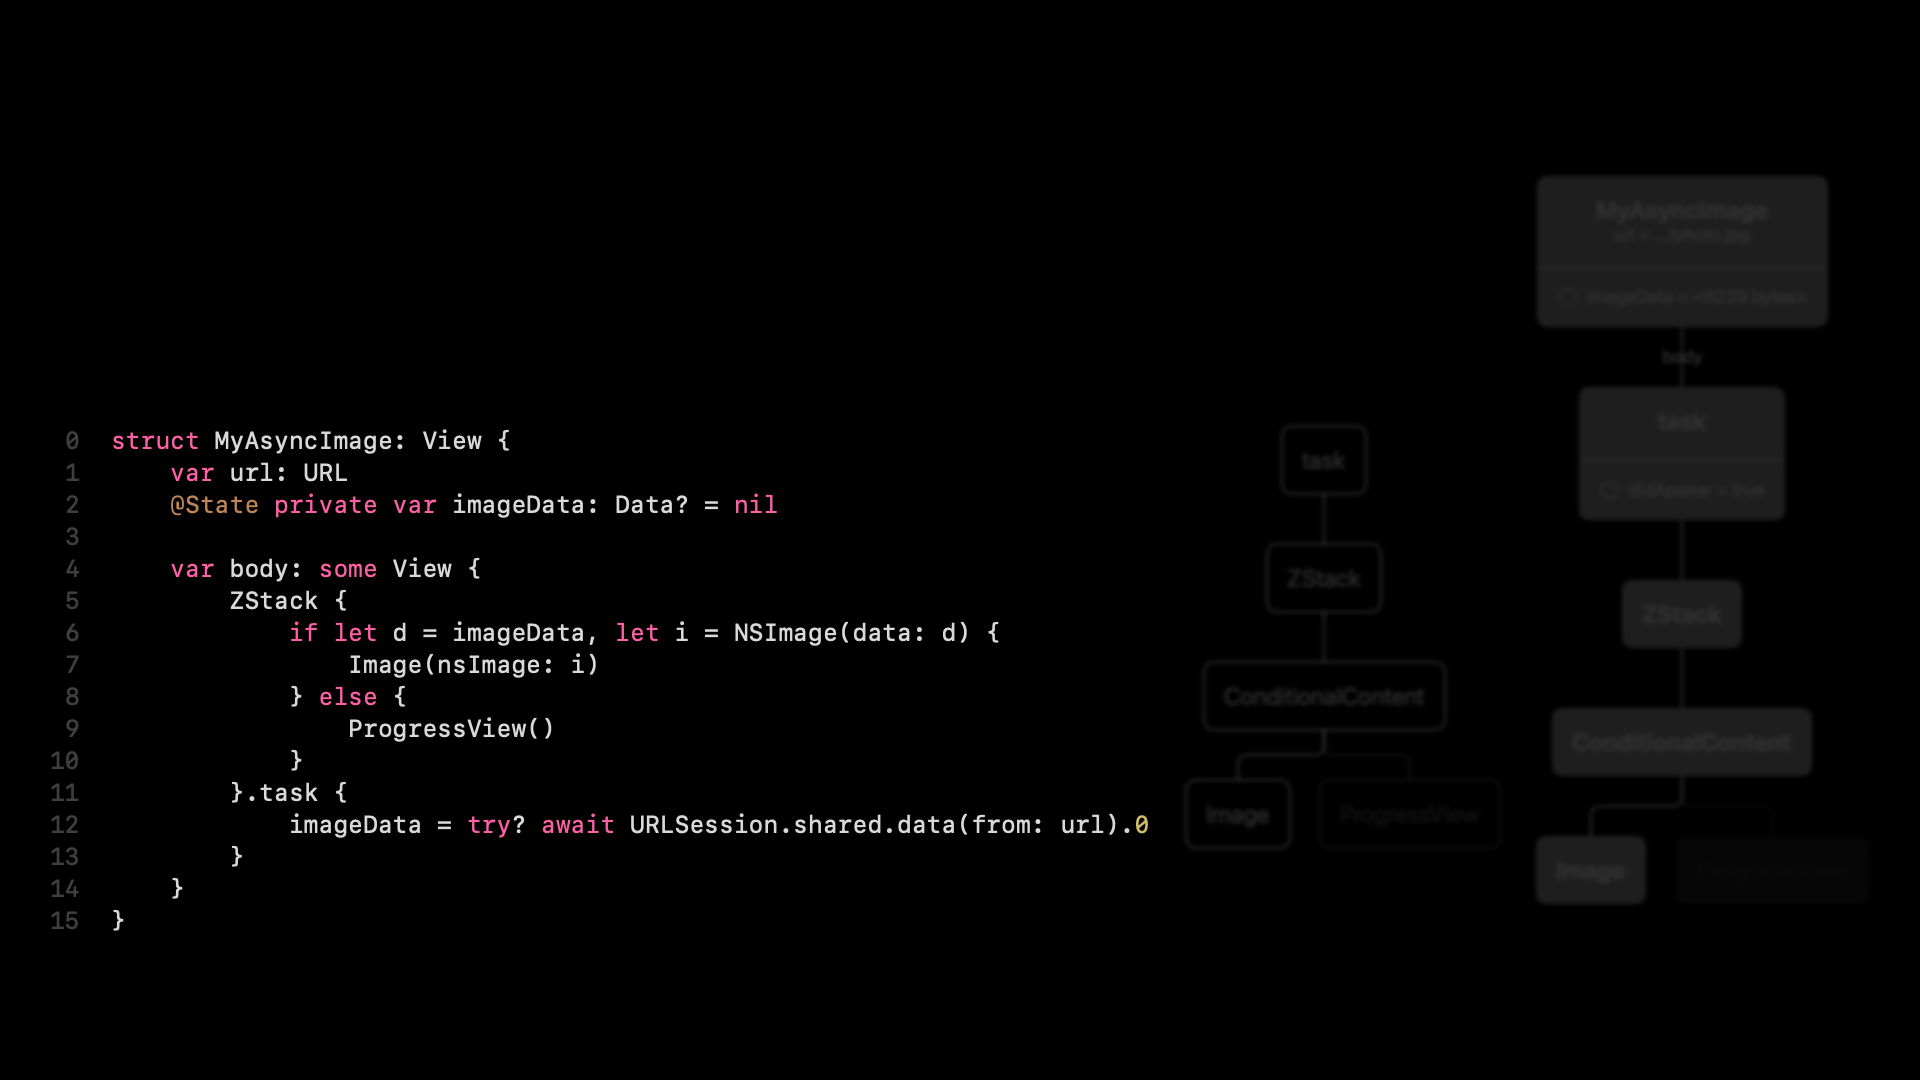
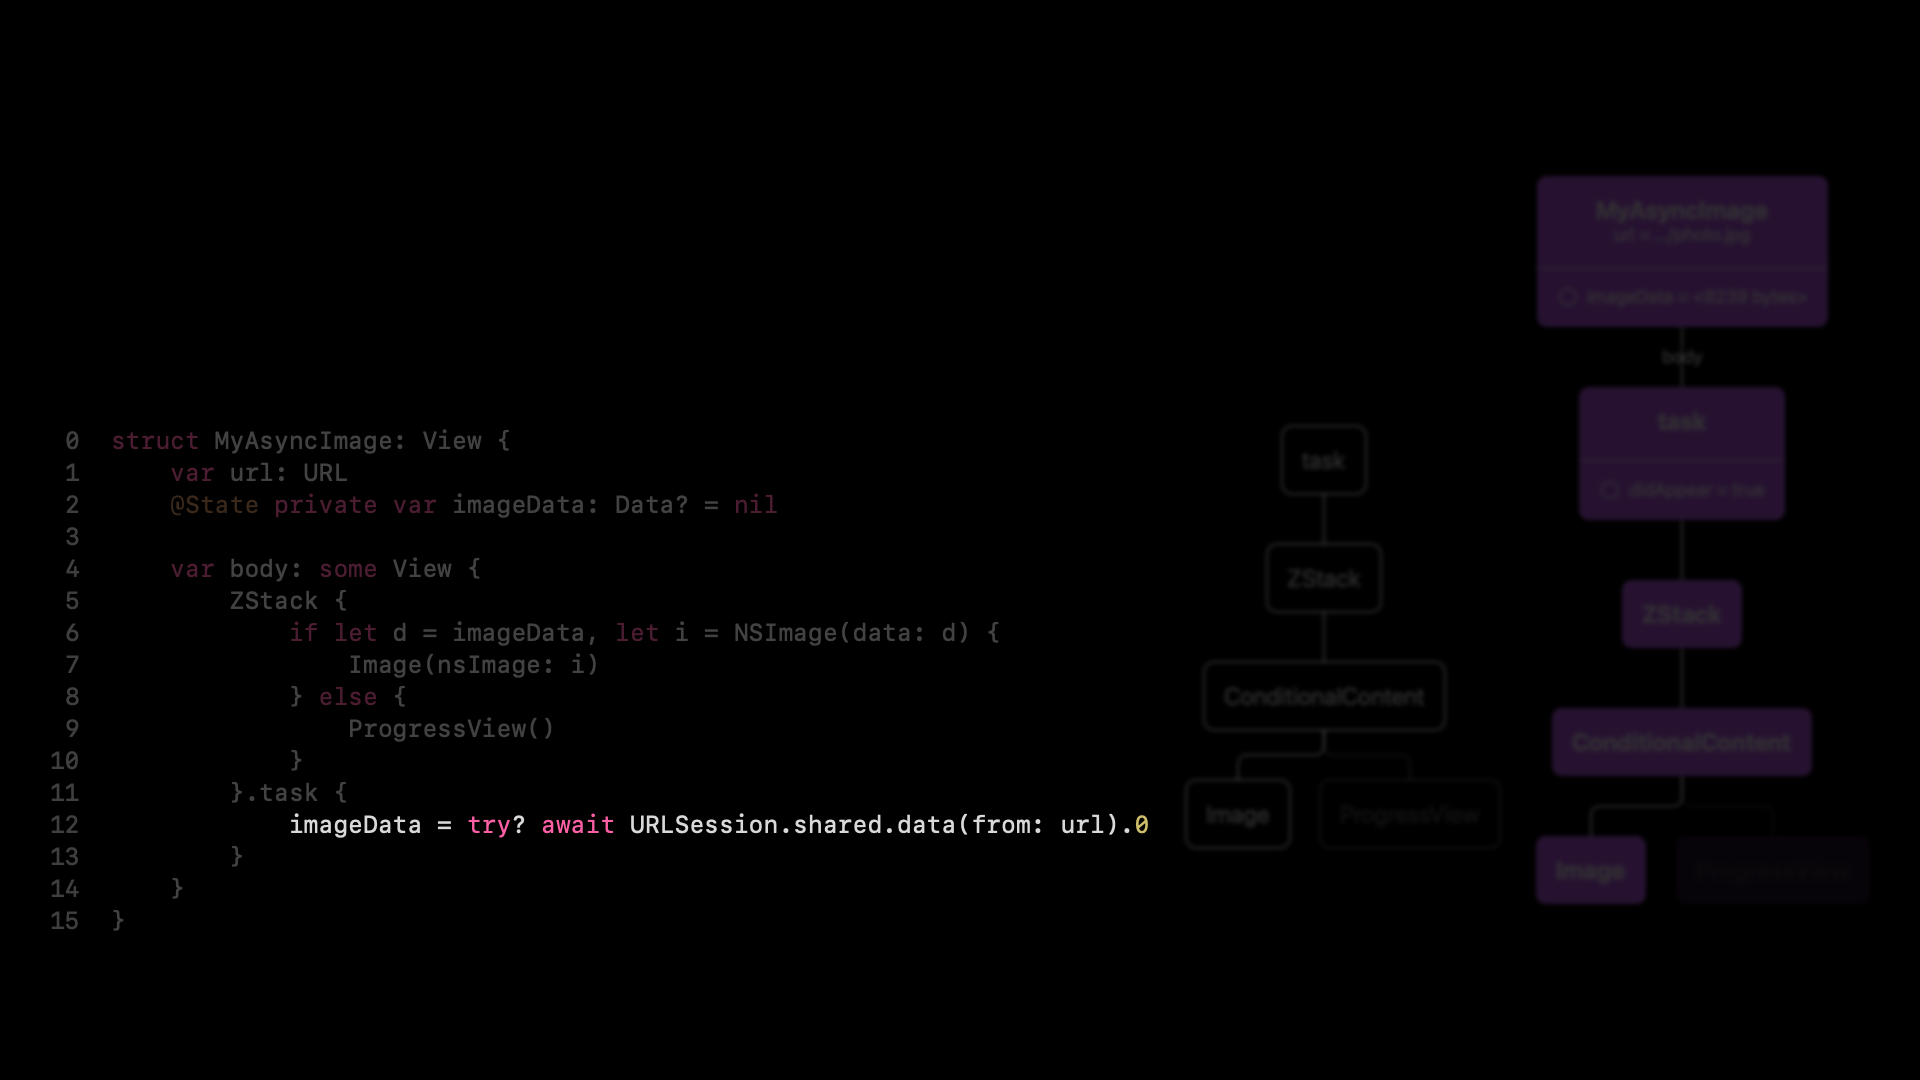
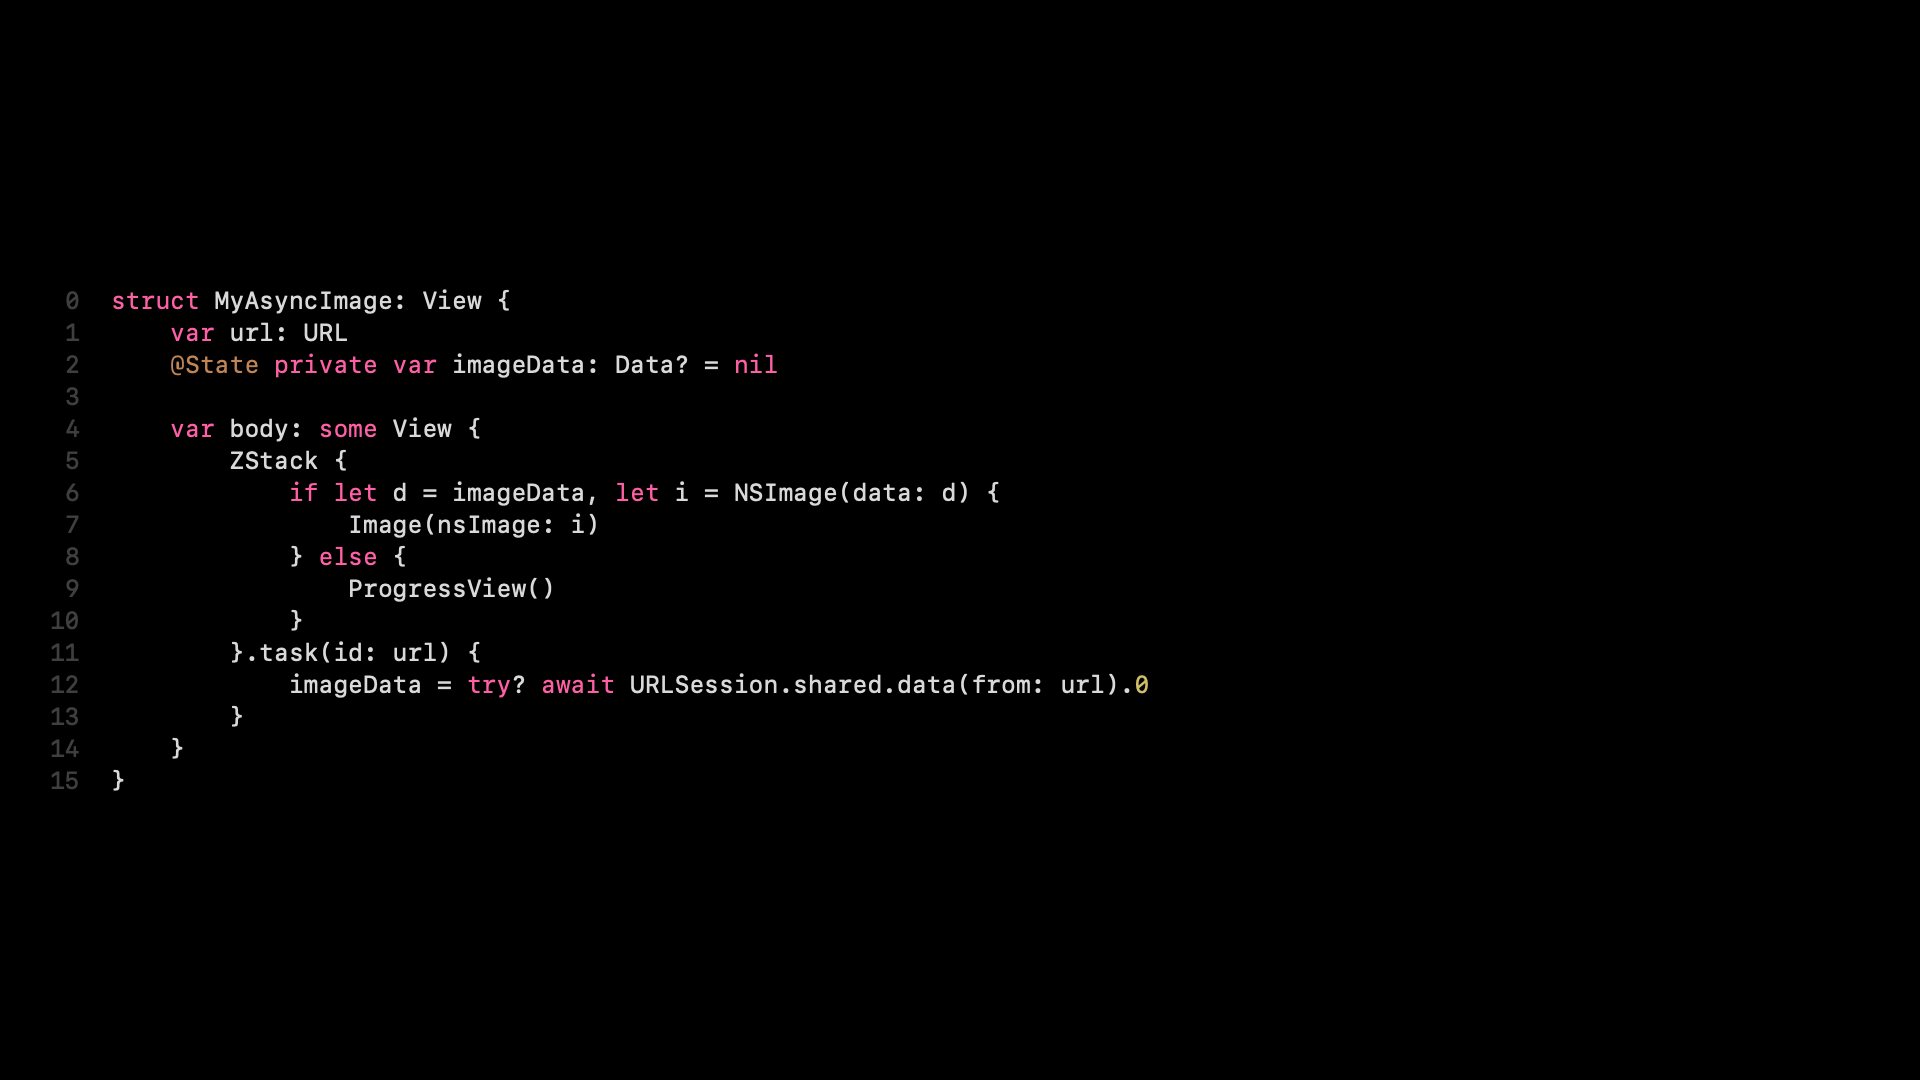
Let’s look at MyAsyncImage. This is the same step. We need to expand the body. In fact, we still need to write MyAsyncImage. So I have a very bare-bones prototype here with just a URL property and an empty body.

One of the first things we’ll do is add a state property. And we’ll add this to hold the data that we loaded from the network, or that we actually will load from the network.
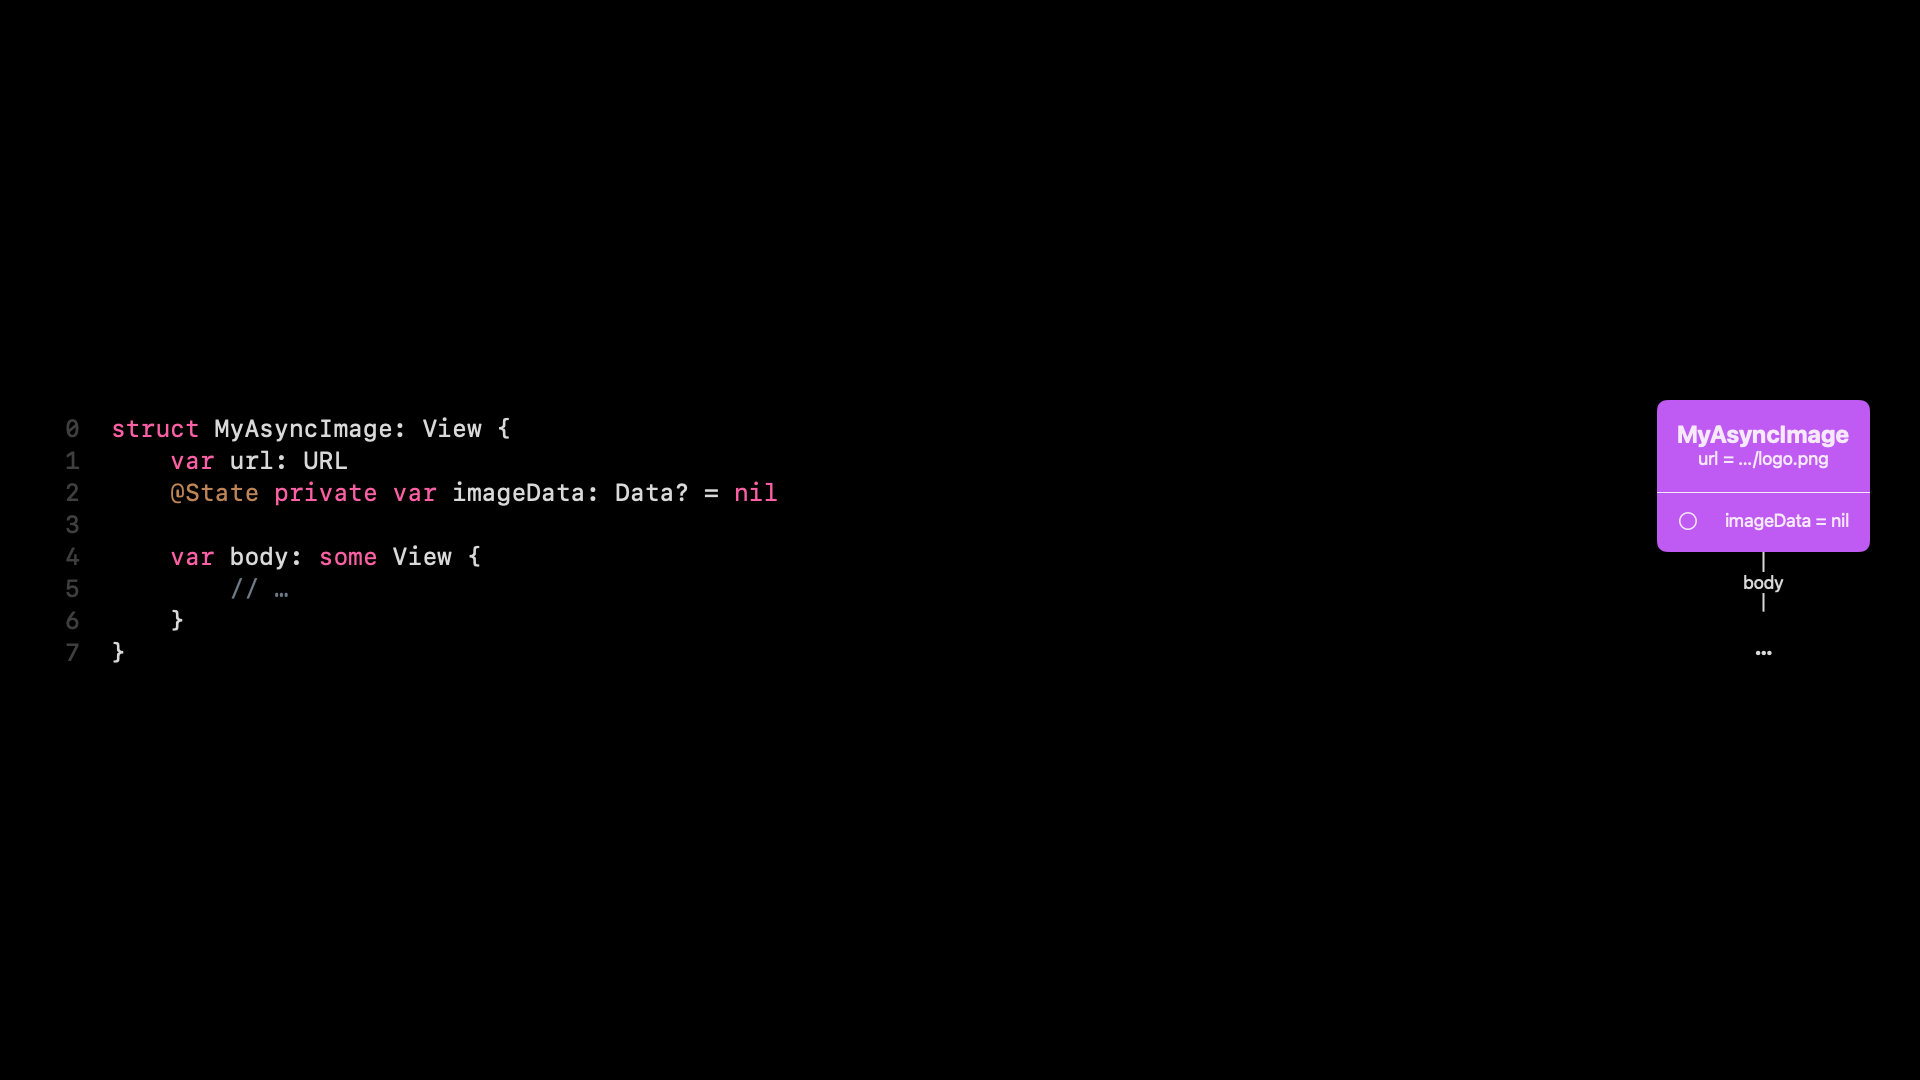
And here’s where the render tree comes into play. When you create a state property like this, what SwiftUI will do, it will allocate memory for that in the render tree. And it needs to, right? Because we want the state property to stay around after we loaded the data. So this needs to be persistent. And this is where SwiftUI stores that in the render tree node. And this is, I think, important to build up that mental model. What we can also see is that the state property is initially nil. On line 2, we see that we assigned nil as the initial value. This is the value that’s used when the node in the render tree is created. You should only be accessing those state properties inside the body of your view. This is why I also made it private.
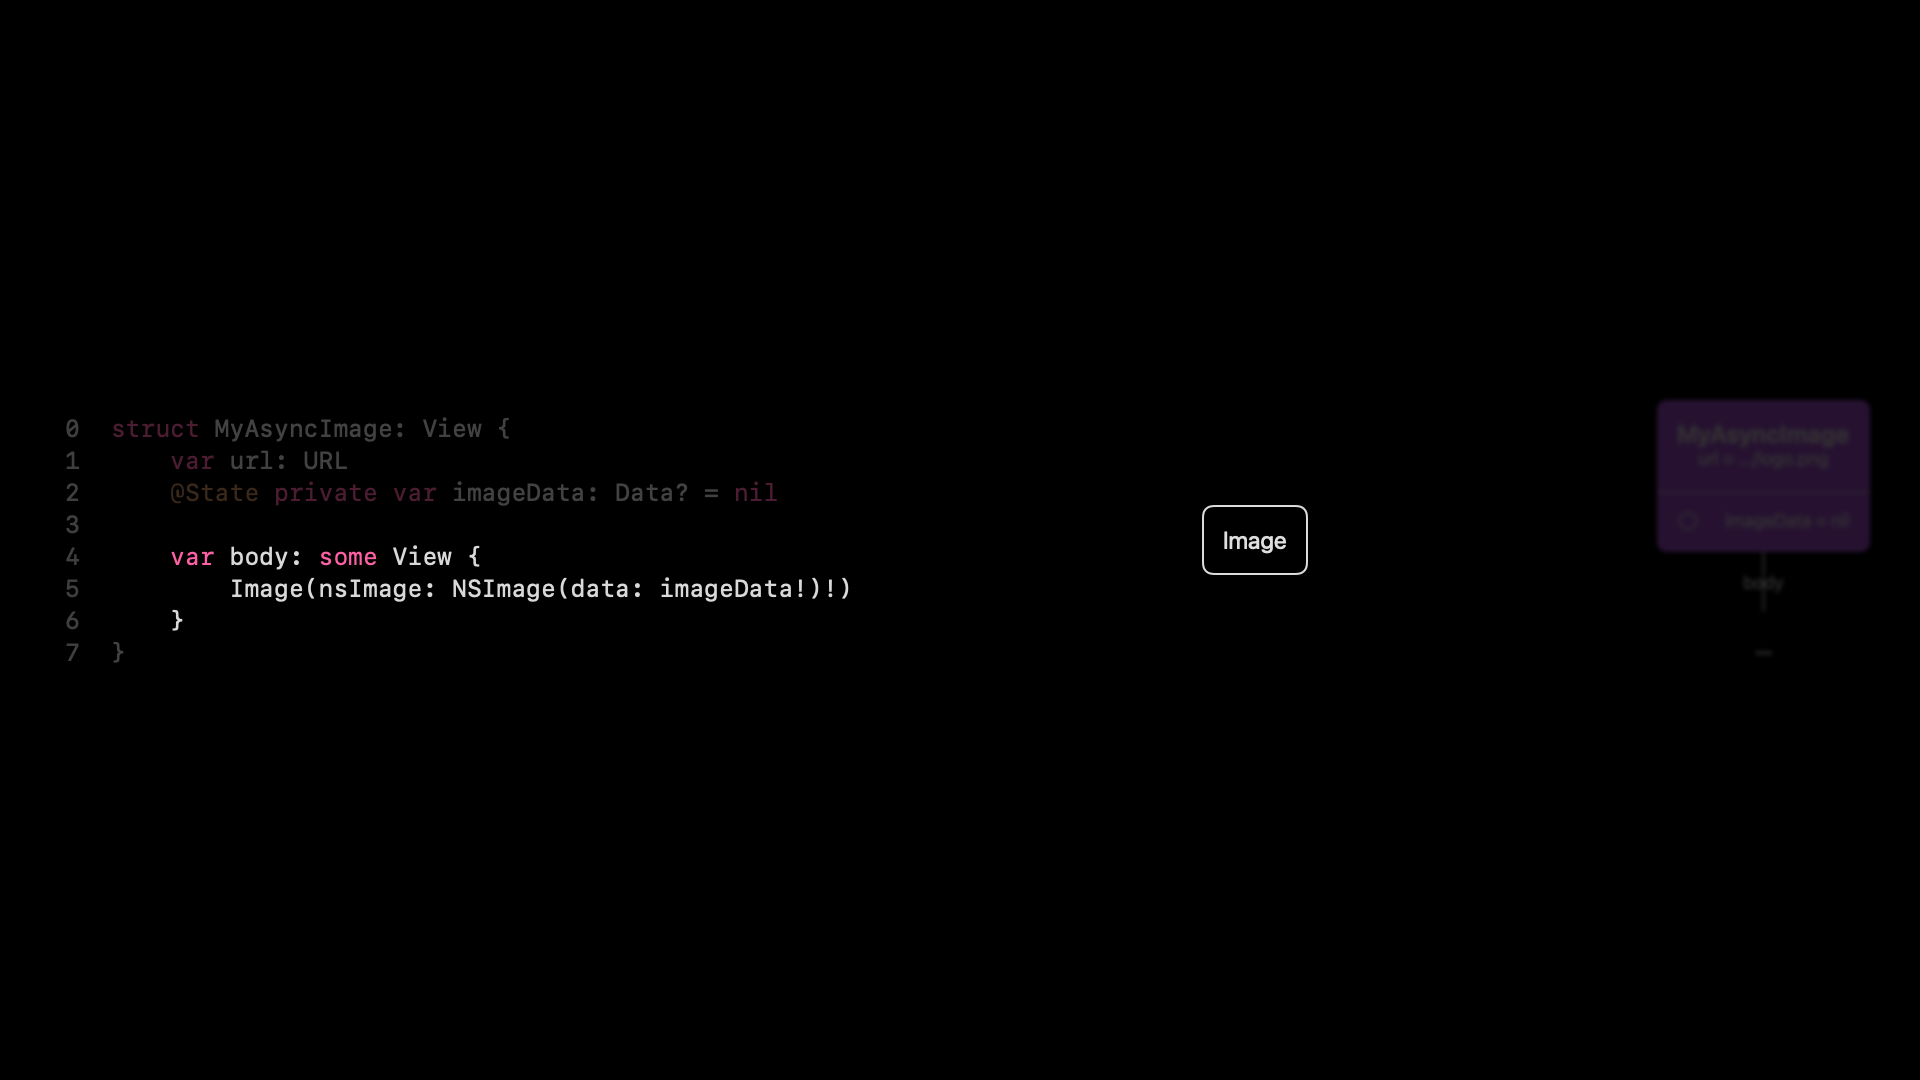
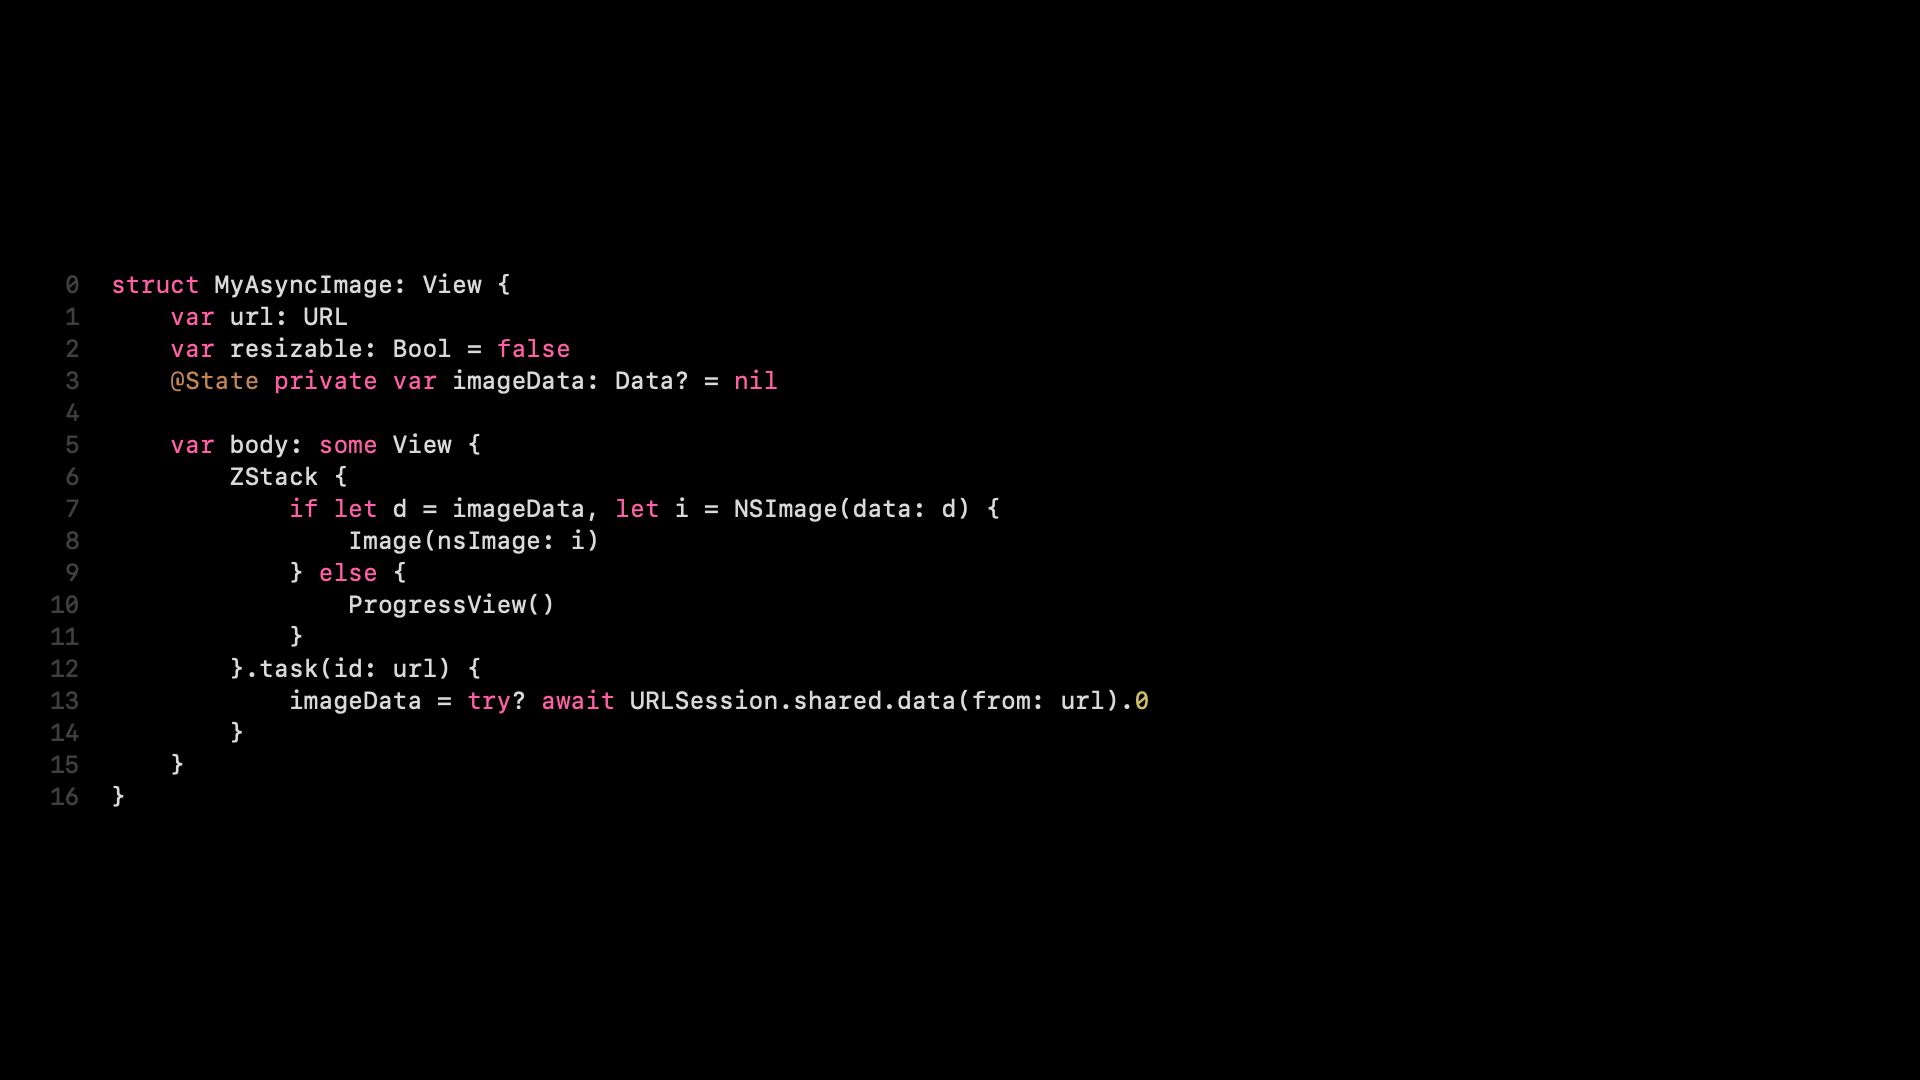
OK, let’s focus on the body of our view. We still need to write that. So a very first, very naive implementation would just be an image, right? Just force unwrap everything, and we’re done. This would be the view tree for that, just an image. Obviously, that’s wrong, so we need to do a little bit more.
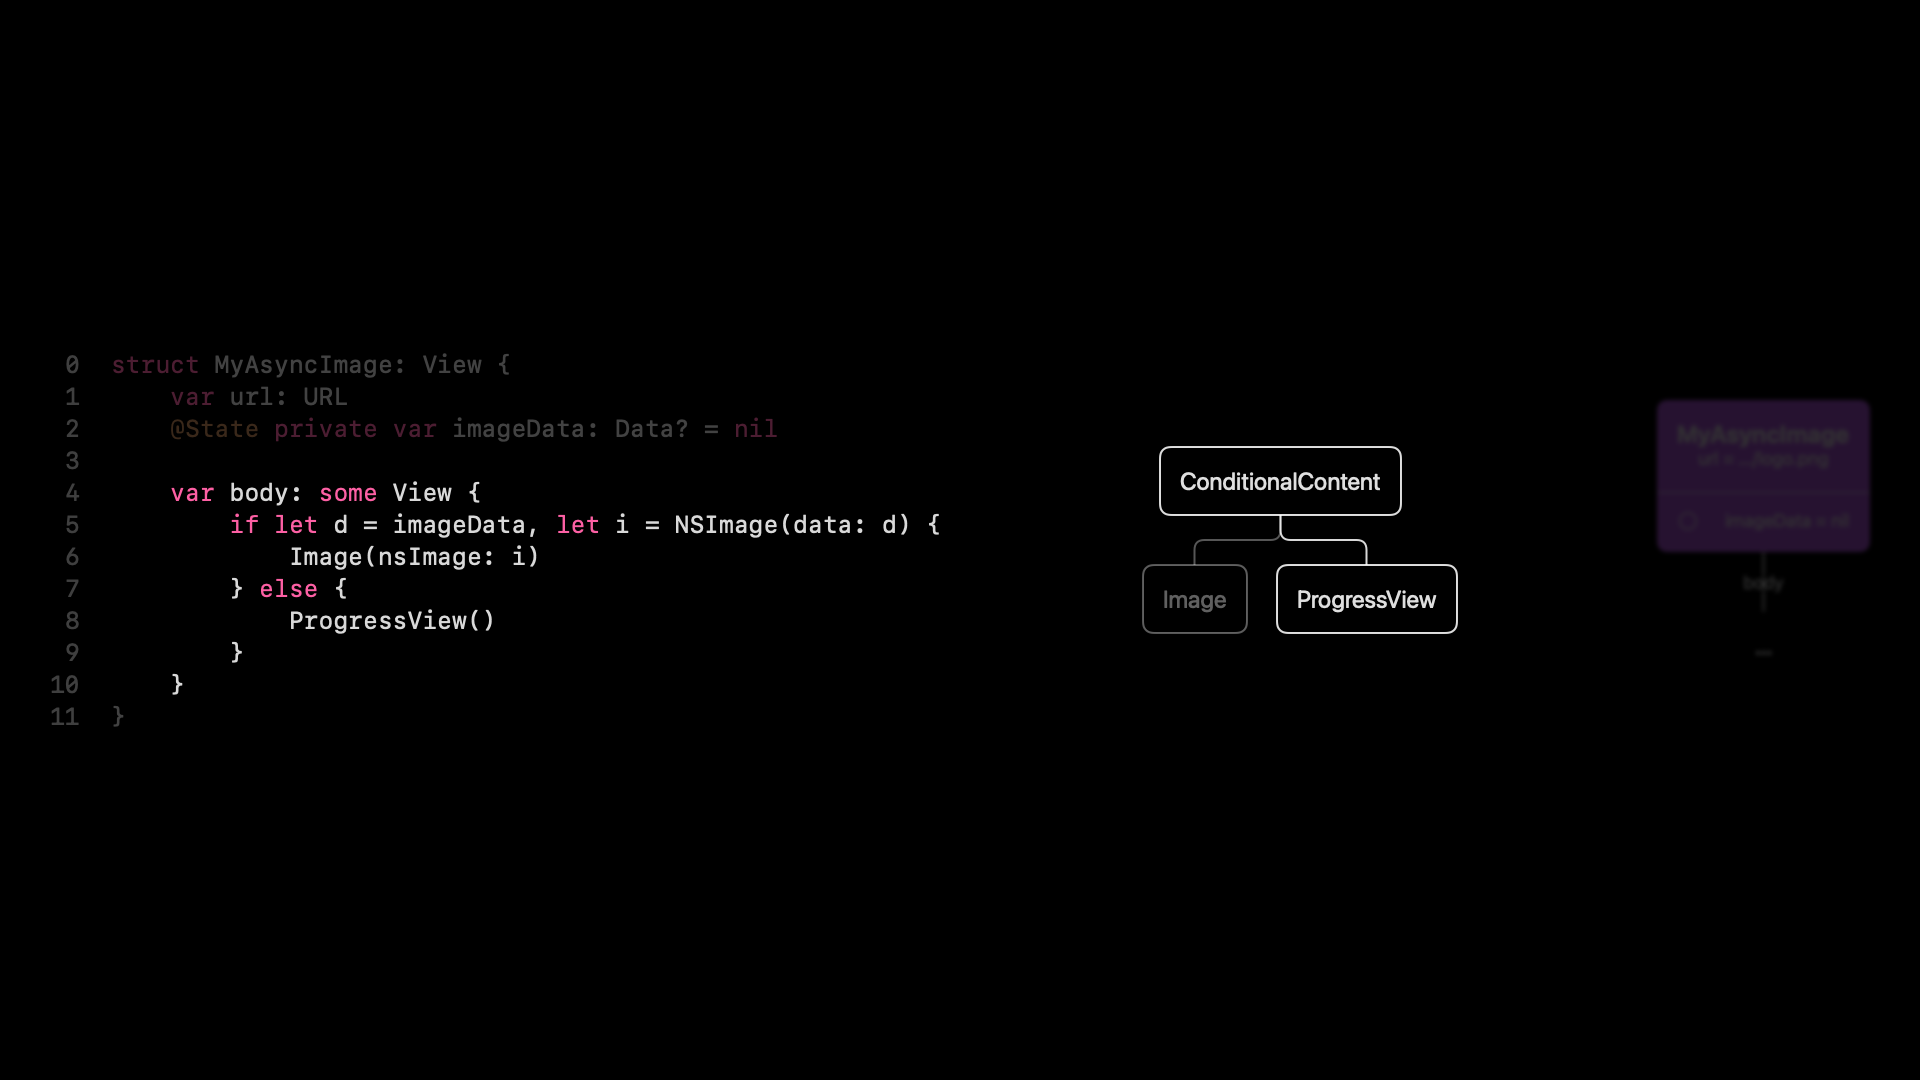
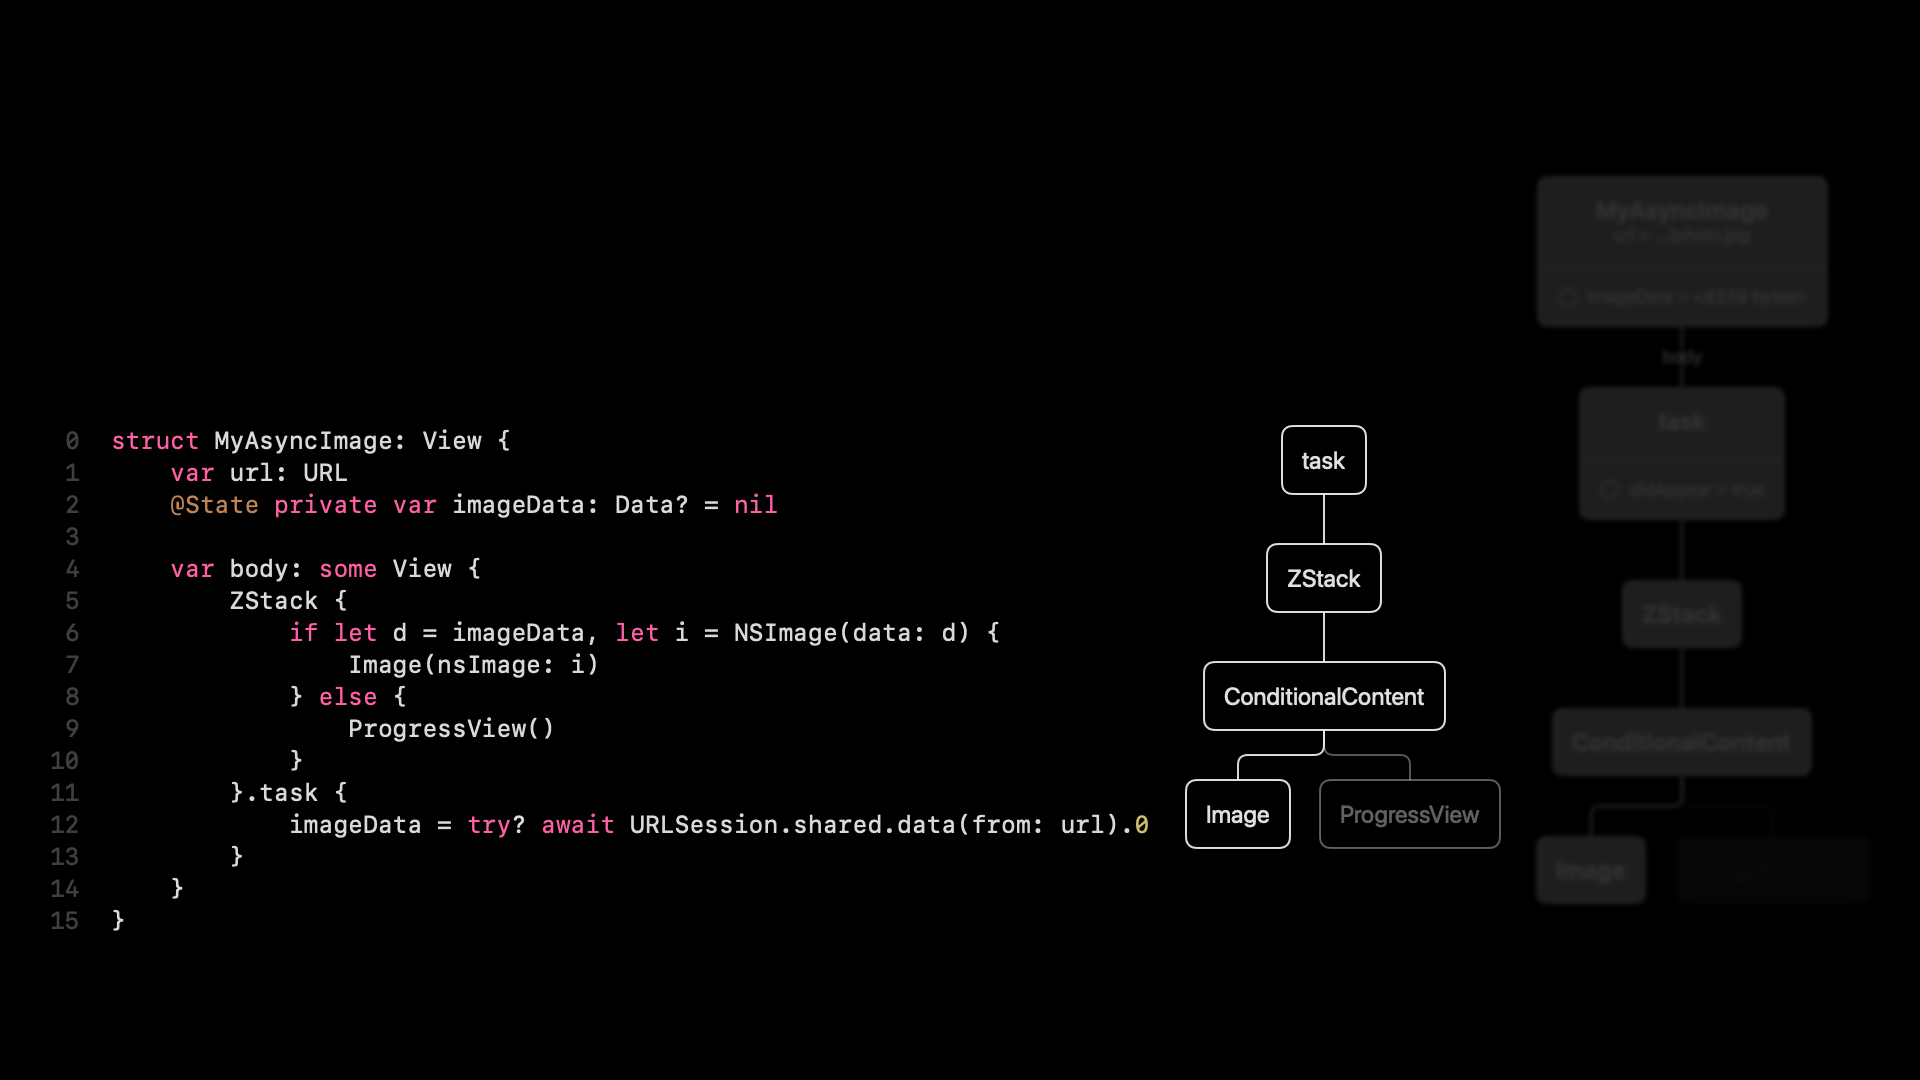
Now, we could add an if let around here. So we can load that image data, check if we can convert that into an image, and then display the image. Otherwise, we display a progress view. And this is where it starts to get interesting, I think.
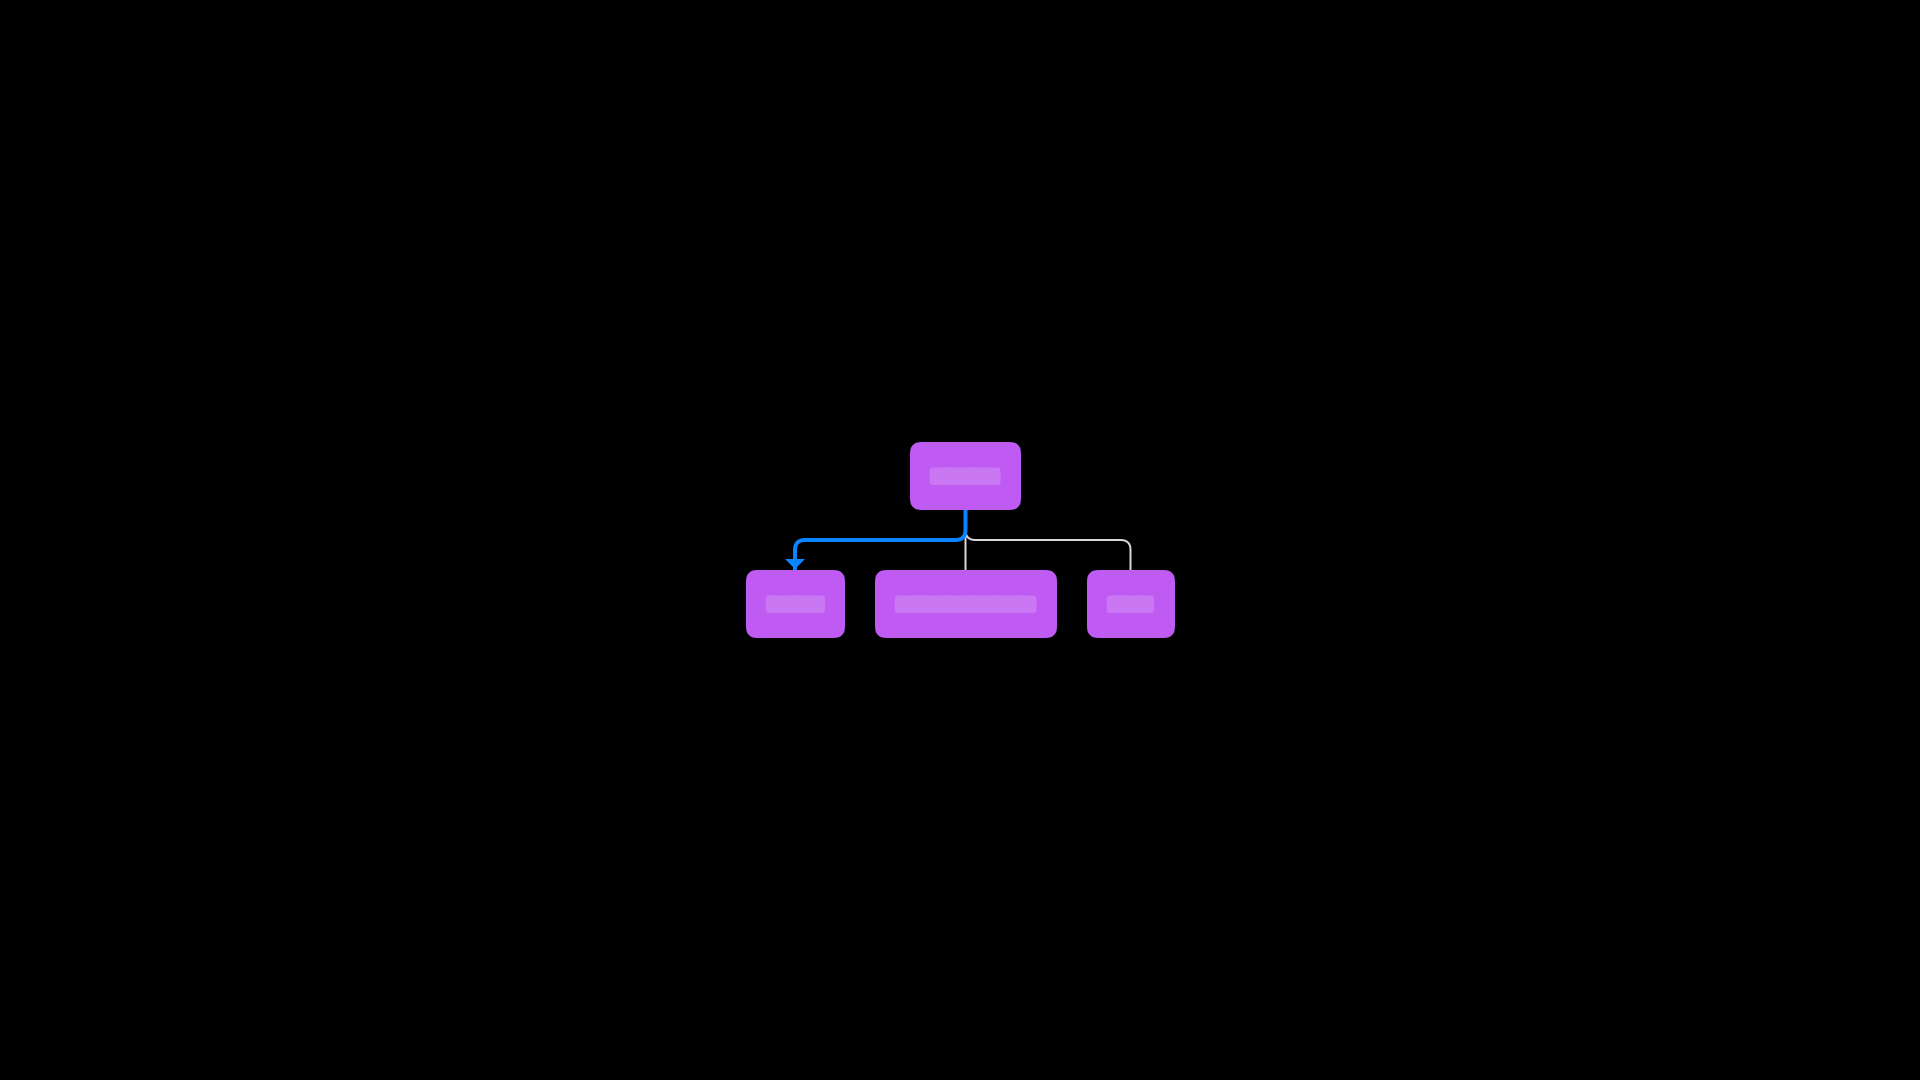
SwiftUI creates a conditional content as the root of our view tree. And it has an image and a progress view. And you can see the progress view is actually active. The image is not there. If you look at the type, if you would print the type of this body, you would see that it’s a conditional content with an image and a progress view. And so SwiftUI knows there will always be either an image or a progress view, never both, never neither. This is all statically encoded into the type system. And this makes SwiftUI so efficient.
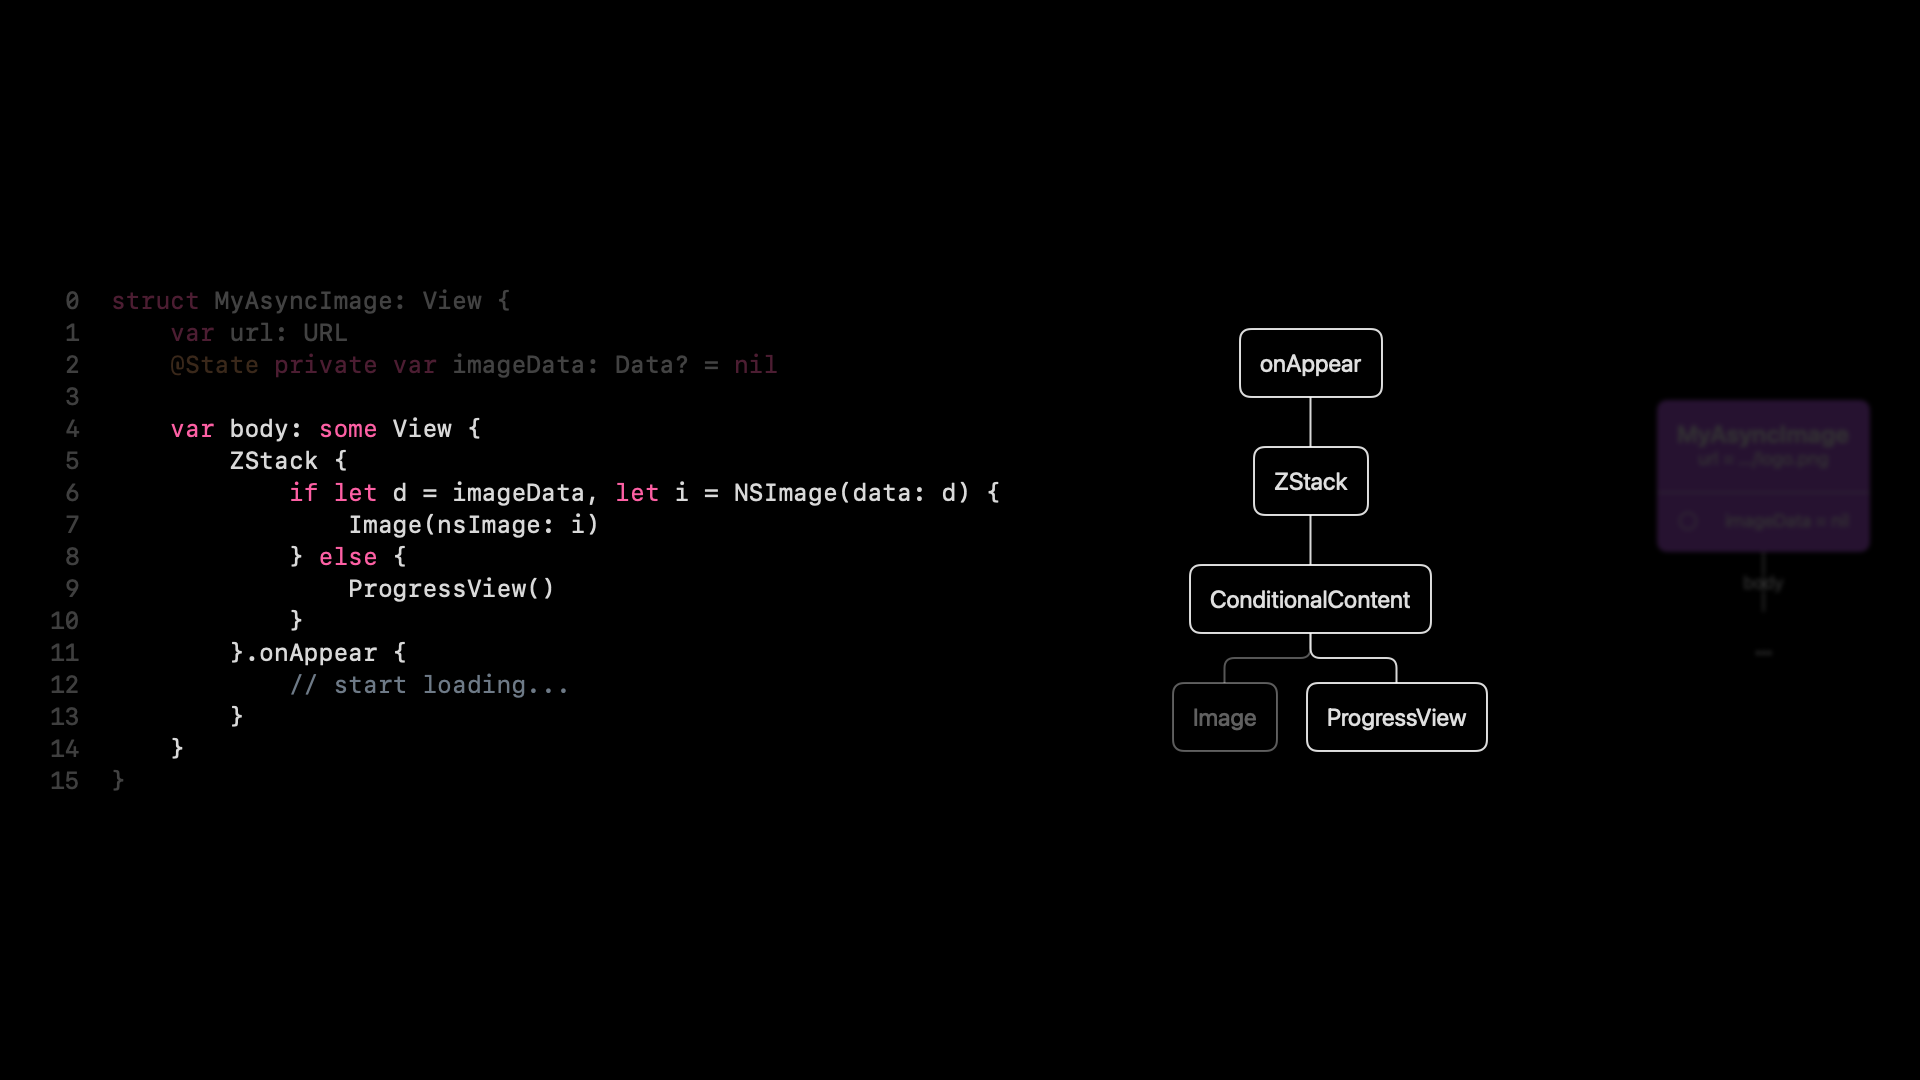
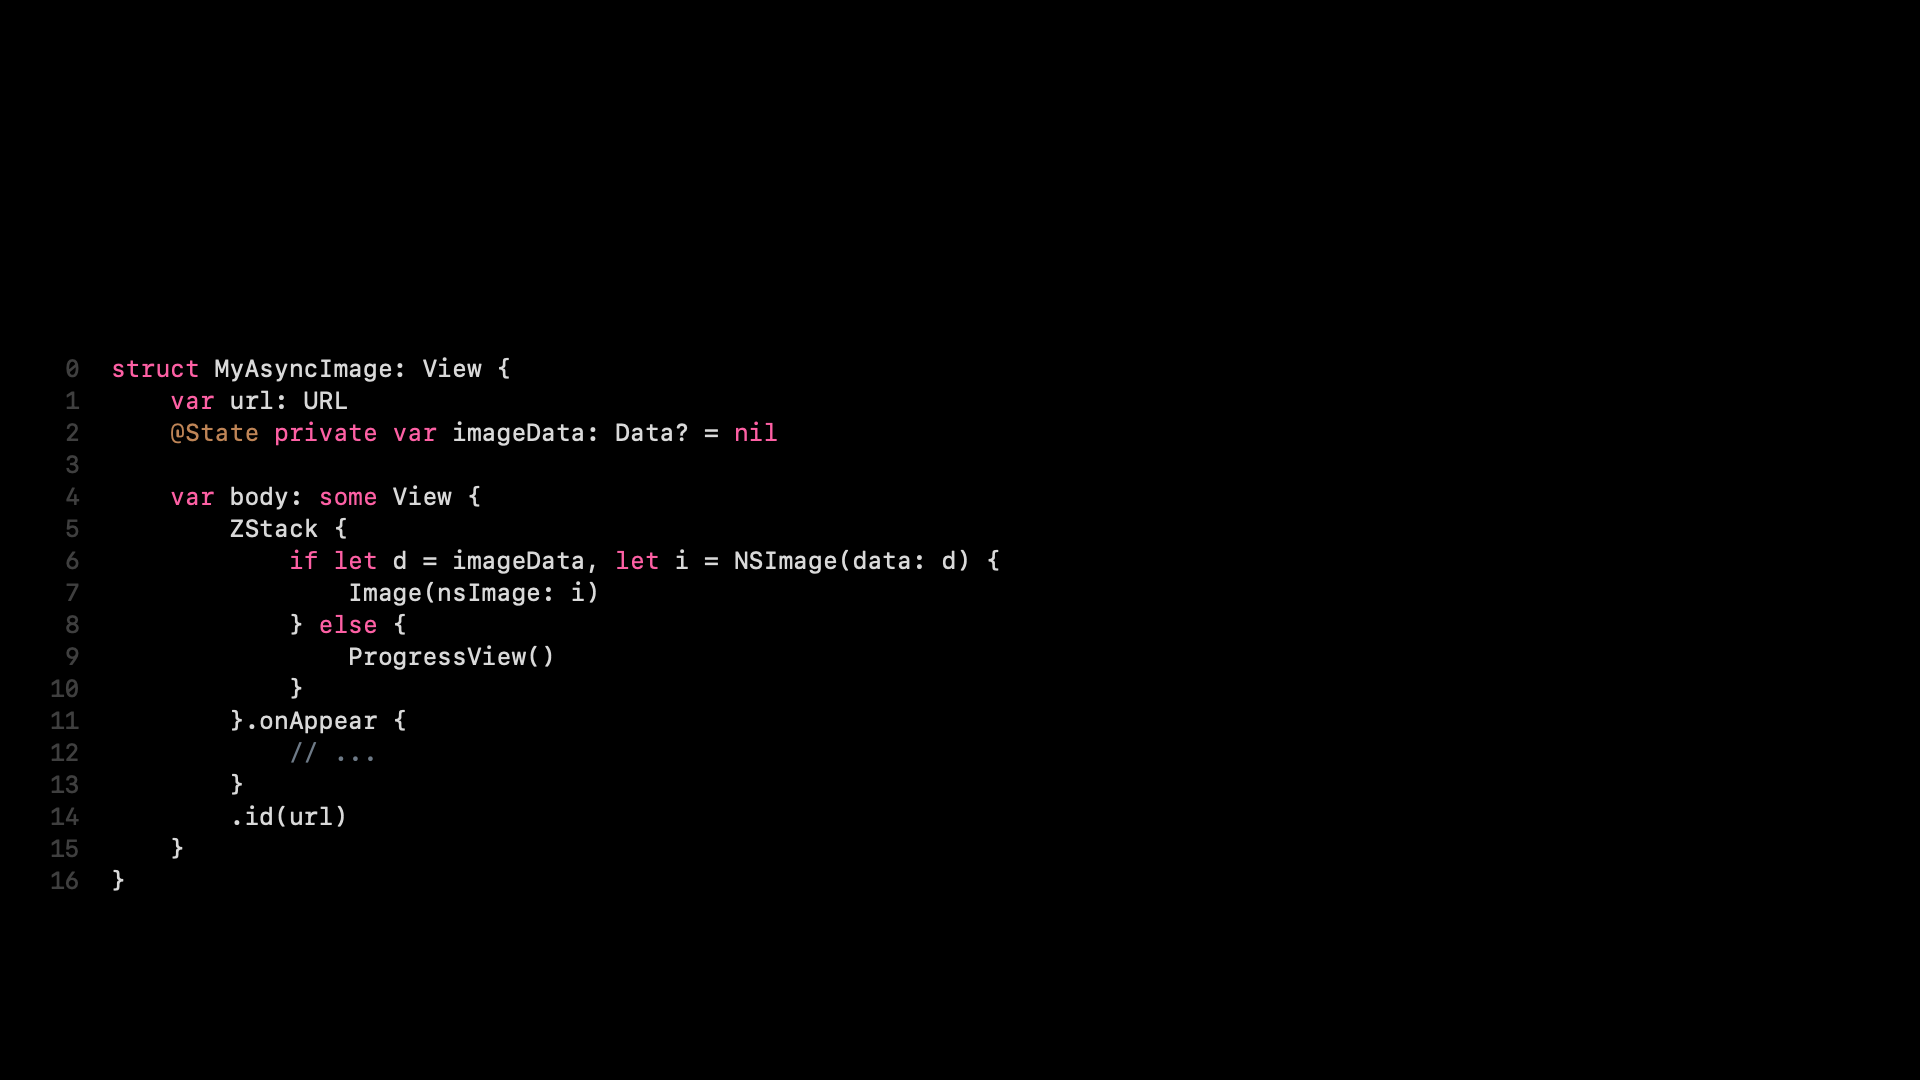
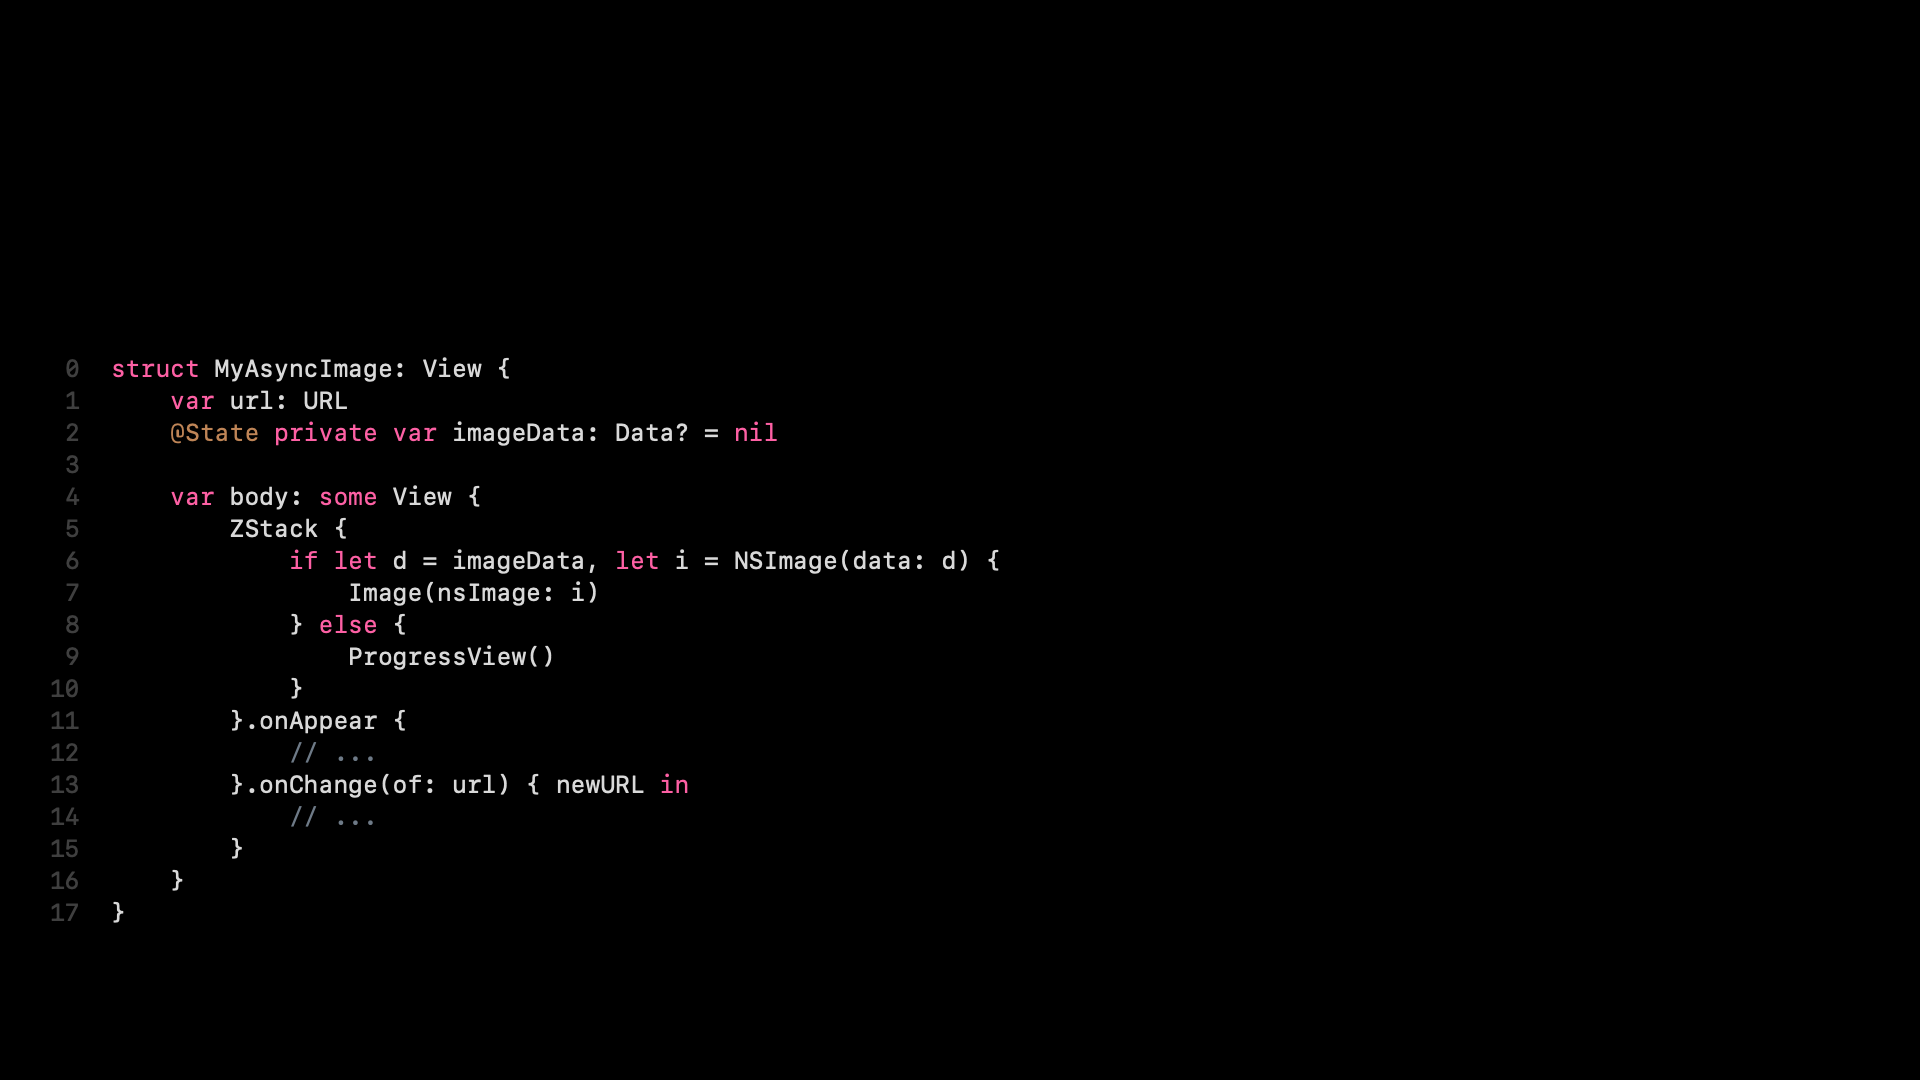
OK, now we would like to start loading some data, and we want to write an onAppear. But we can’t, because we have an if/else. You cannot write onAppear on an if/else. So we need some kind of wrapper. It doesn’t really matter what you use here.
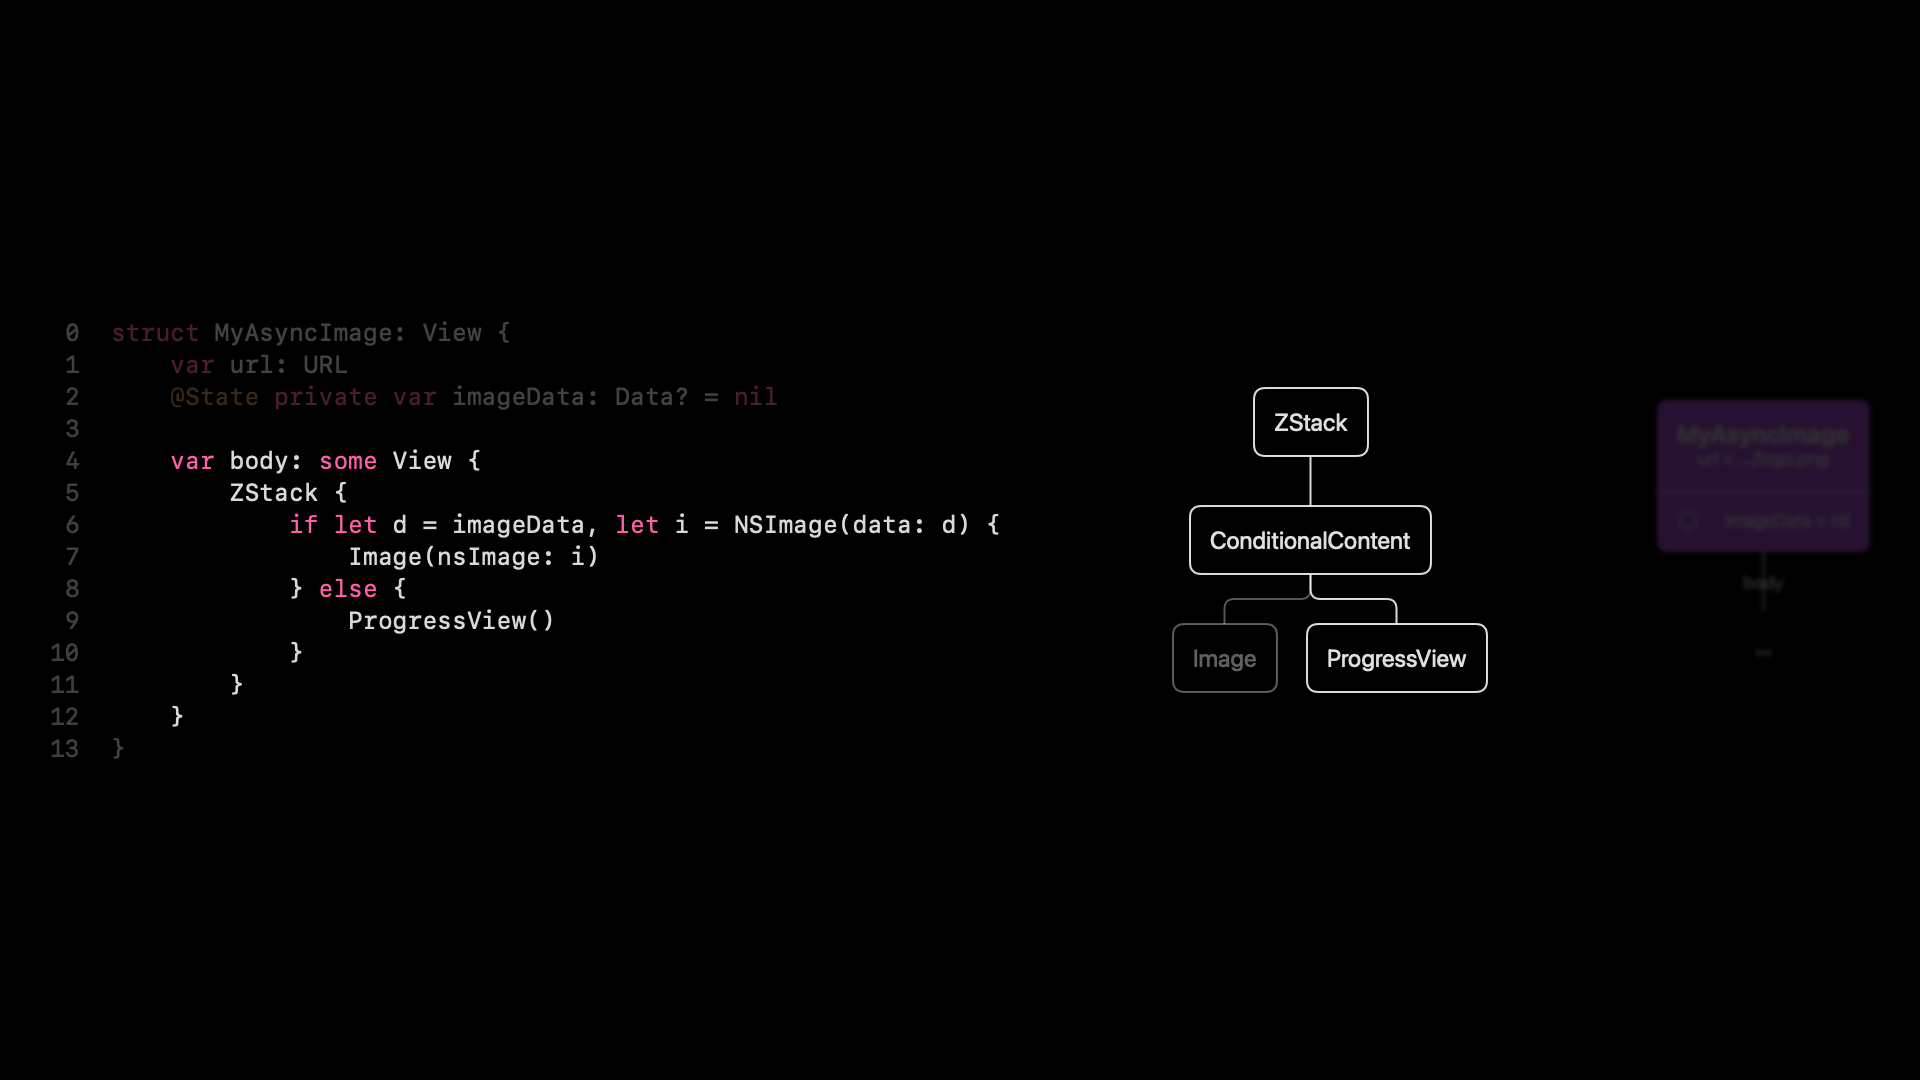
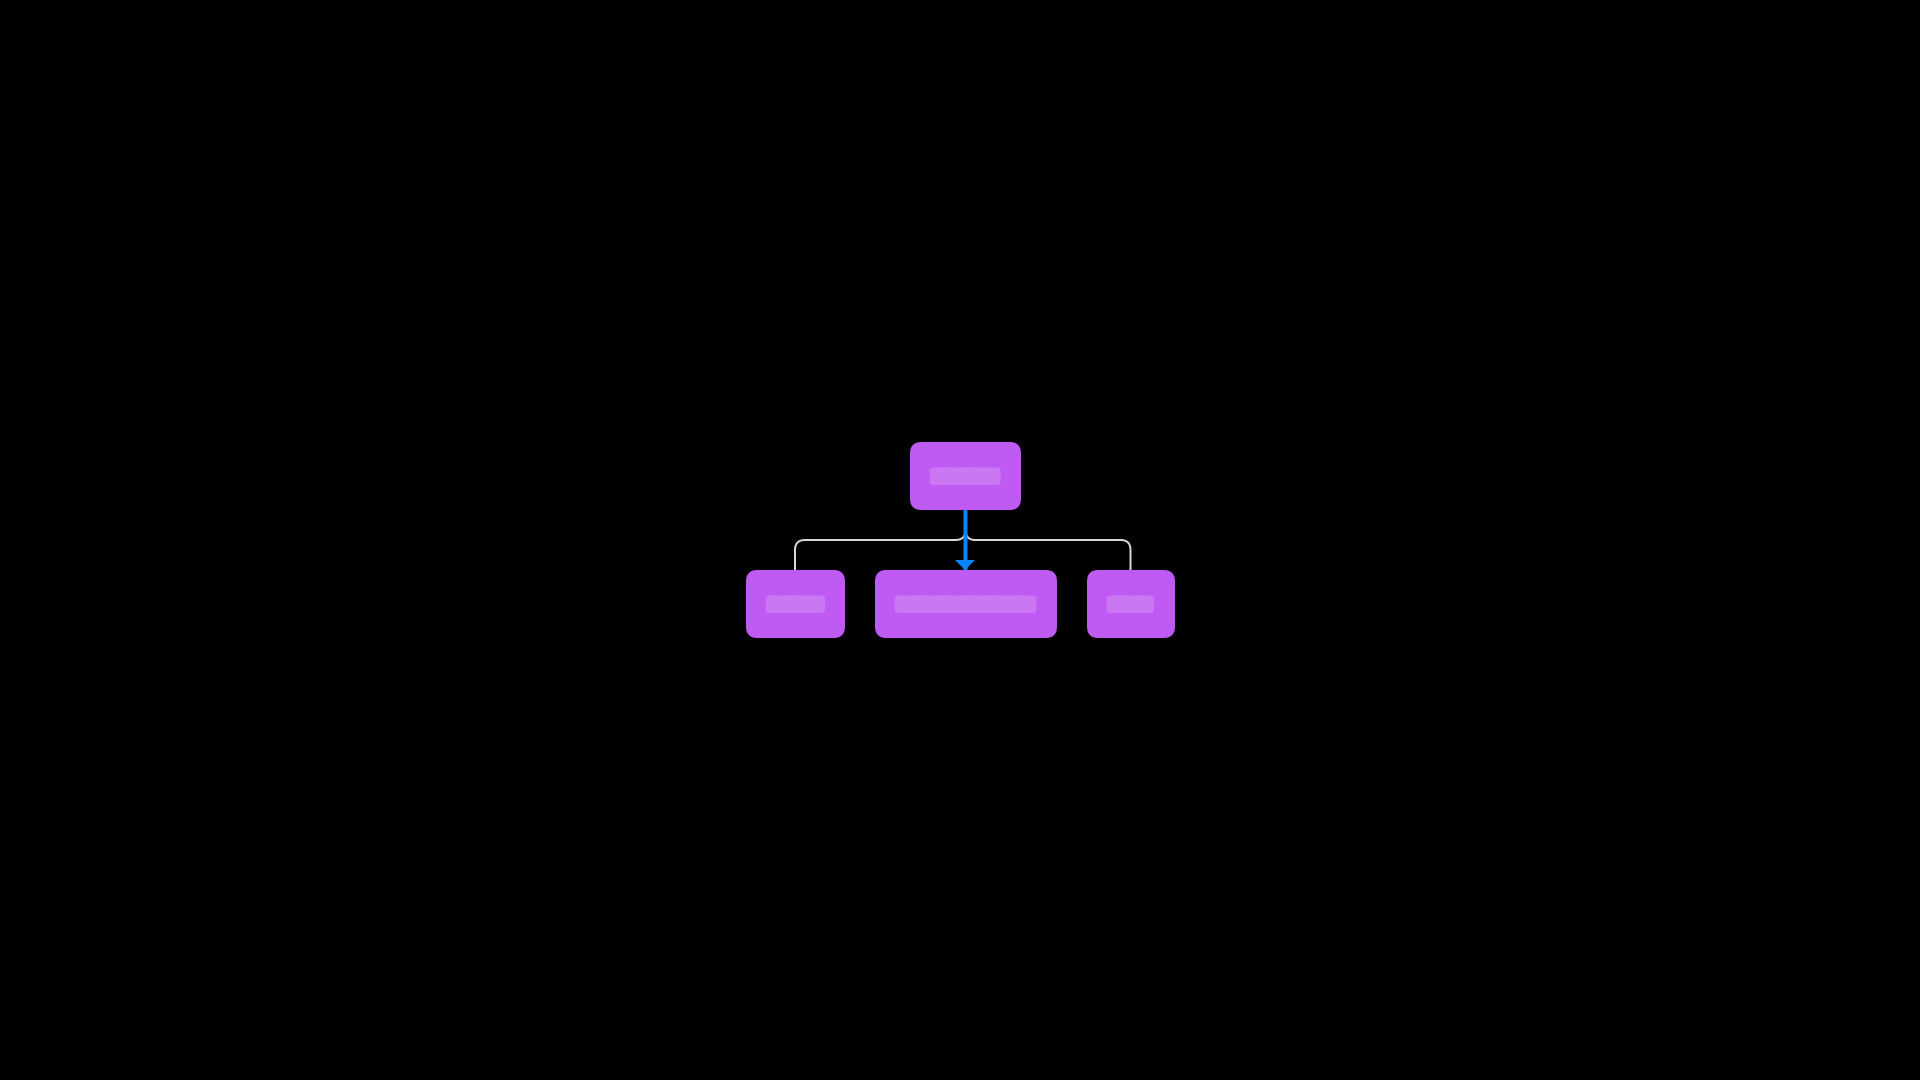
I used the ZStack just because it felt the simplest. And what happens is when you do something like this is that we get a new root node. The ZStack is now the root of our view tree and the conditional content, the child of that ZStack.
We’re finally ready to write our onAppear, and we can start loading our data. Here, it’s also quite interesting. We saw that this container view created a new root node. But if we add a modifier on that, that will be the new root node. These modifiers also turn into the parents of the thing they’re applying to.
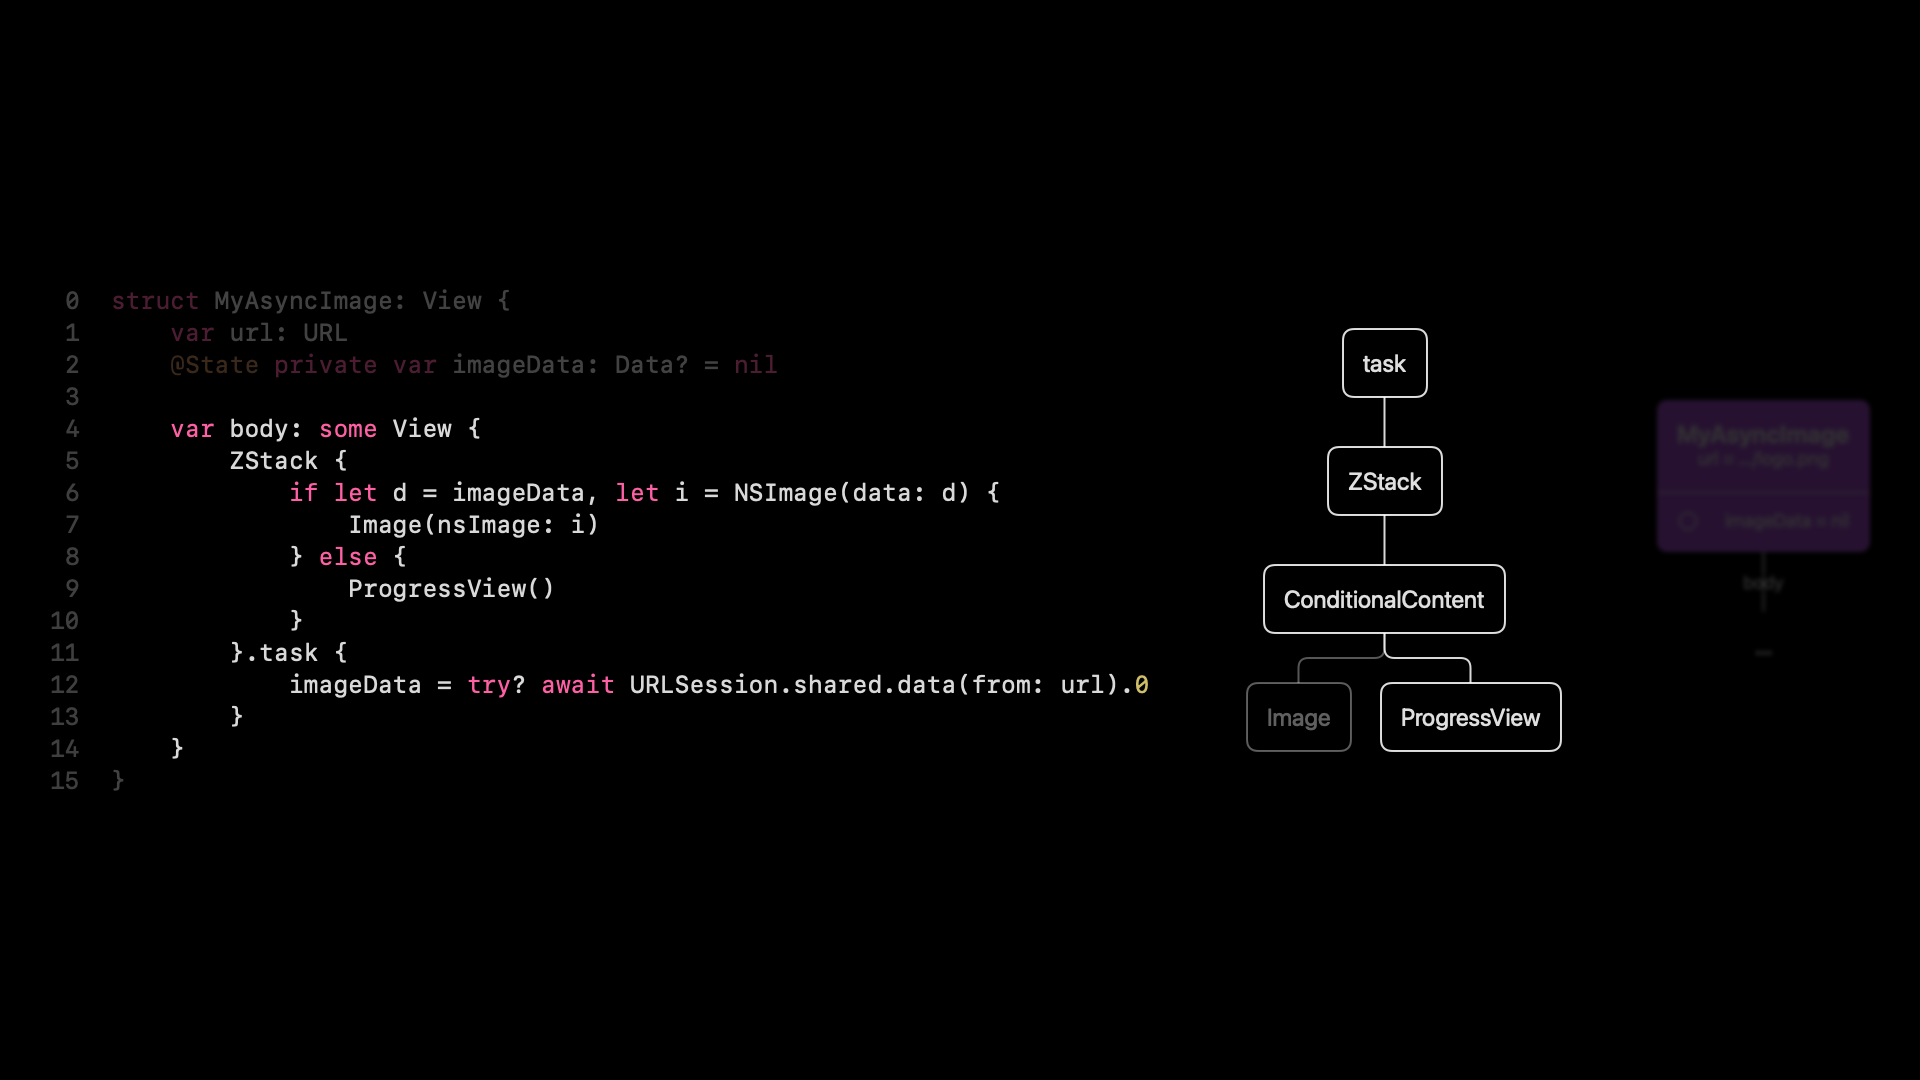
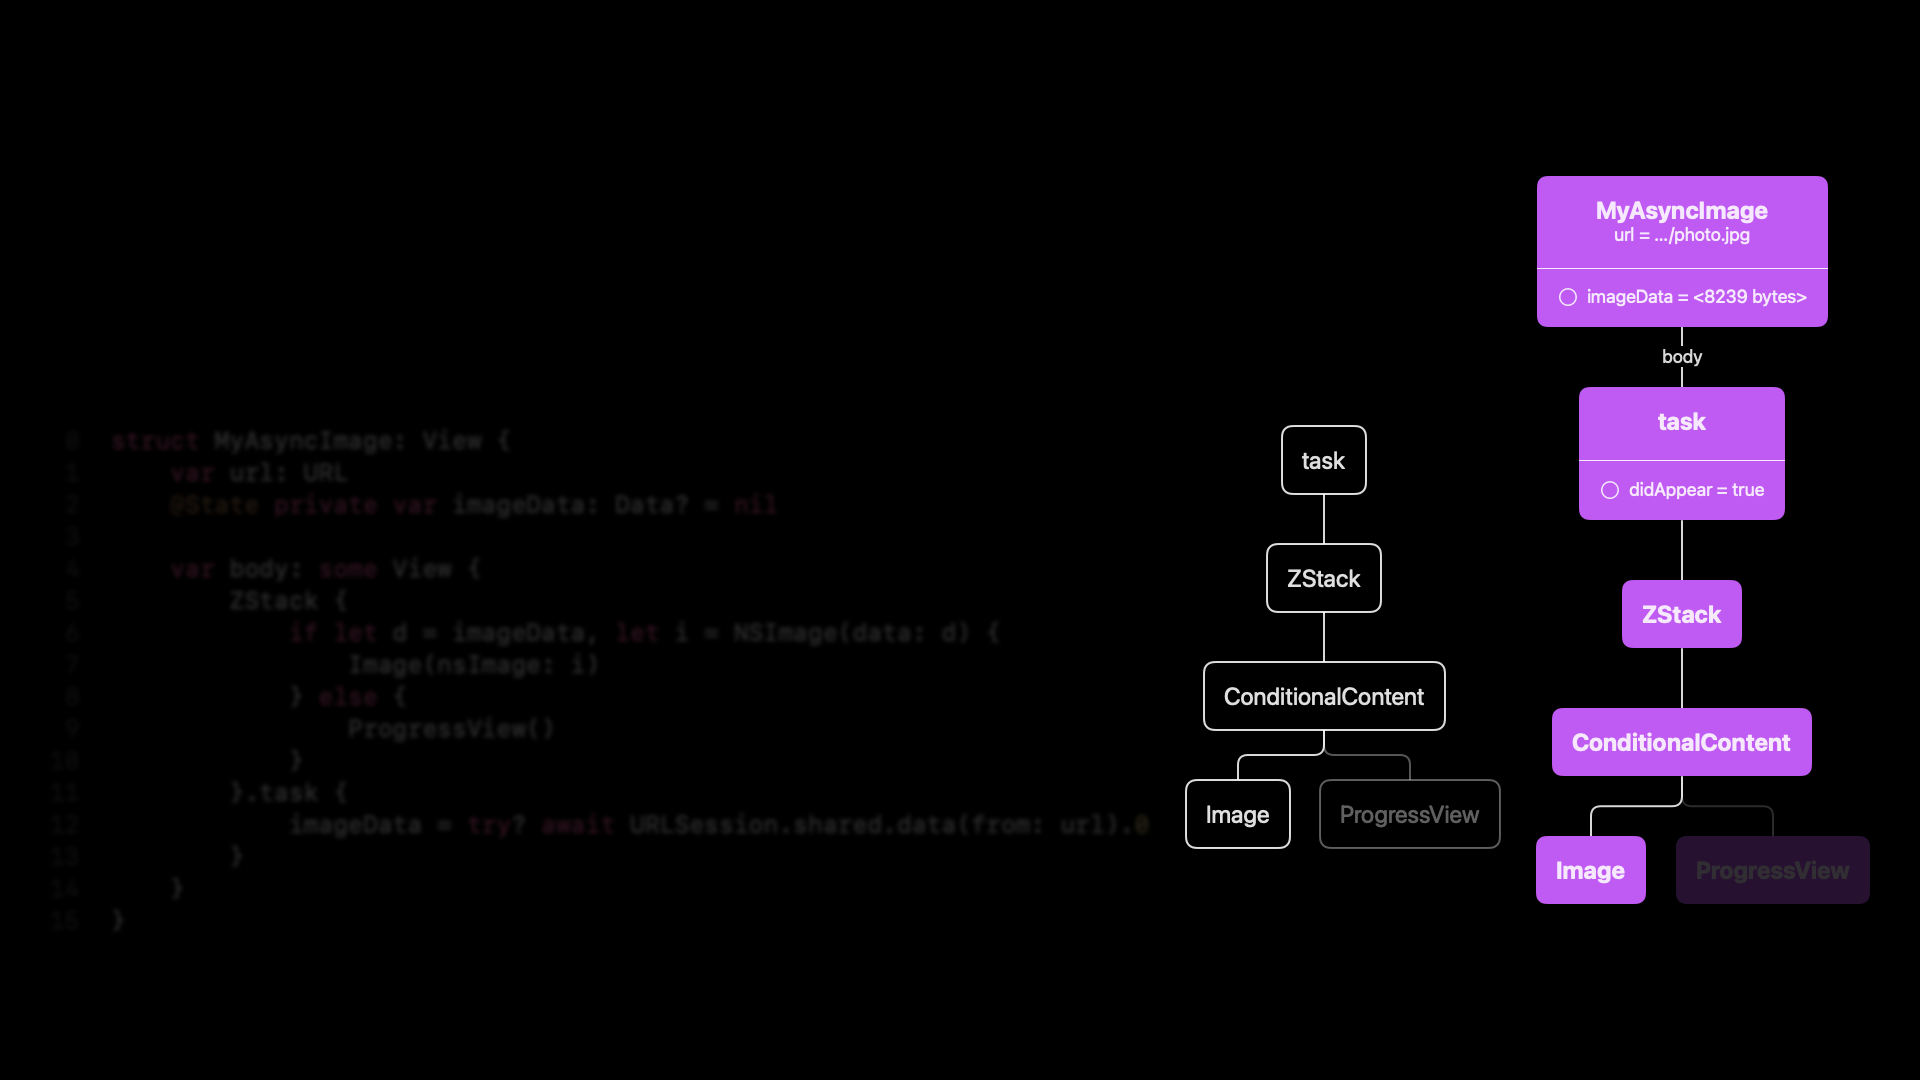
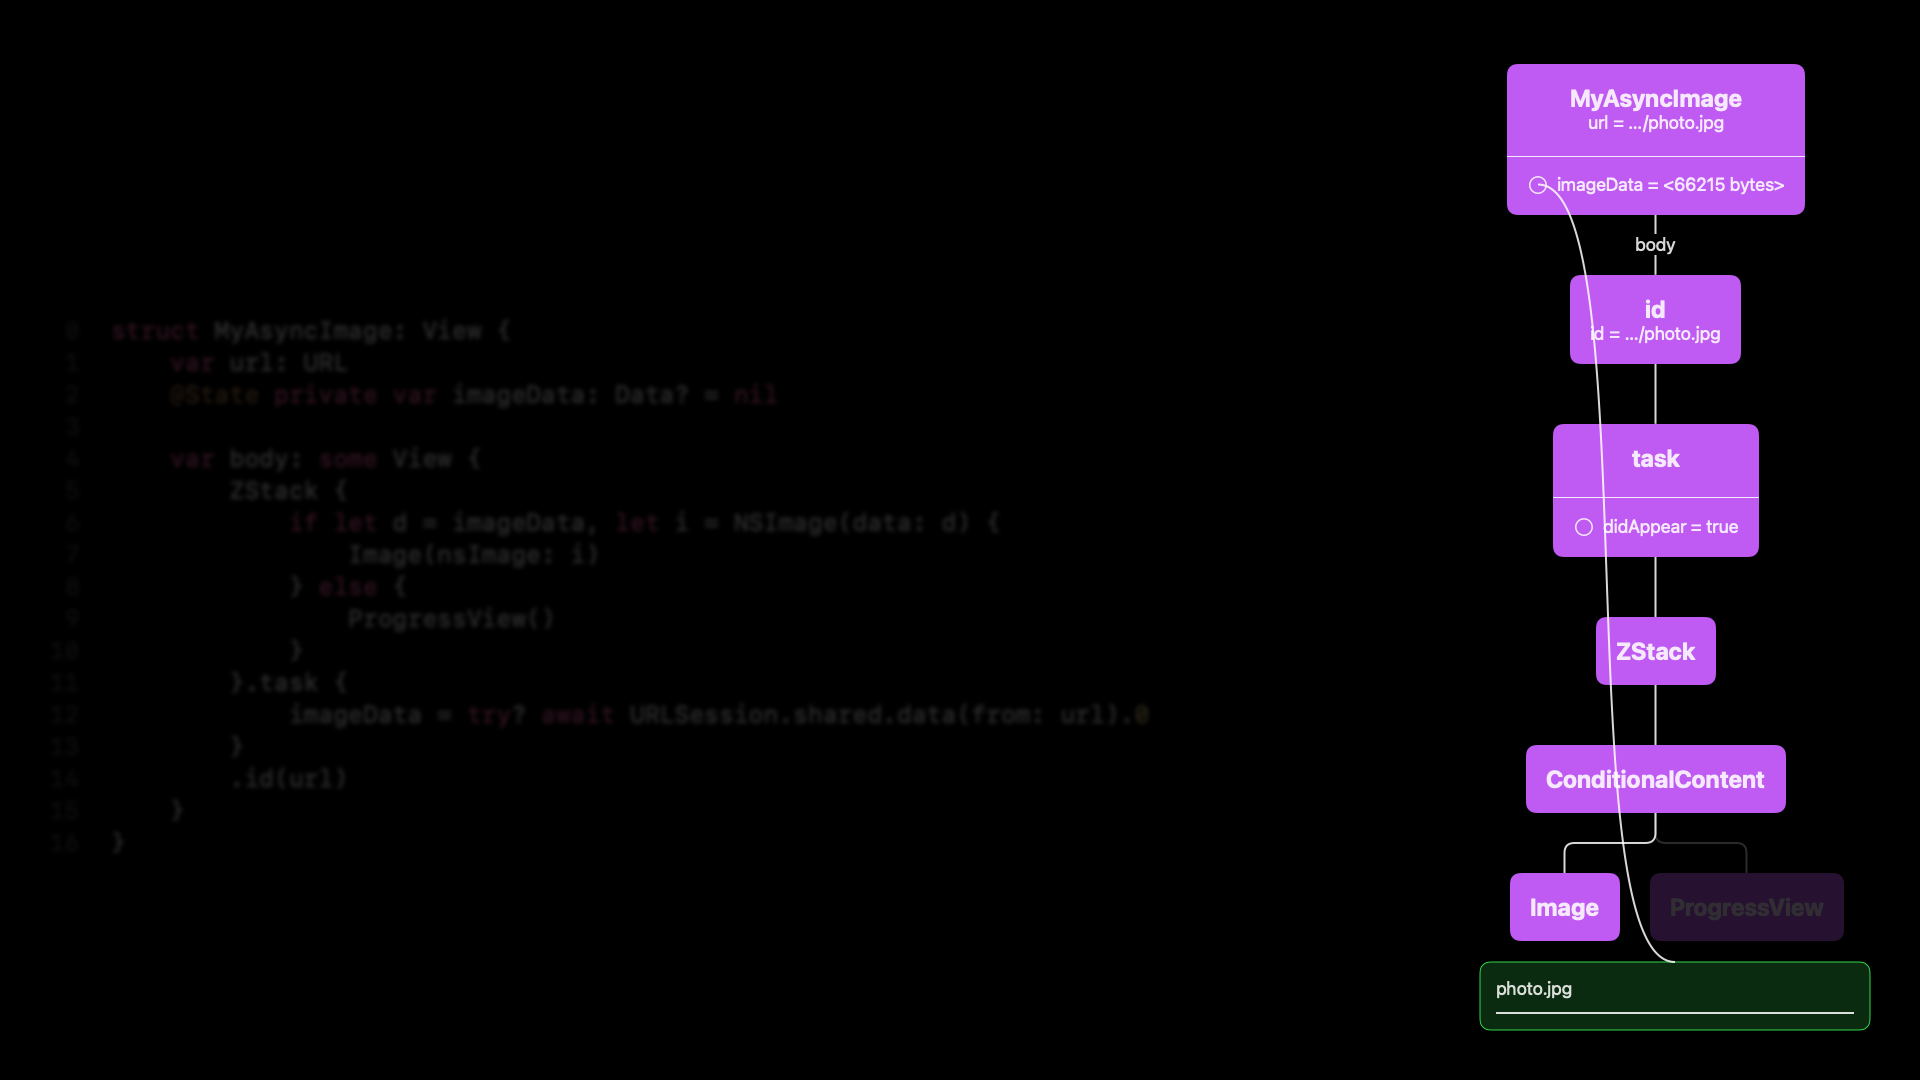
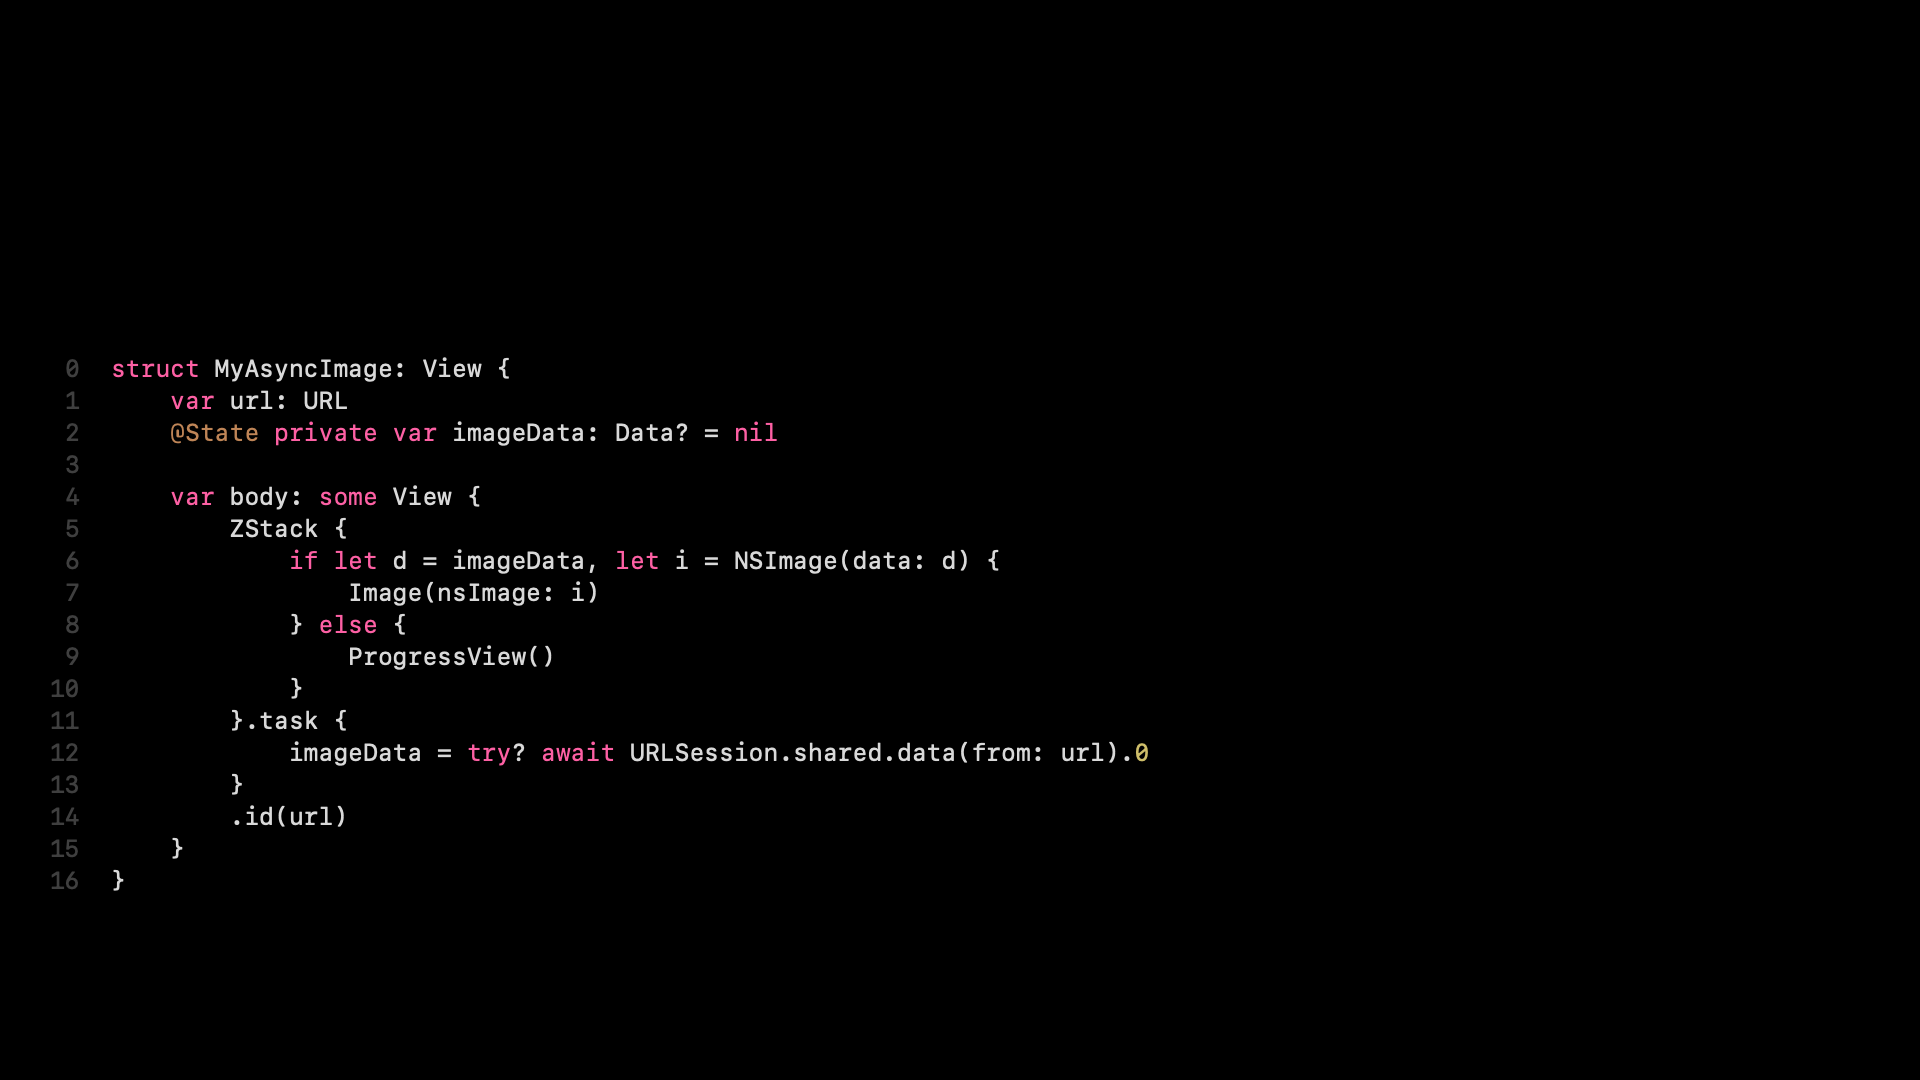
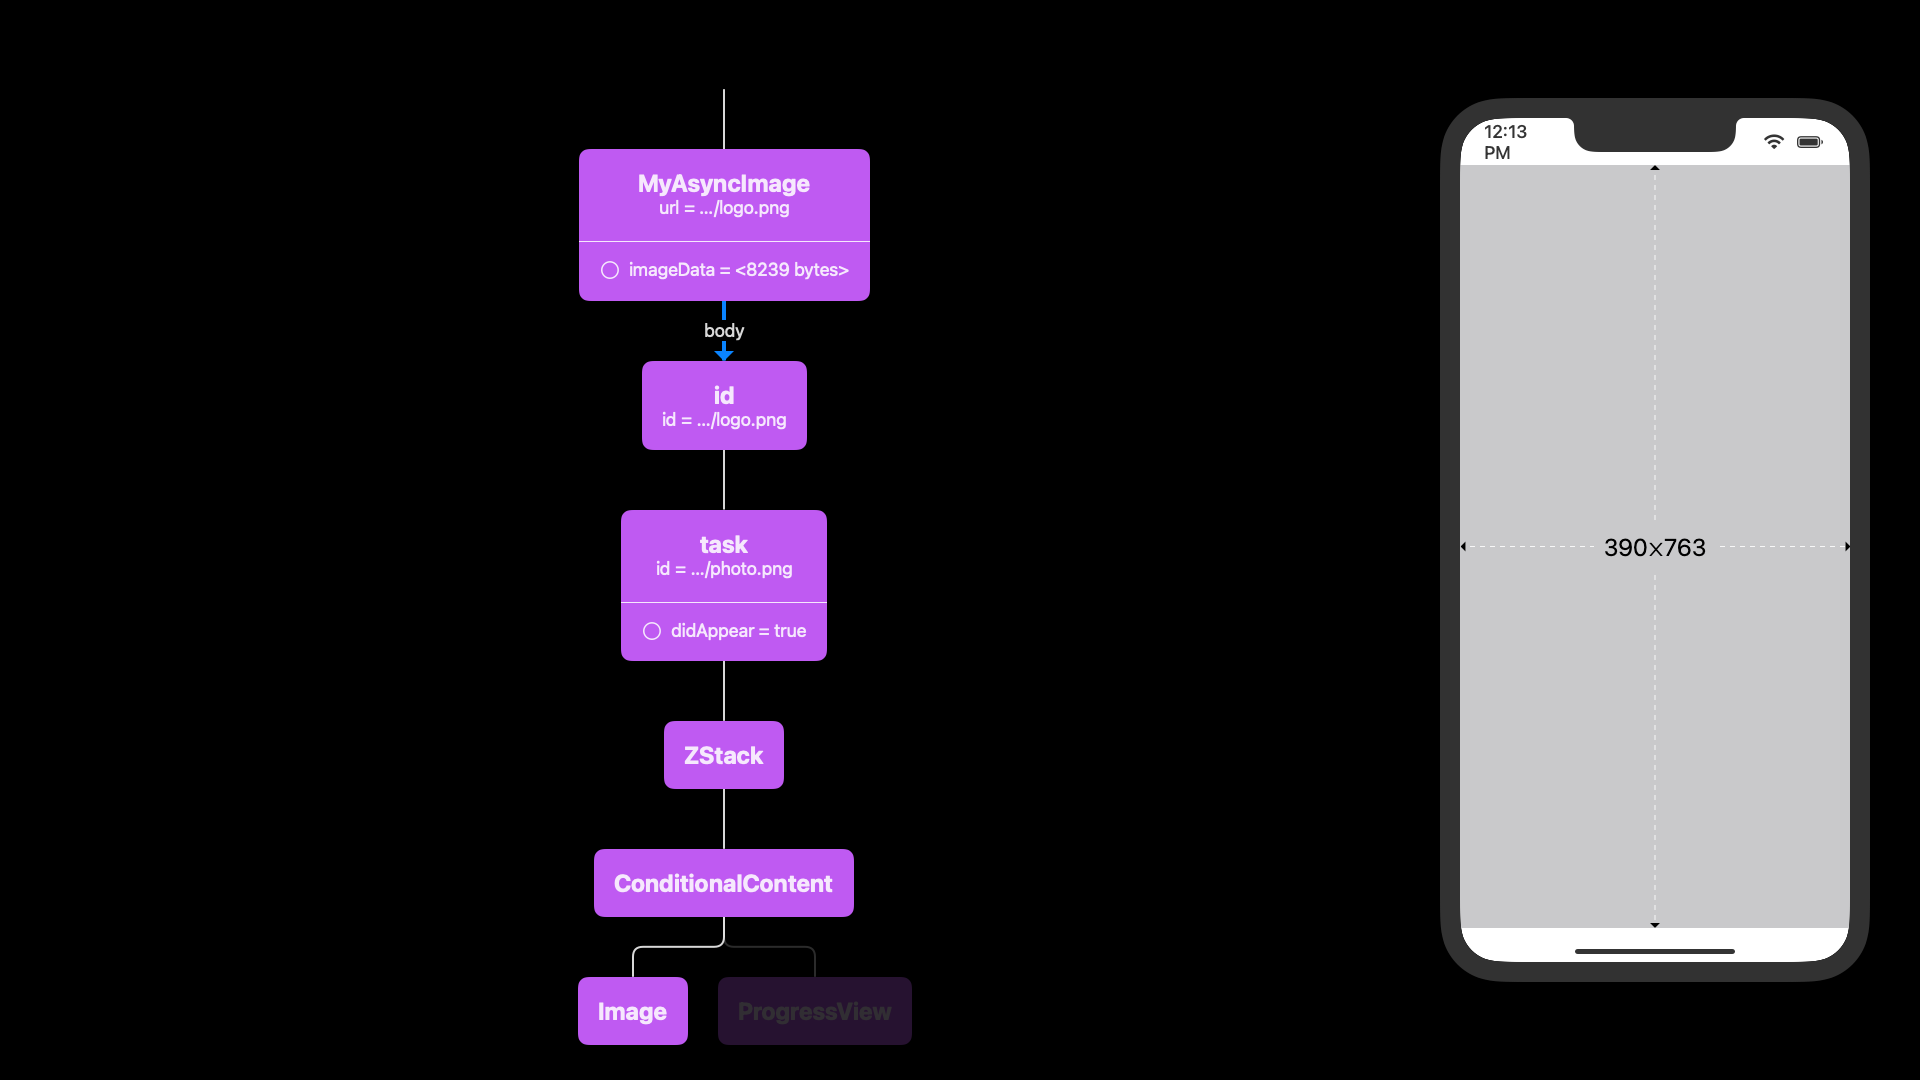
Now, because we have a presentation here, I’d like to load my code with as little code as possible, or load my data with as little code as possible. So I want to use async/await. An onAppear doesn’t play as nicely with async/await as task does. We’re going to change this to a task, and now we can load our data in a single line, which is great for presentations. This changes our view tree ever so slightly. Now we have a task instead of an onAppear. Otherwise, task and onAppear work exactly the same. They start executing the closure the moment the view appears on screen. And then if the body is re-executed, that task or that onAppear is not going to be executed again. OK, I think we’re done with our view tree.
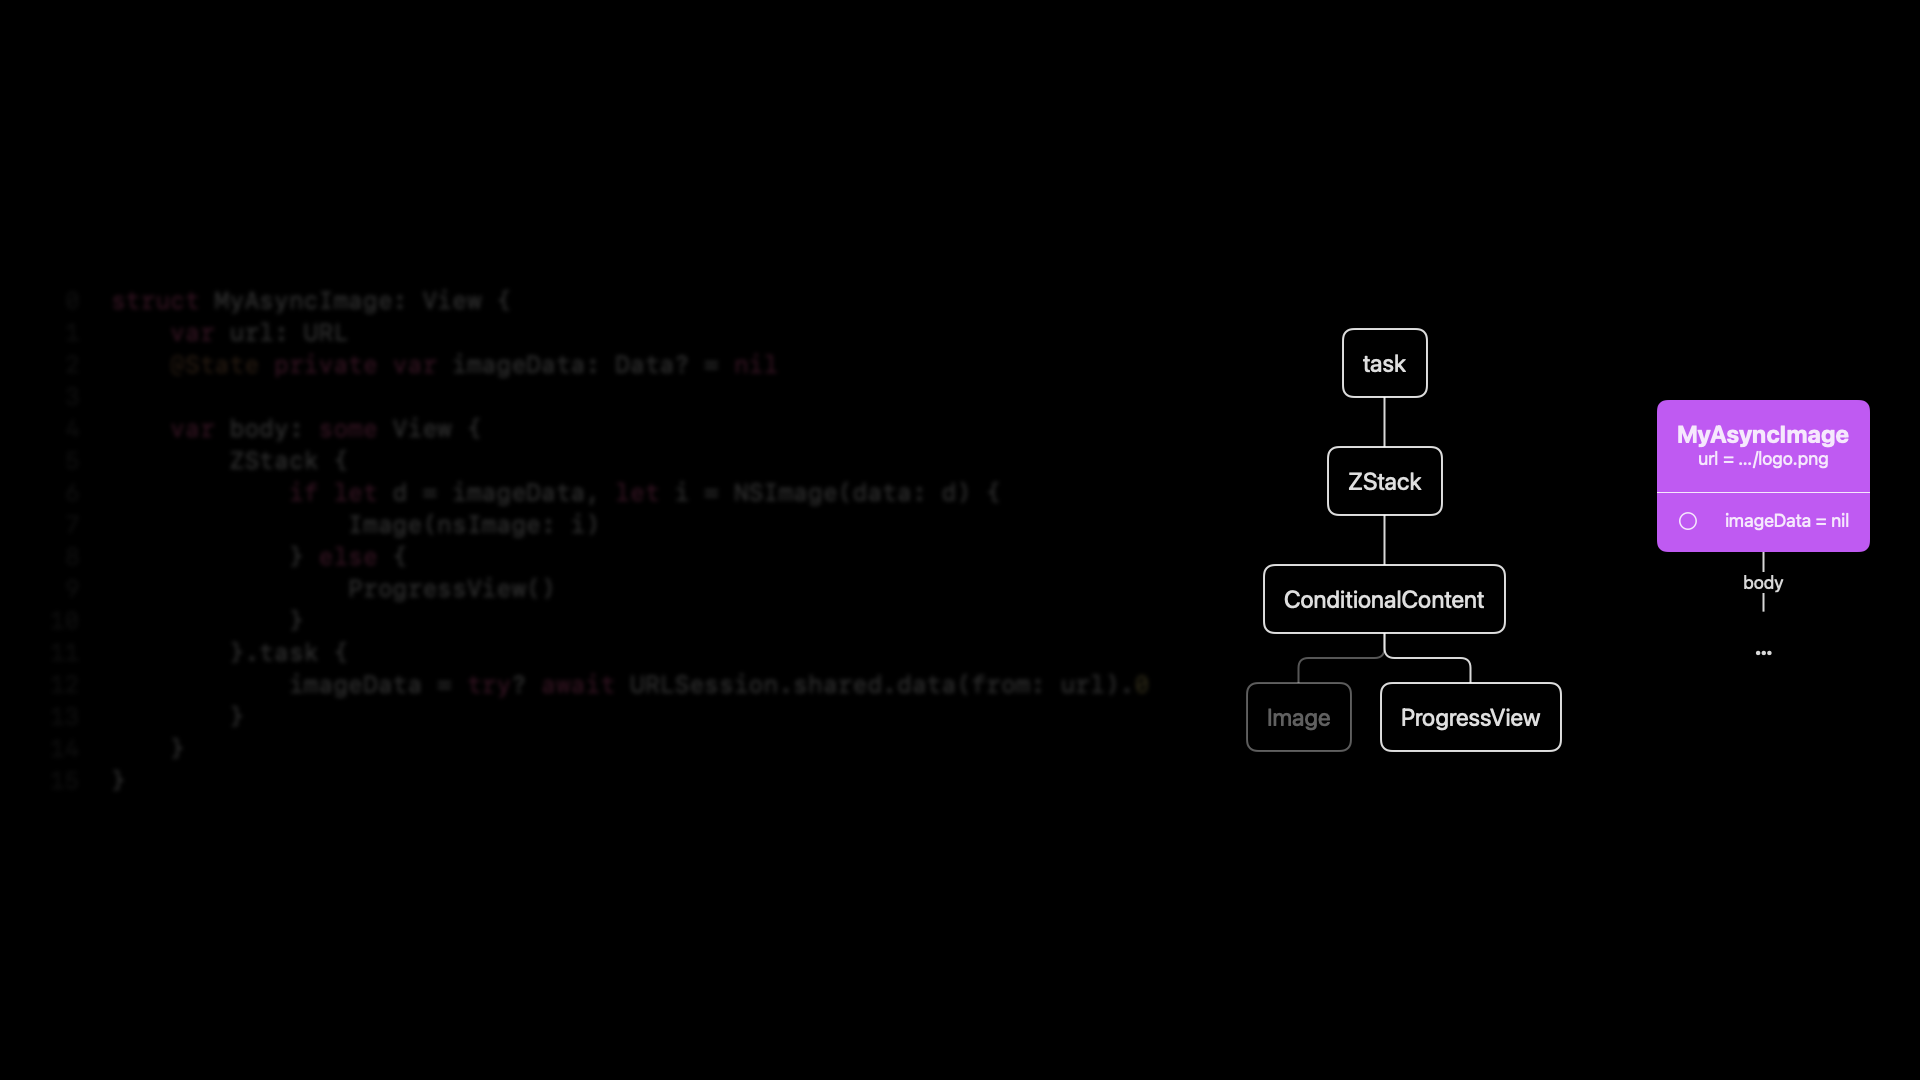
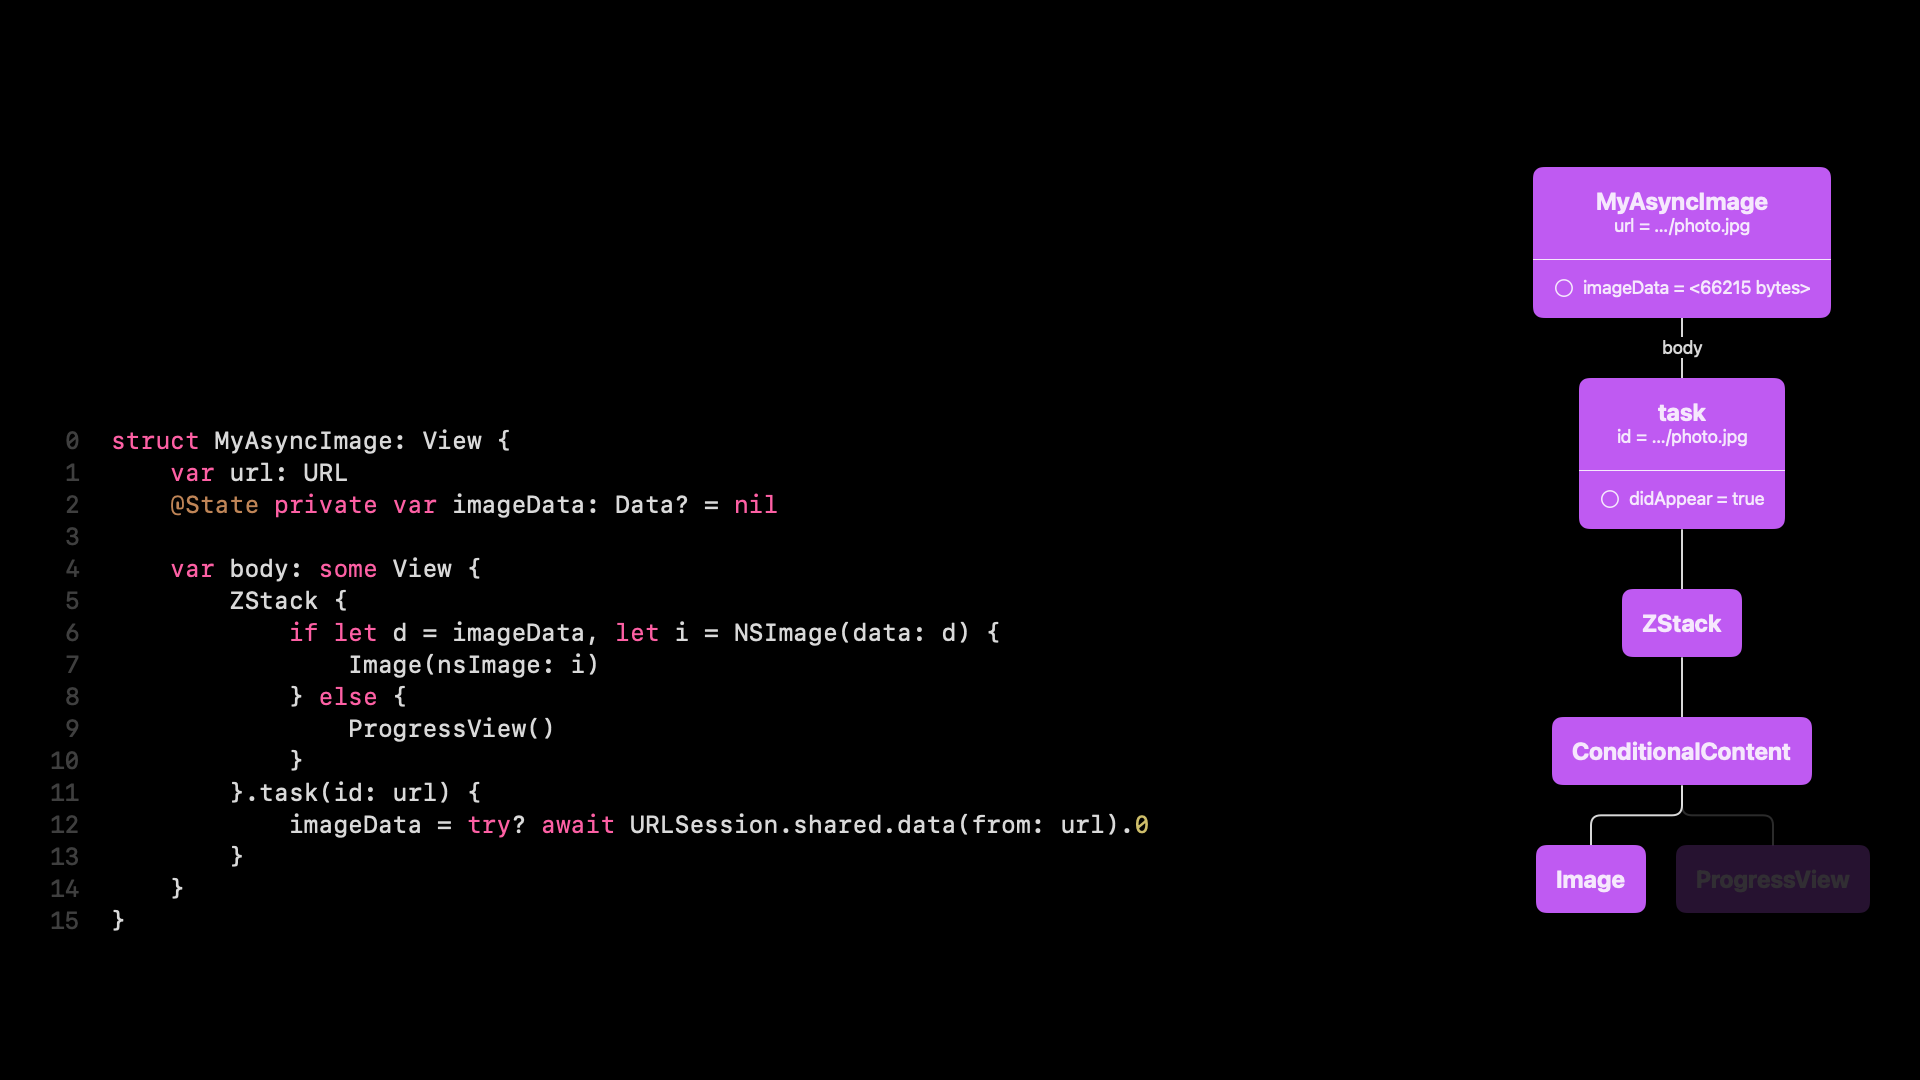
We’re good now. Now we can turn this into a render tree. And I think this is also very interesting. This is a one-to-one translation, and we can really see this here.
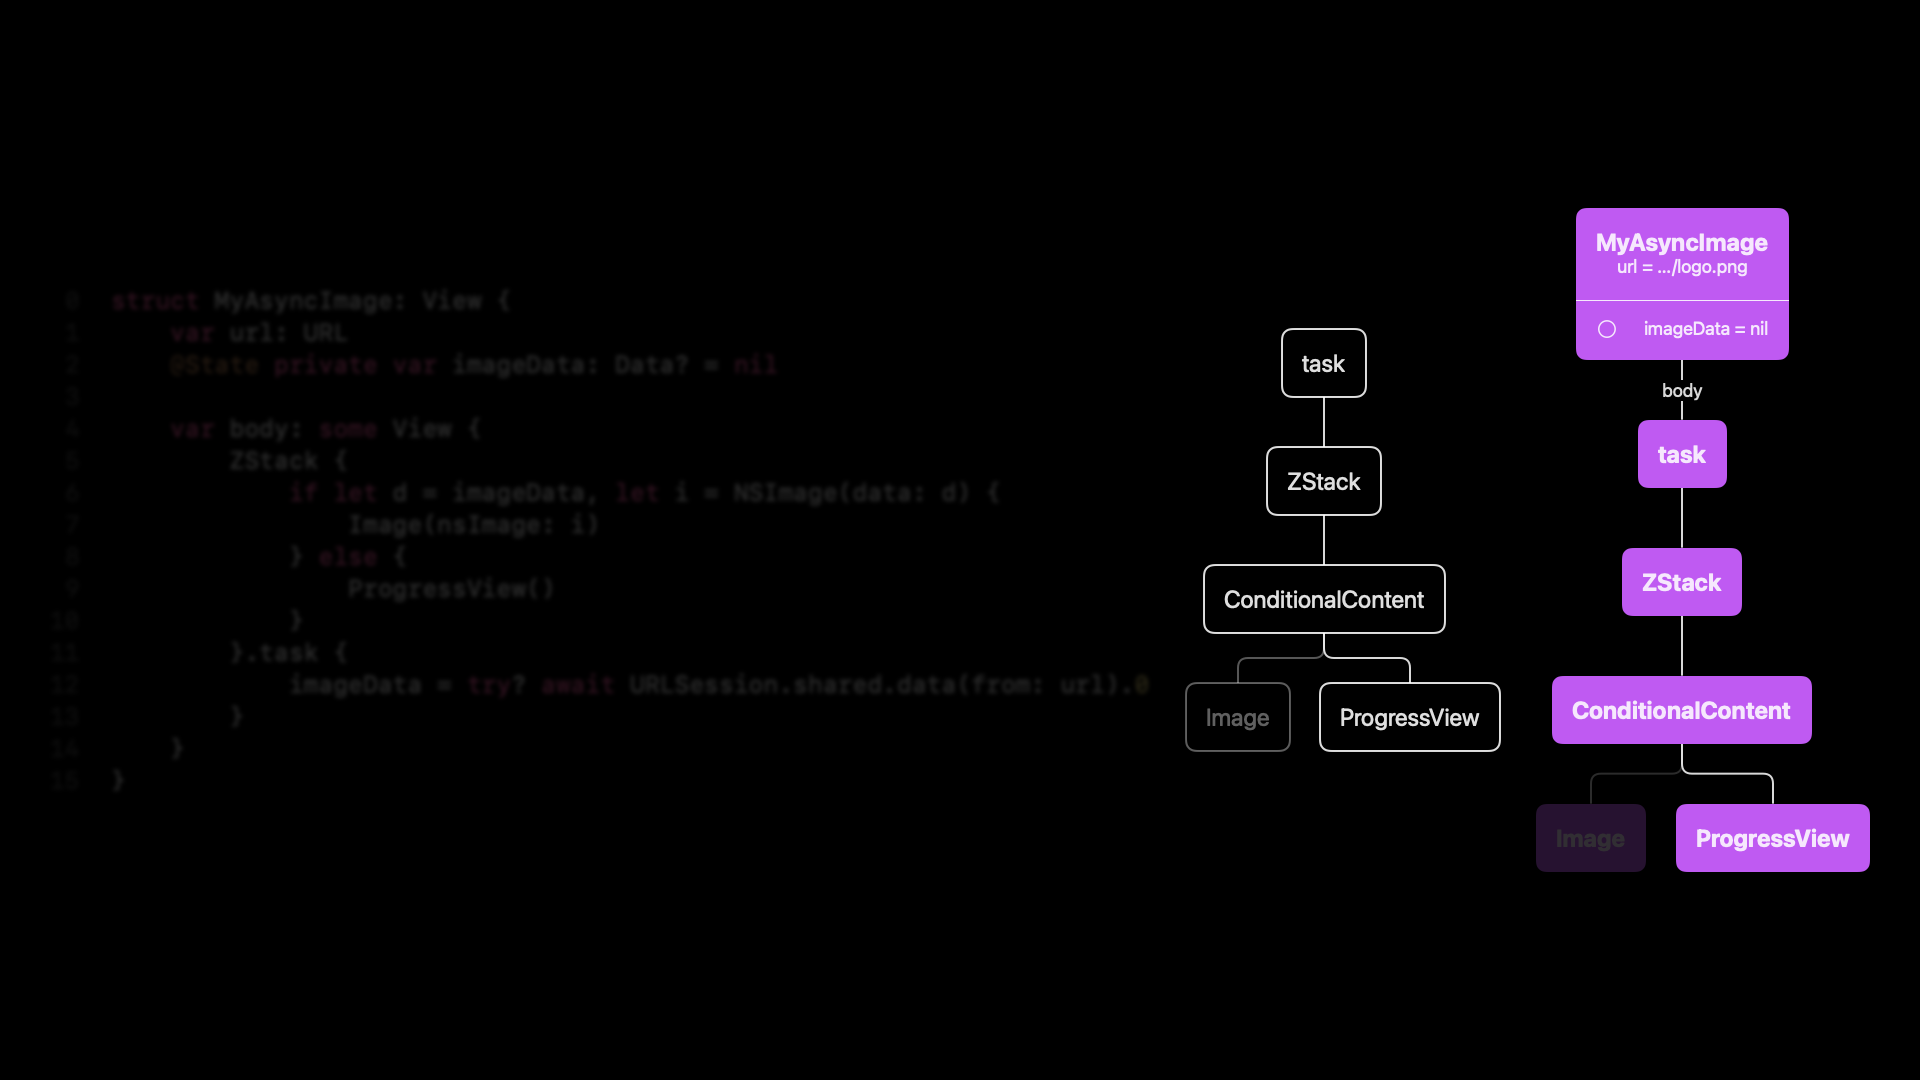
This is a direct copy, but there is a little bit more to it. So internally, of course, as I mentioned, the onAppear runs once, and the task runs once. And so to do that, once the rendering is done, SwiftUI will need to keep track of that.
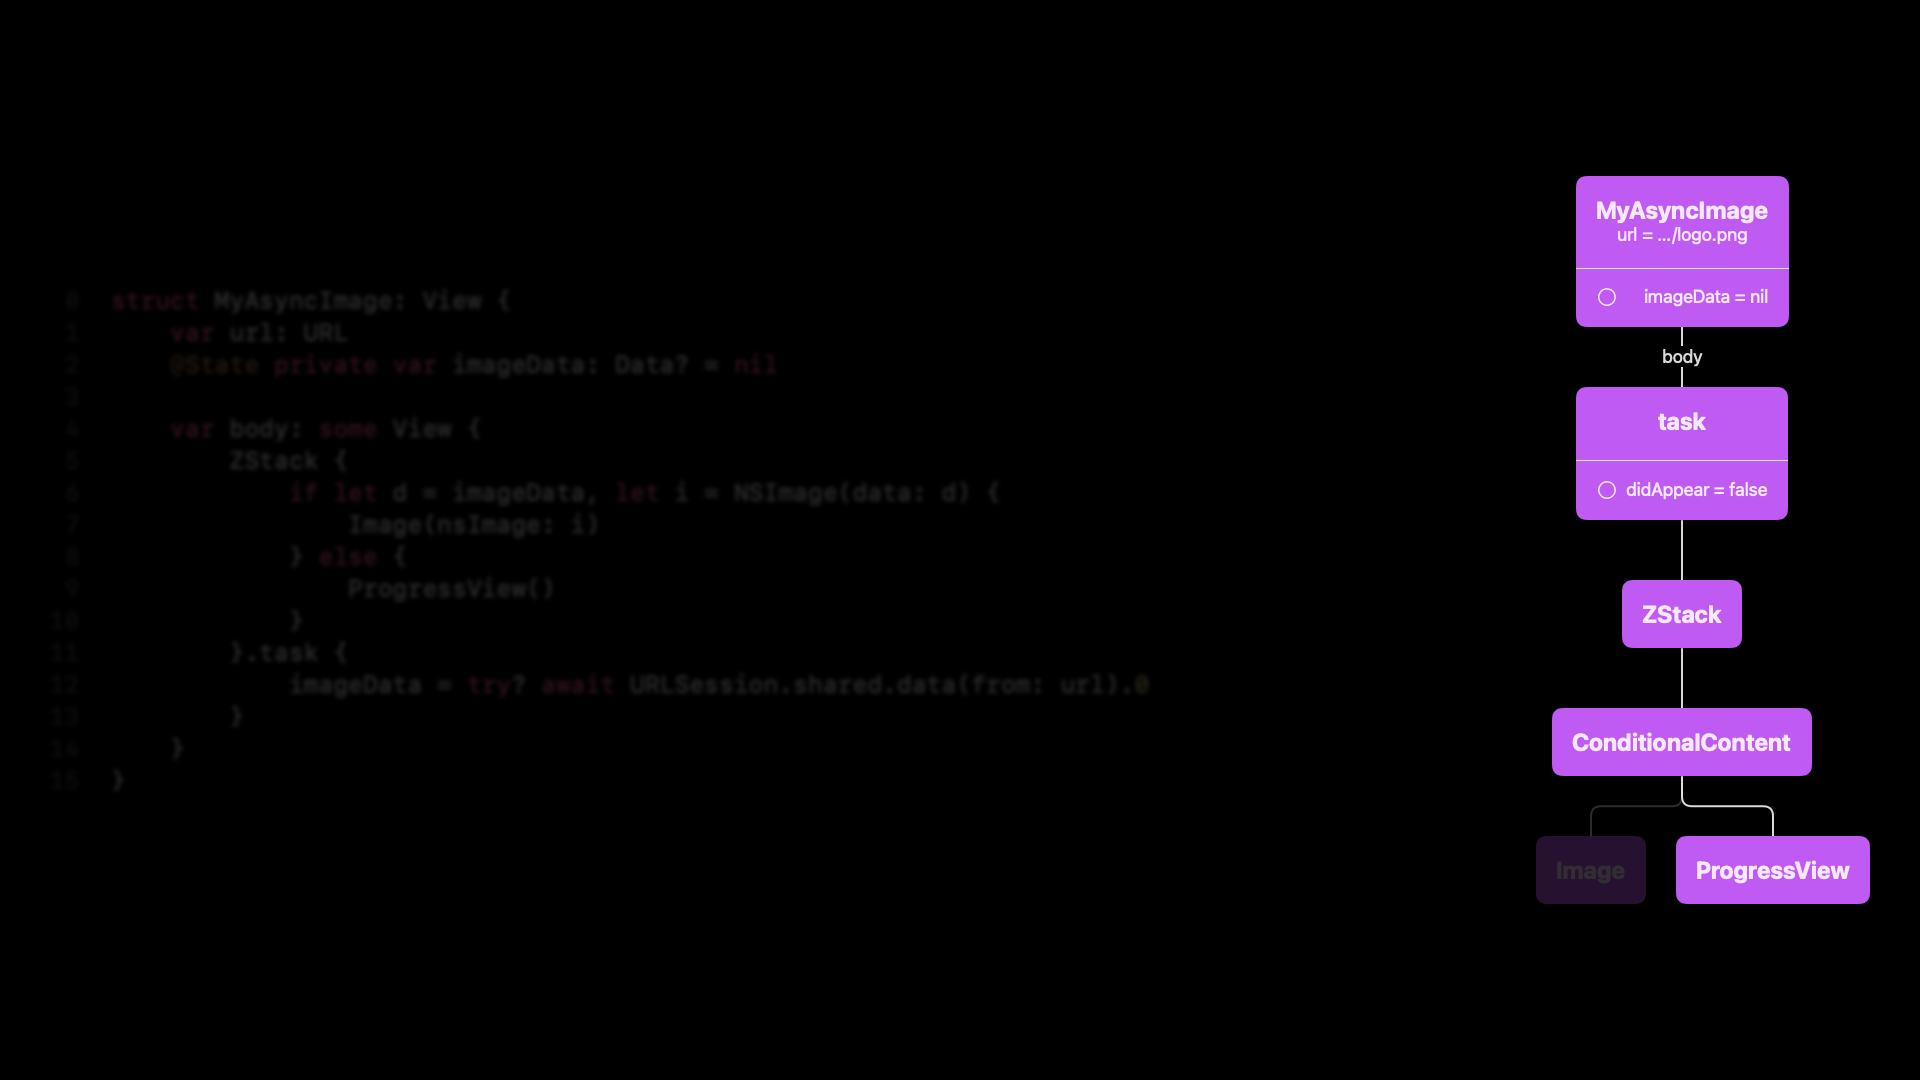
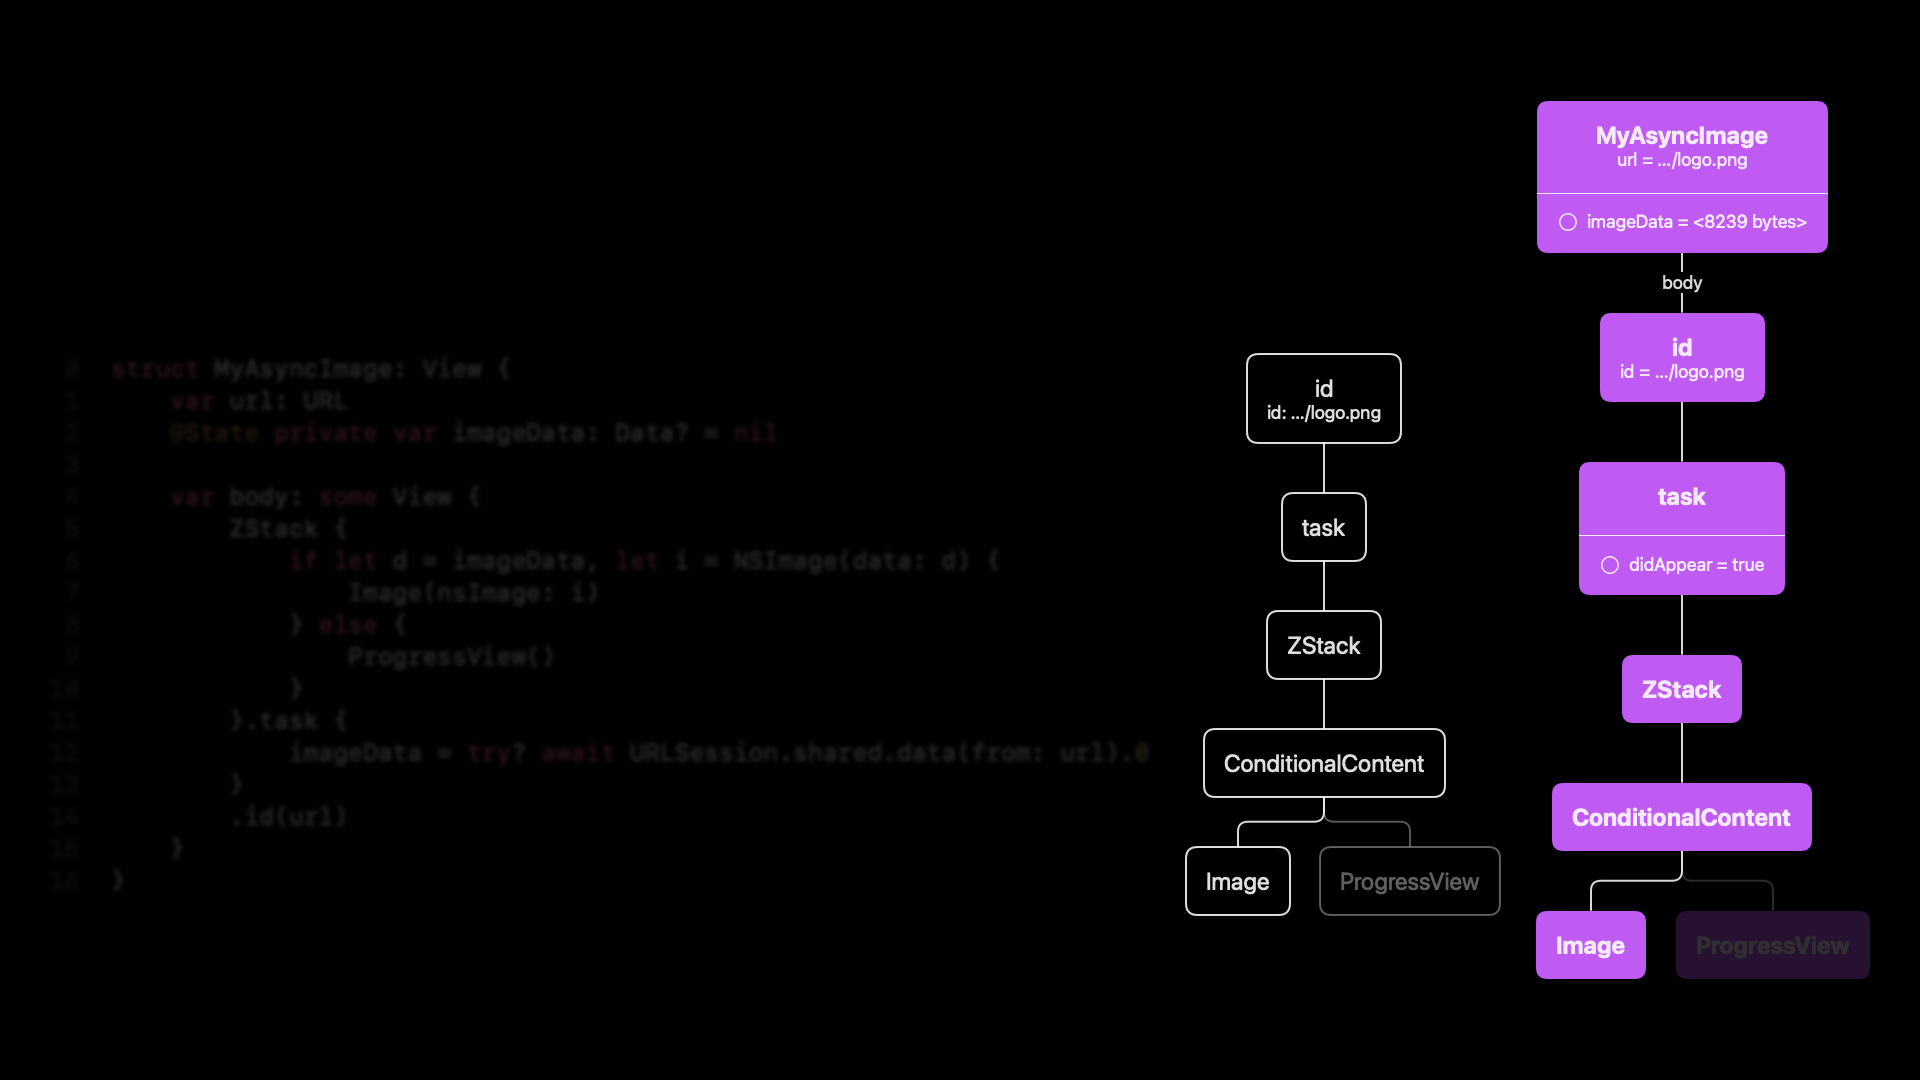
This is probably not how it’s implemented, but you can imagine there’s some kind of didAppear property in the render tree. And then initially, it’s false. So what happens when this view renders? Well, this didAppear turns to true.
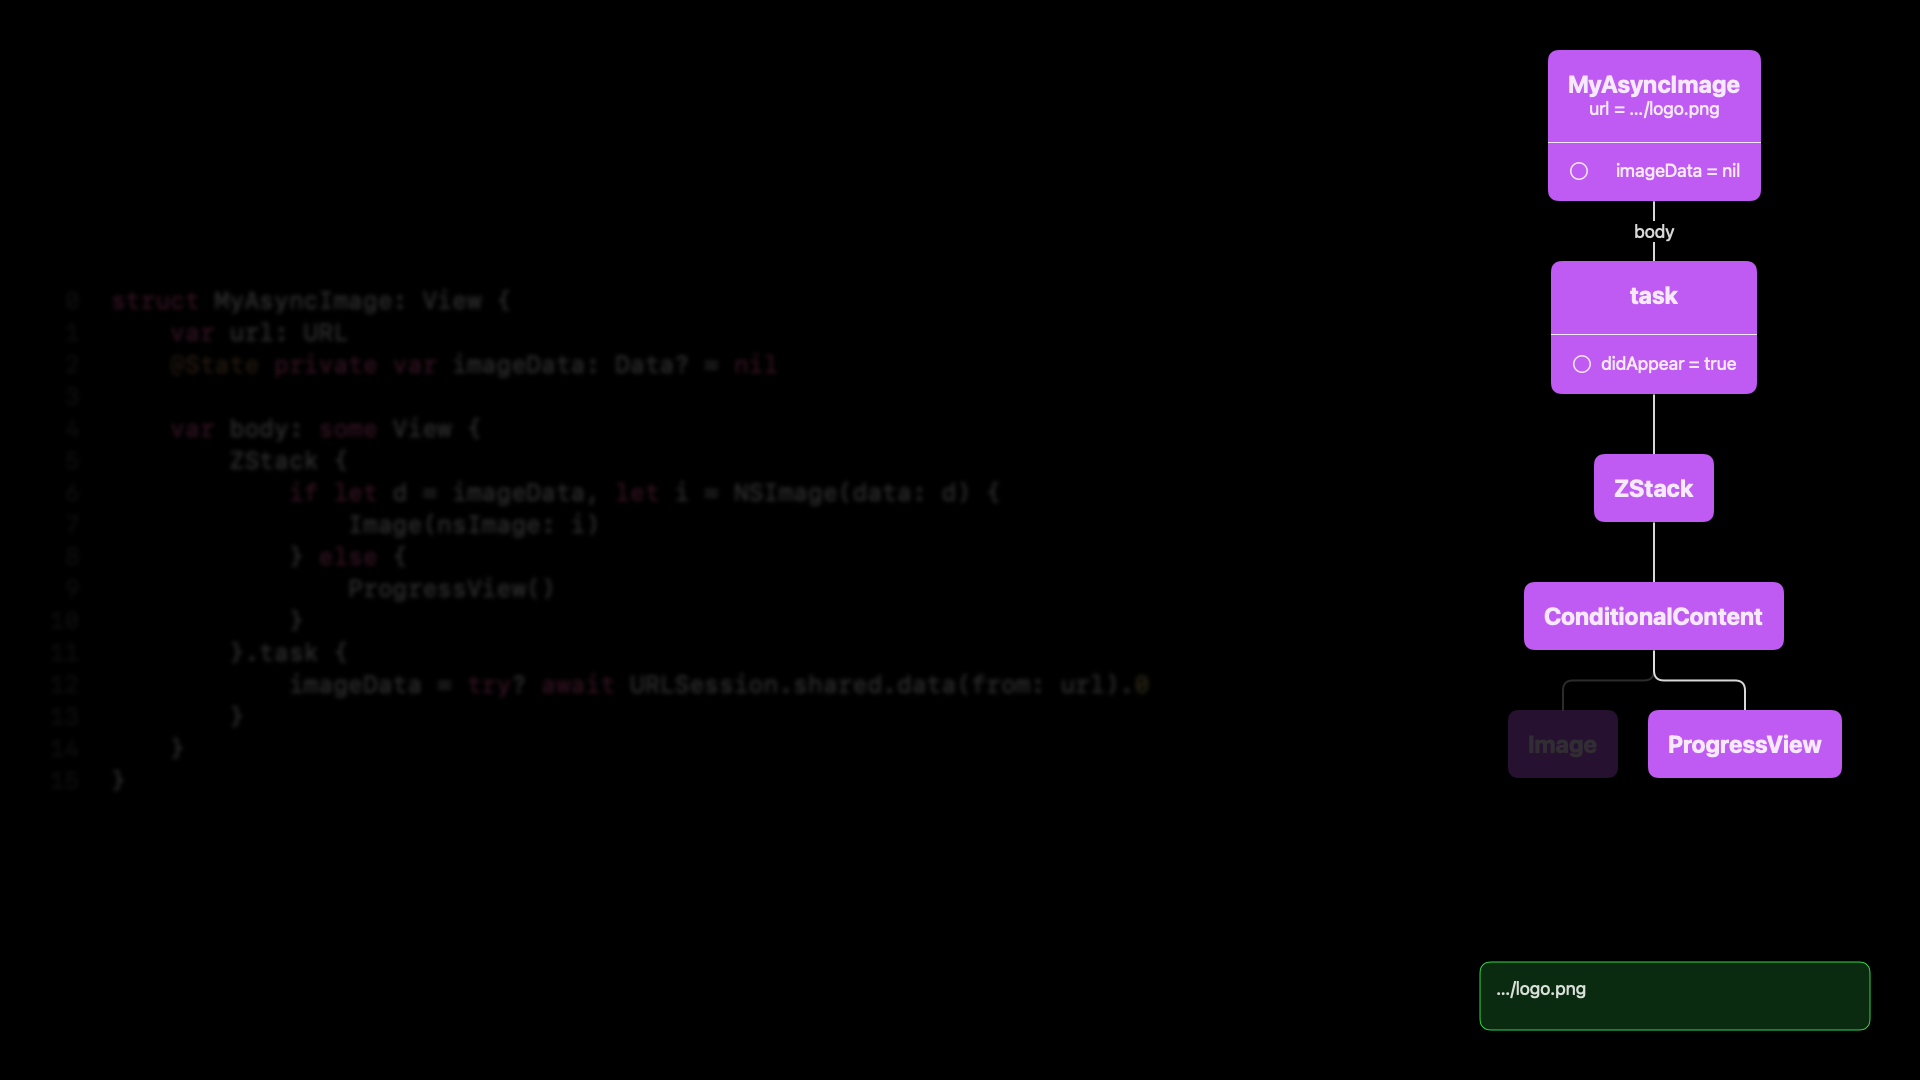
It’s a little bit hard to see, but you can see that it’s now true in the render tree, and the task is created. The data starts loading.
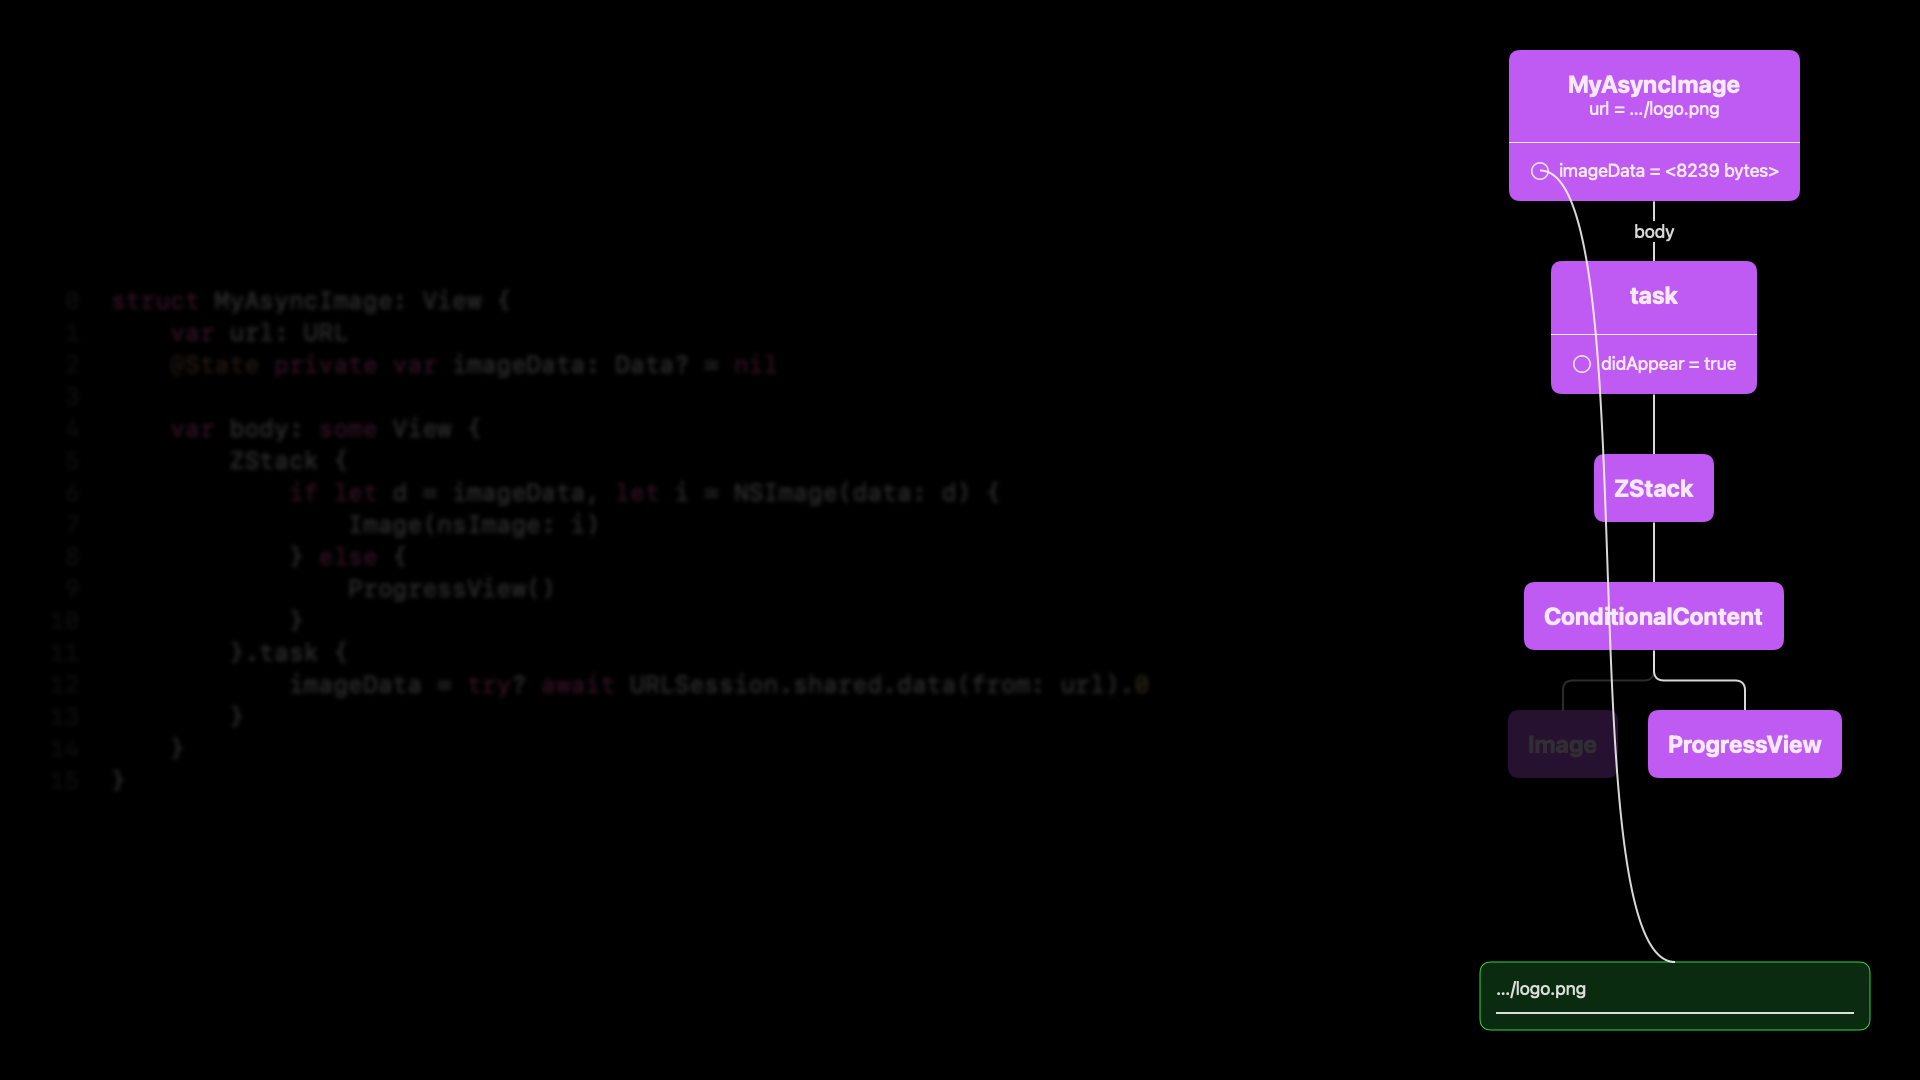
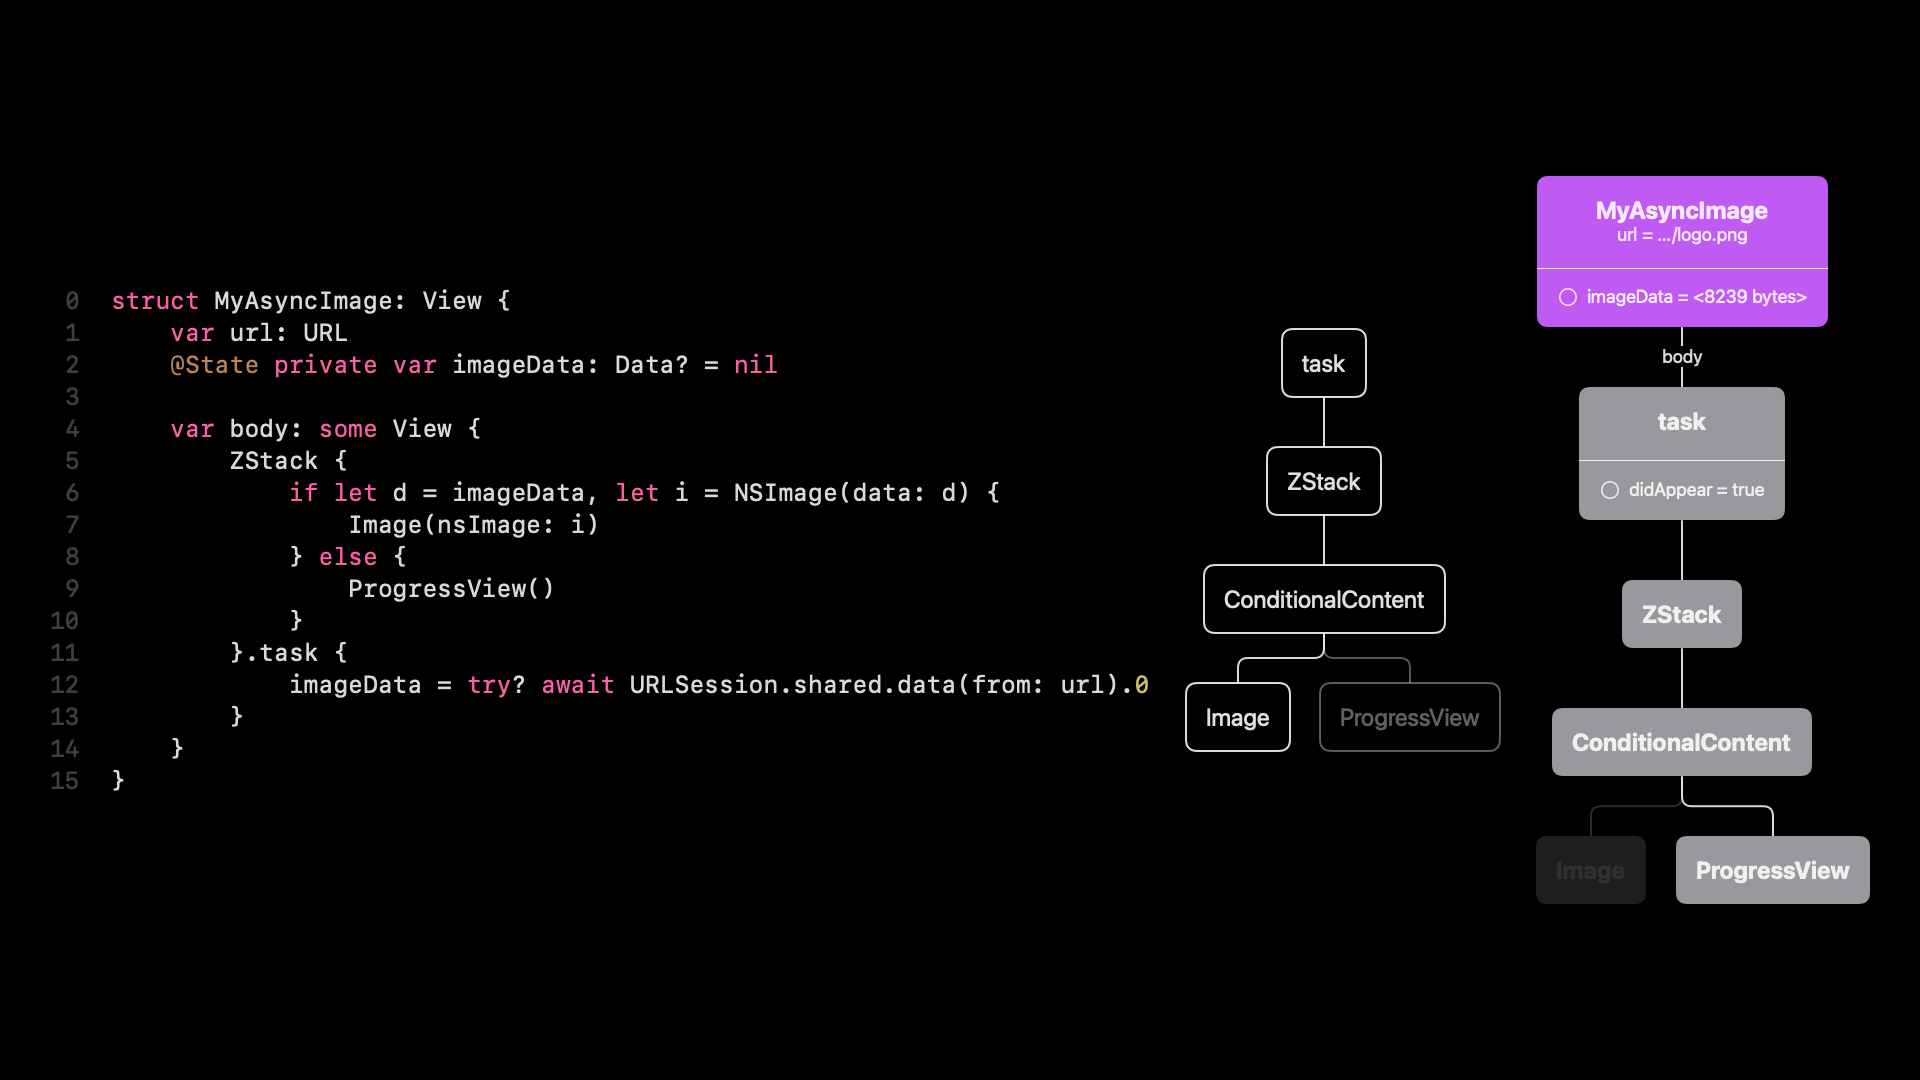
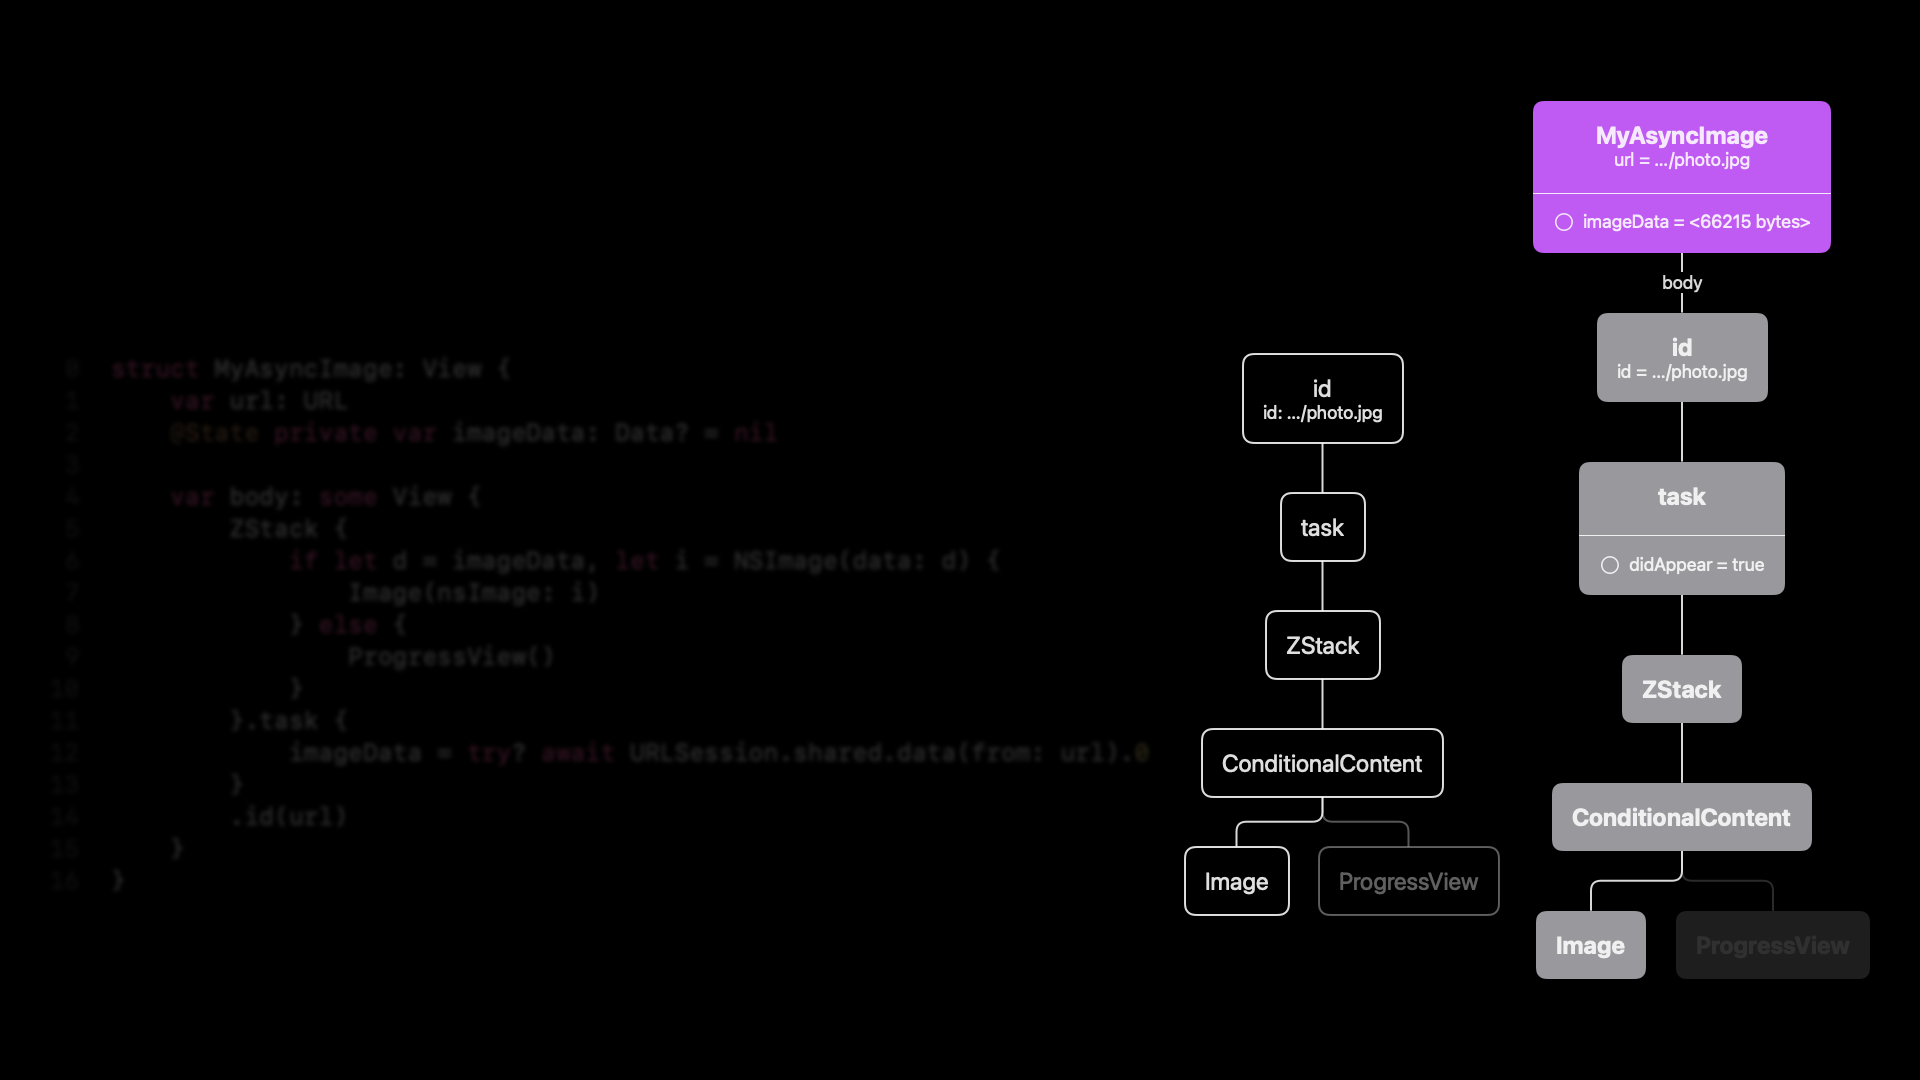
And then once the data is there, it updates this image data property. And this is, again, very interesting what’s happening here. Whenever a property changes, whether that’s a regular property like the URL or a state property, like image data, SwiftUI invalidates the entire body.

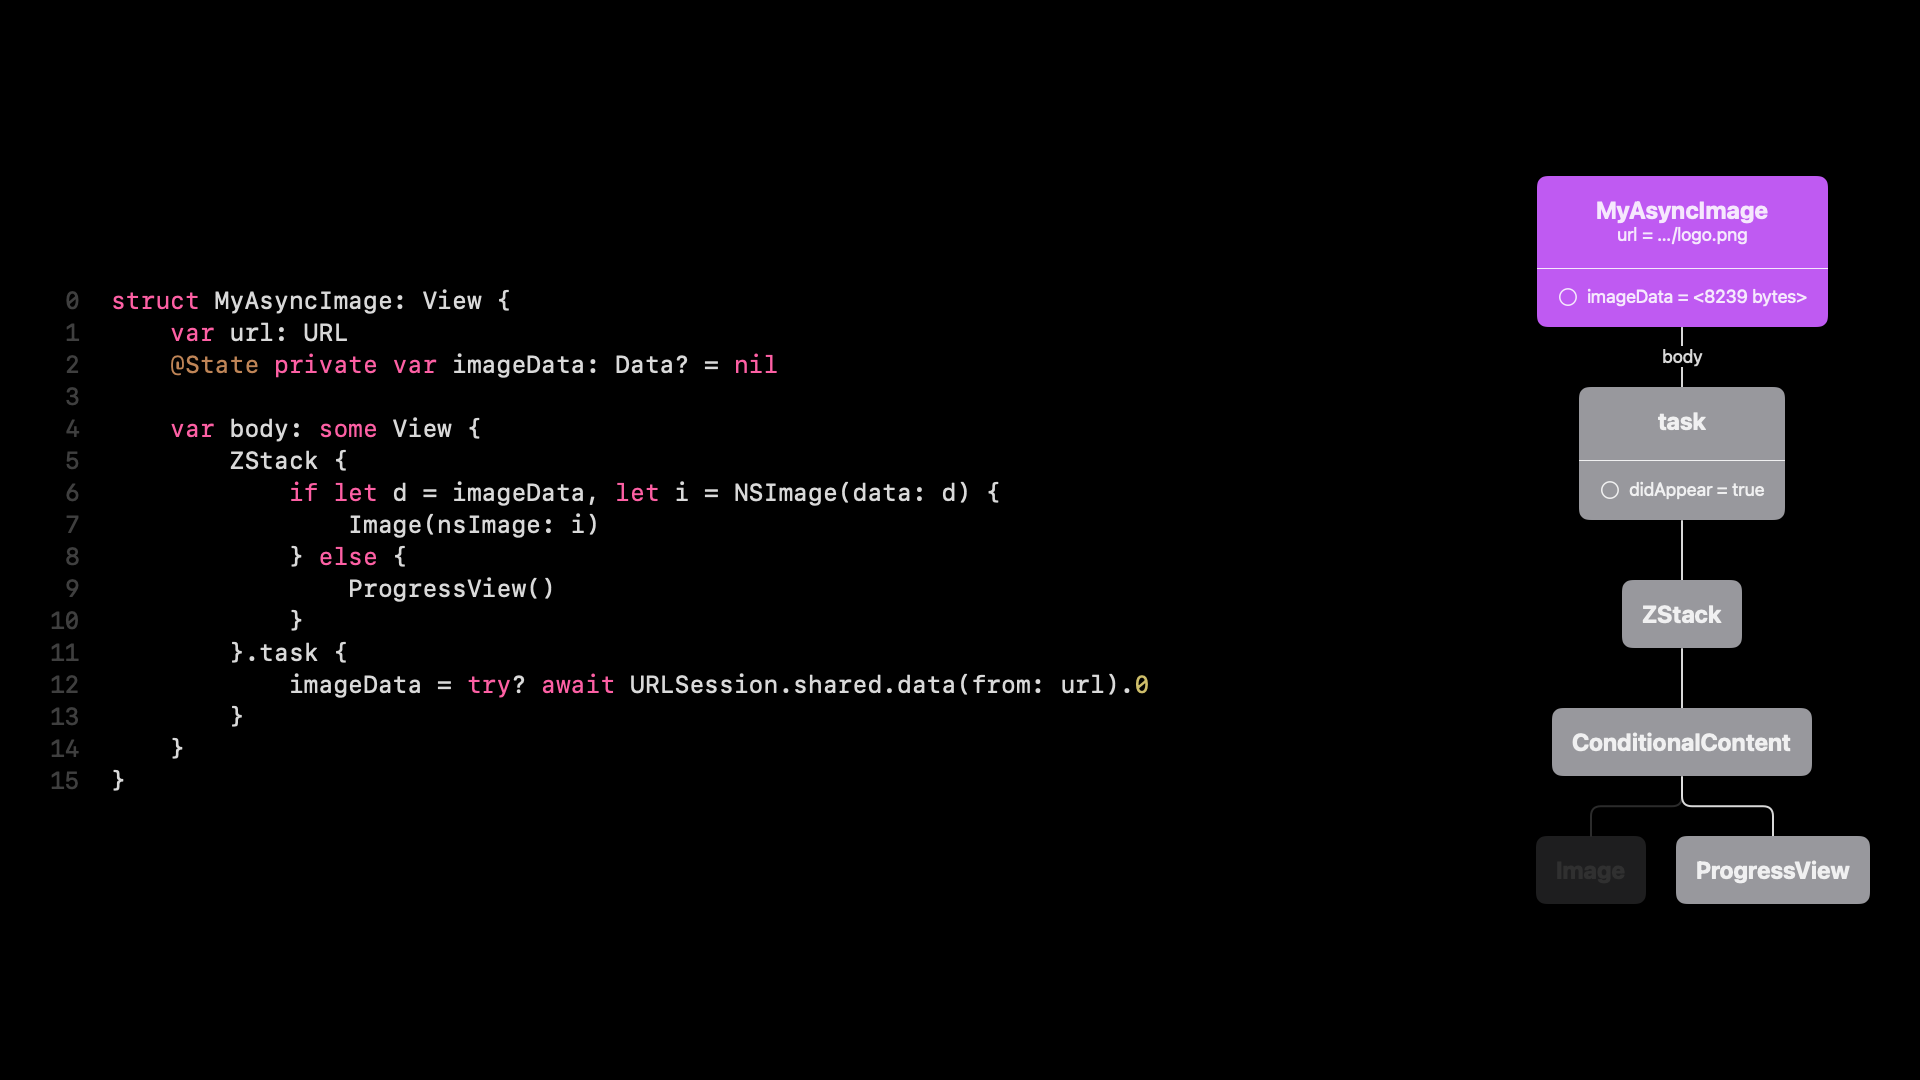
I made it gray here. It doesn’t throw this away. So remember, the render tree is persistent. It doesn’t throw away these nodes. It invalidates them, which means it needs to re-execute the view tree. And so we can look at the code and re-execute that view tree.
And then we get a new view tree.
And you can see here that there is a difference, right? In our view tree, we have an image node. And in our render tree, we have this progress view. I think one of the powers of SwiftUI is, of course, that we don’t need to think about adding subviews, removing subviews. This happens automatically. So as we update this render tree, SwiftUI will remove the progress view and all of its associated state and animations, and it will insert the image.
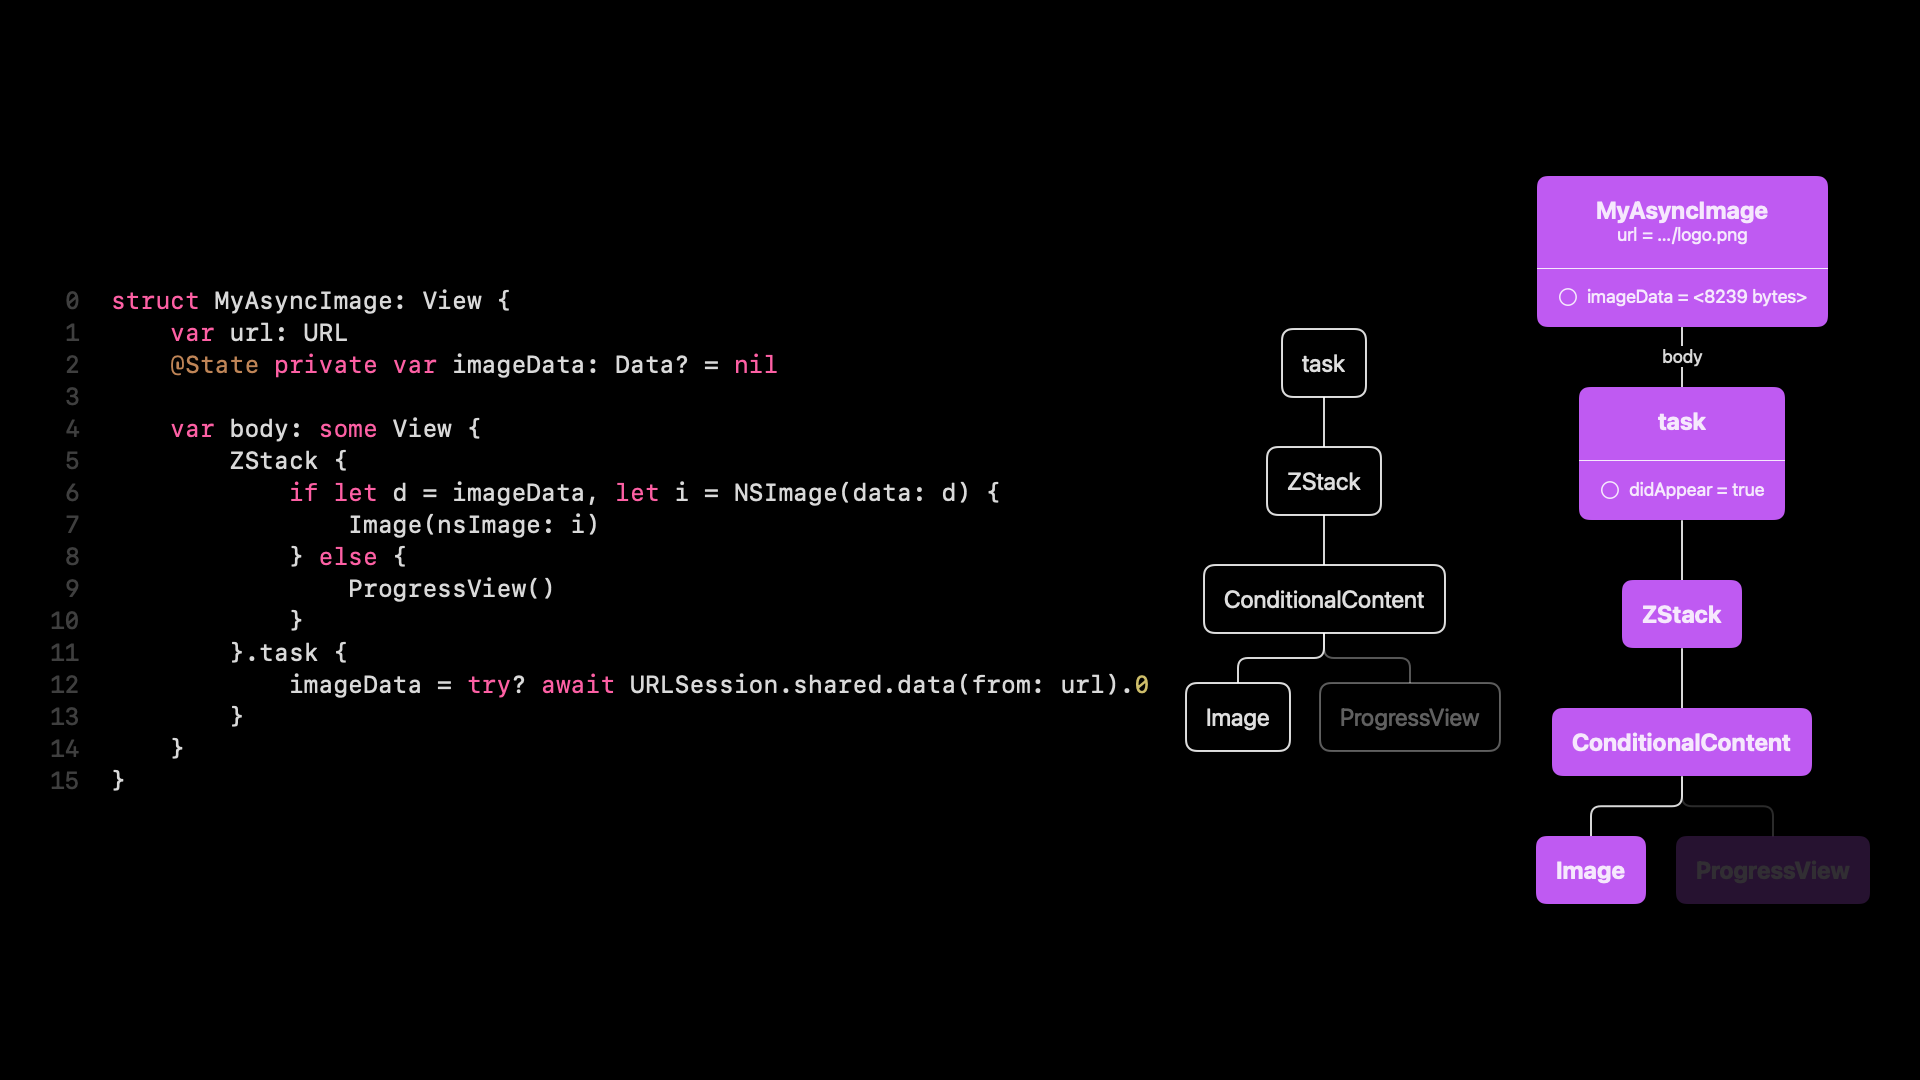
And both the removal and the insertions are transitions that happen in parallel. OK, so now we have our updated render tree, and we can discard the view tree. We don’t need it anymore. And all is good.
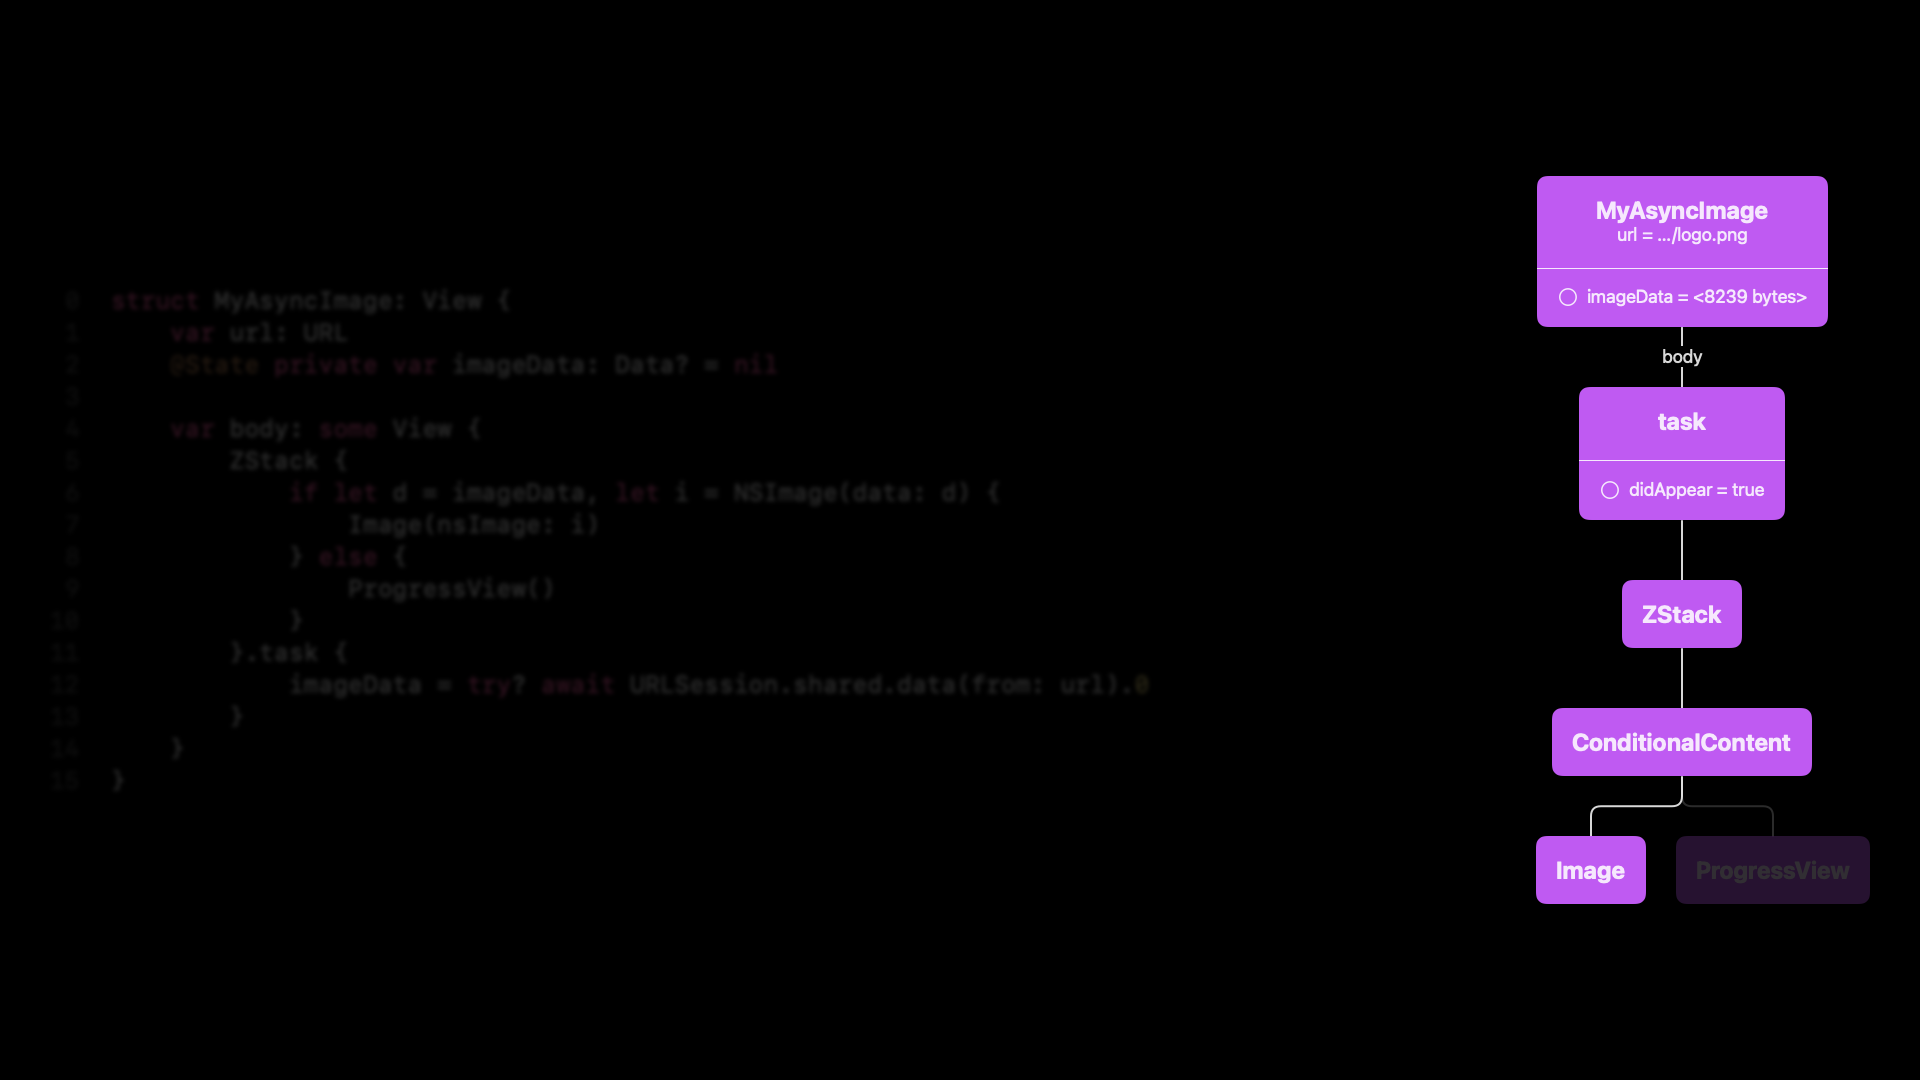
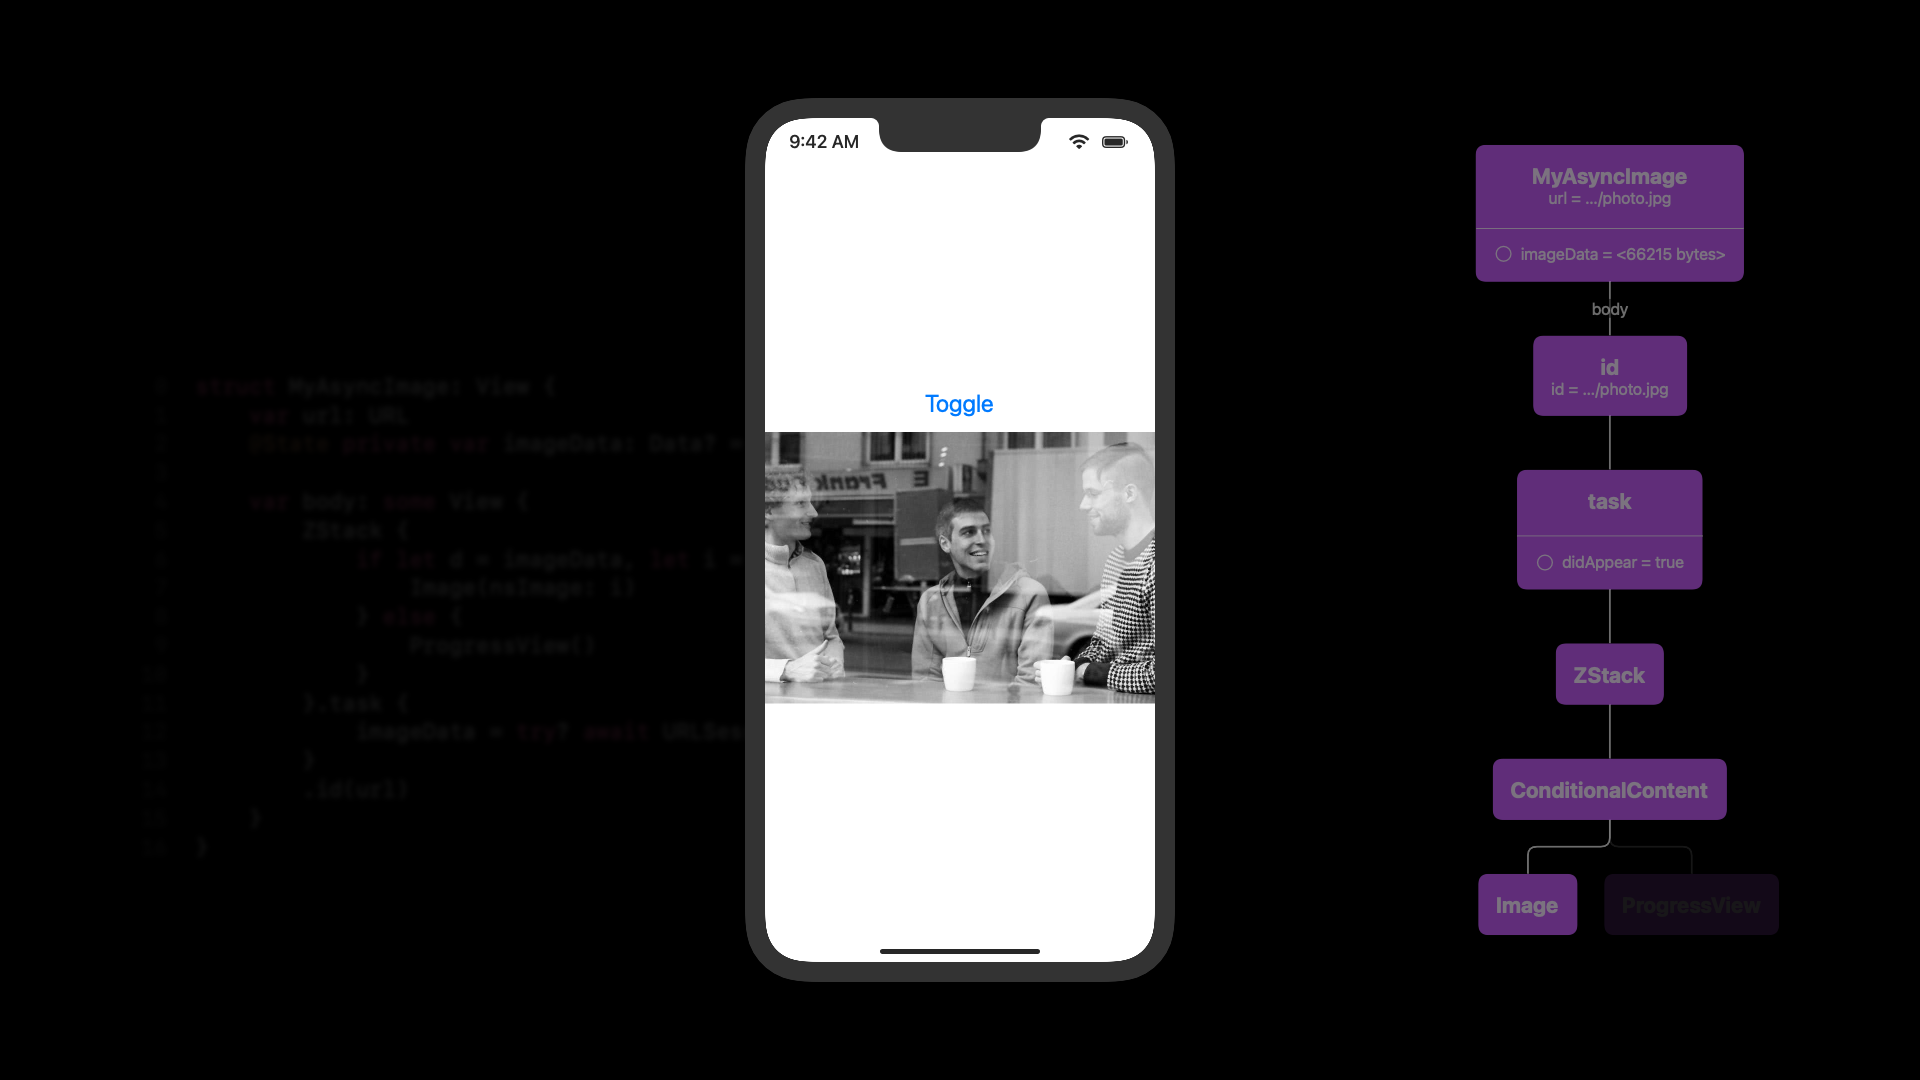
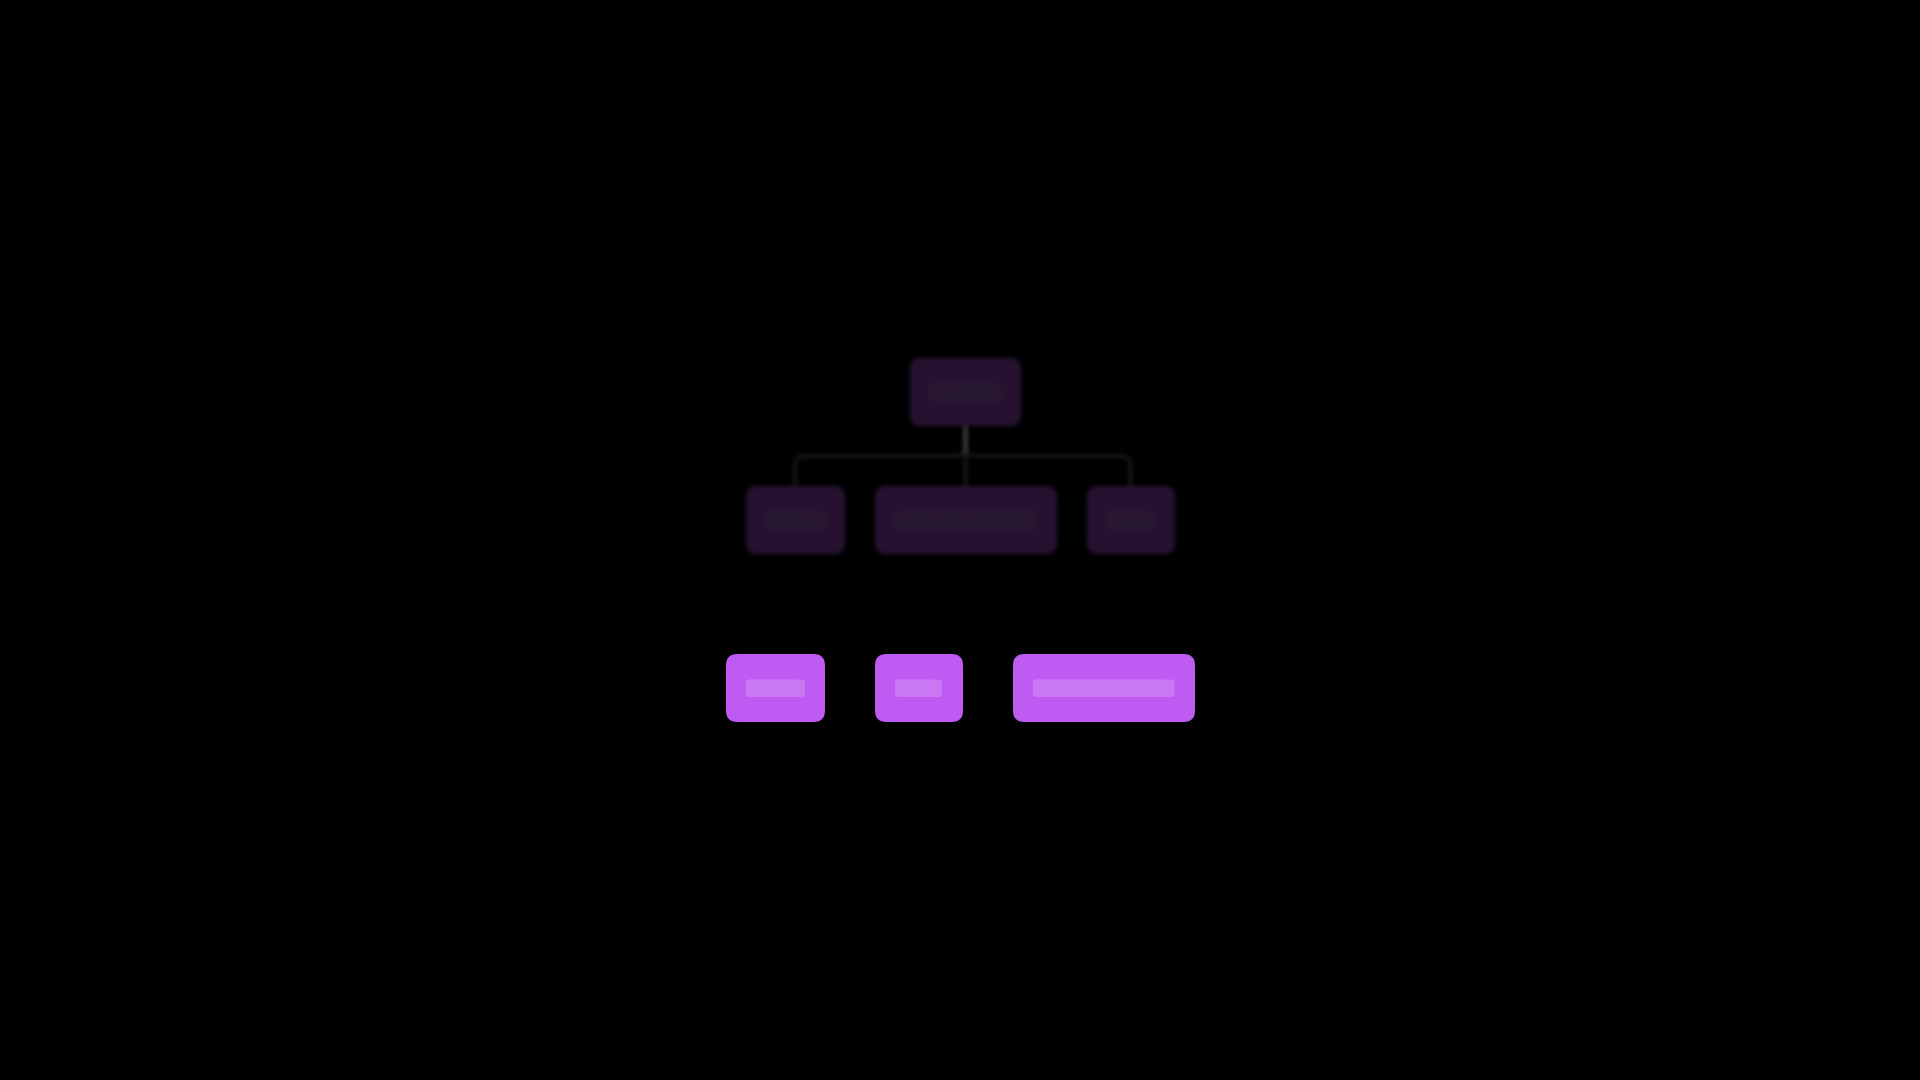
You can see the progress indicator and the logo loaded. So we’re done, right? Not quite.
![]()
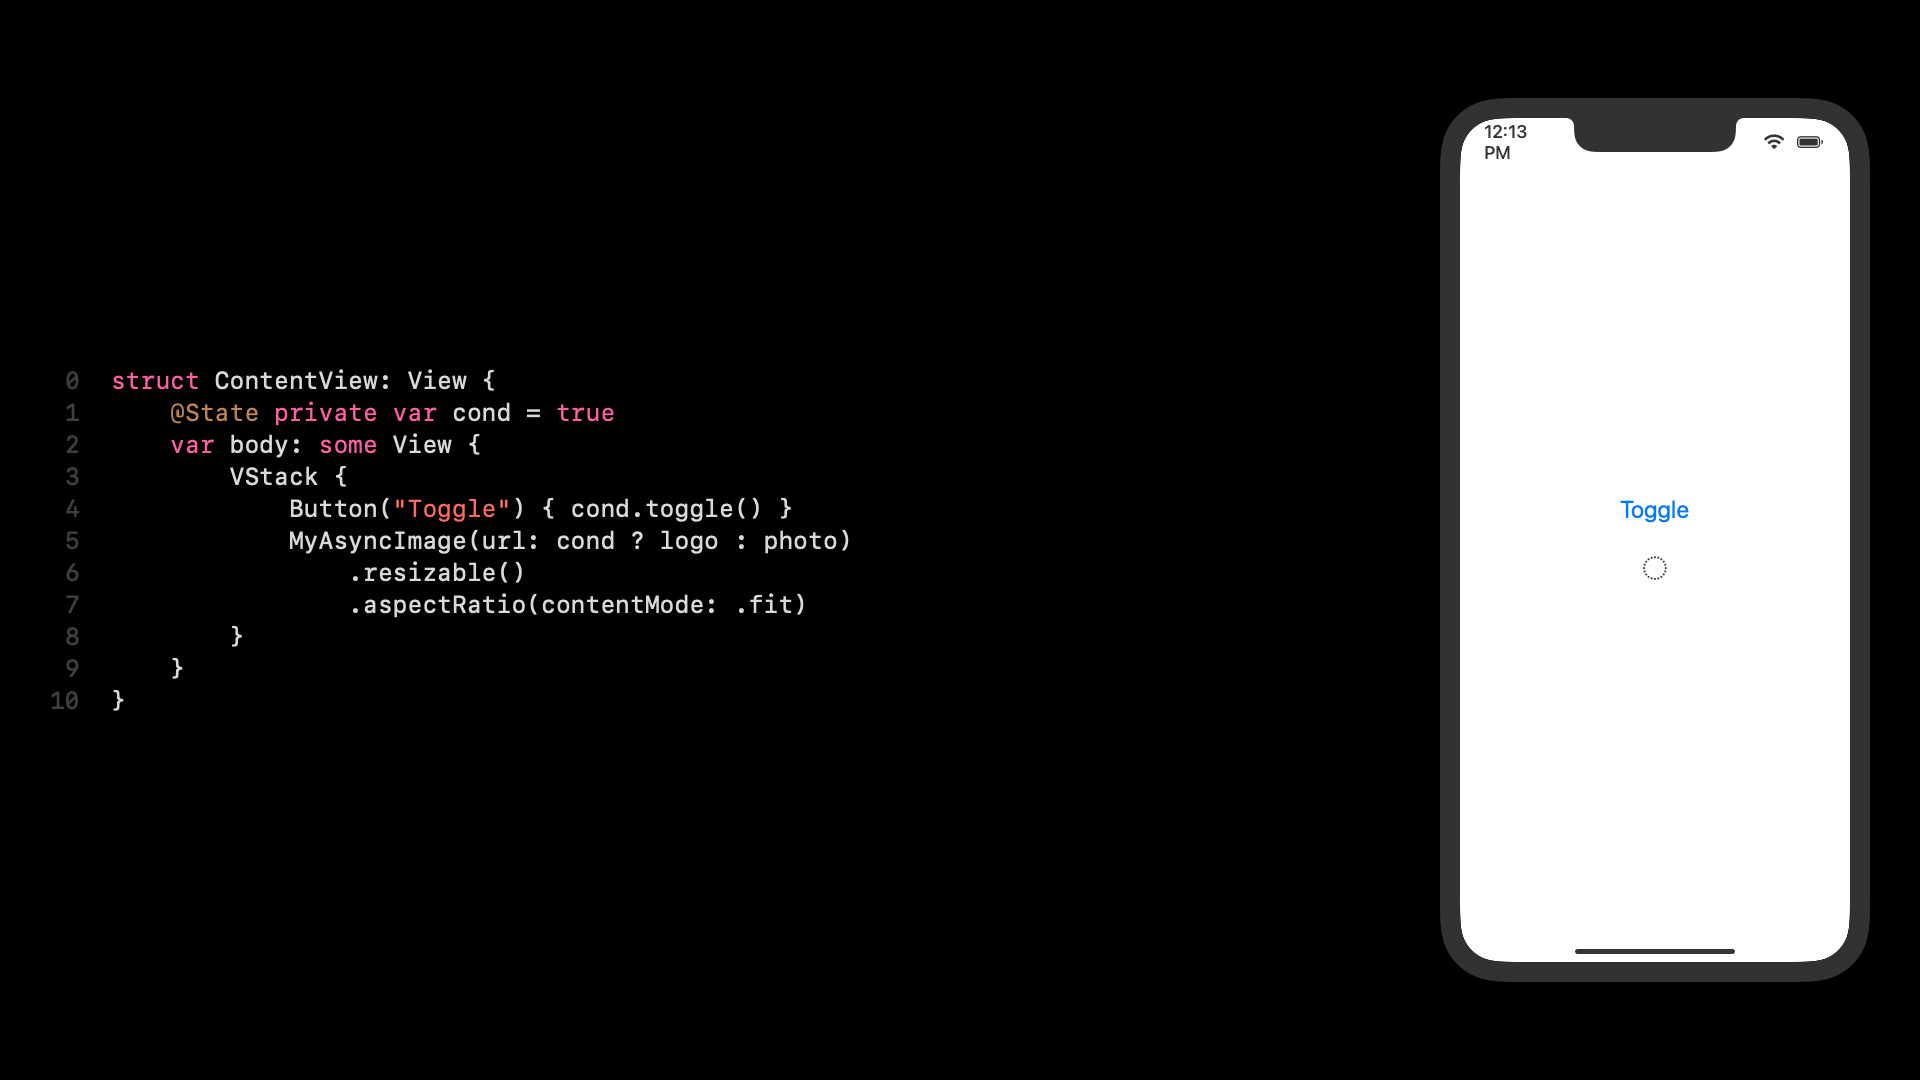
Let’s rewrite our content view a little bit. I wonder if anybody already knows the problem here. But we will see it very quickly.
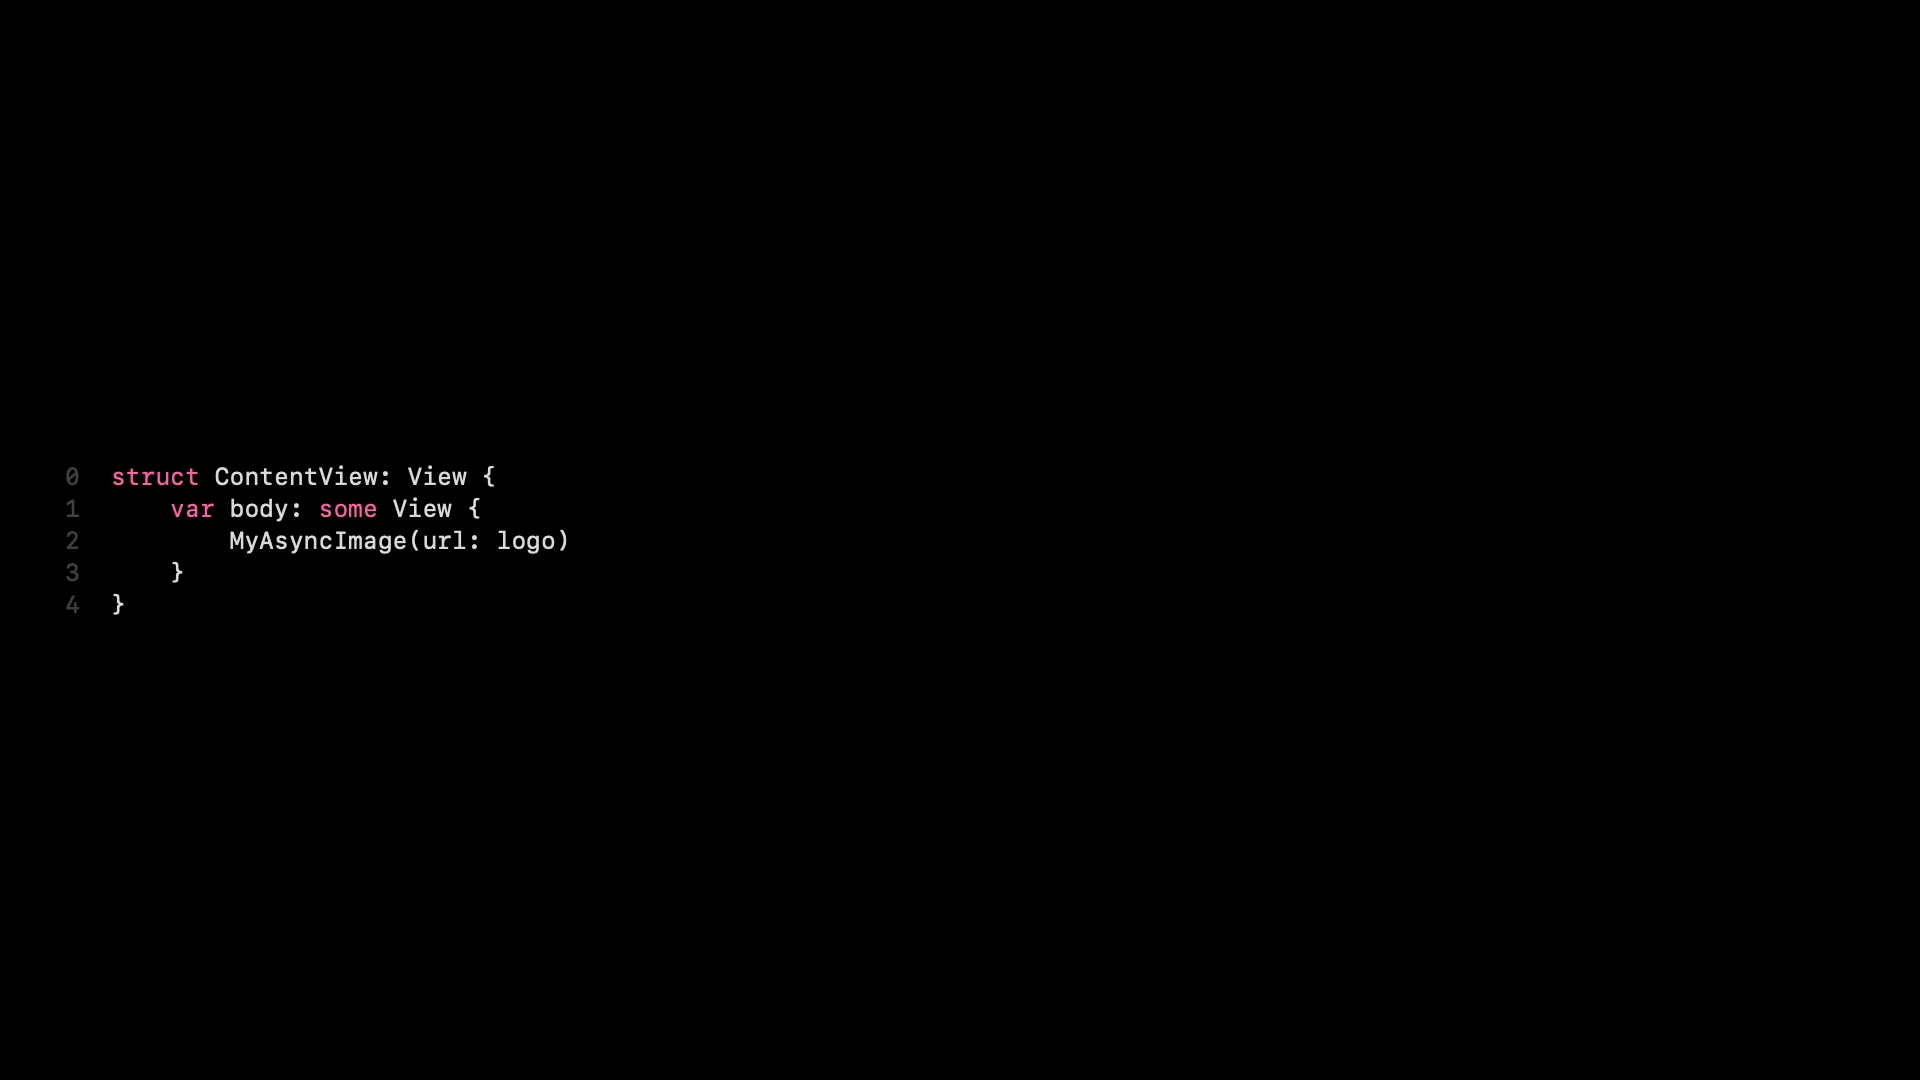
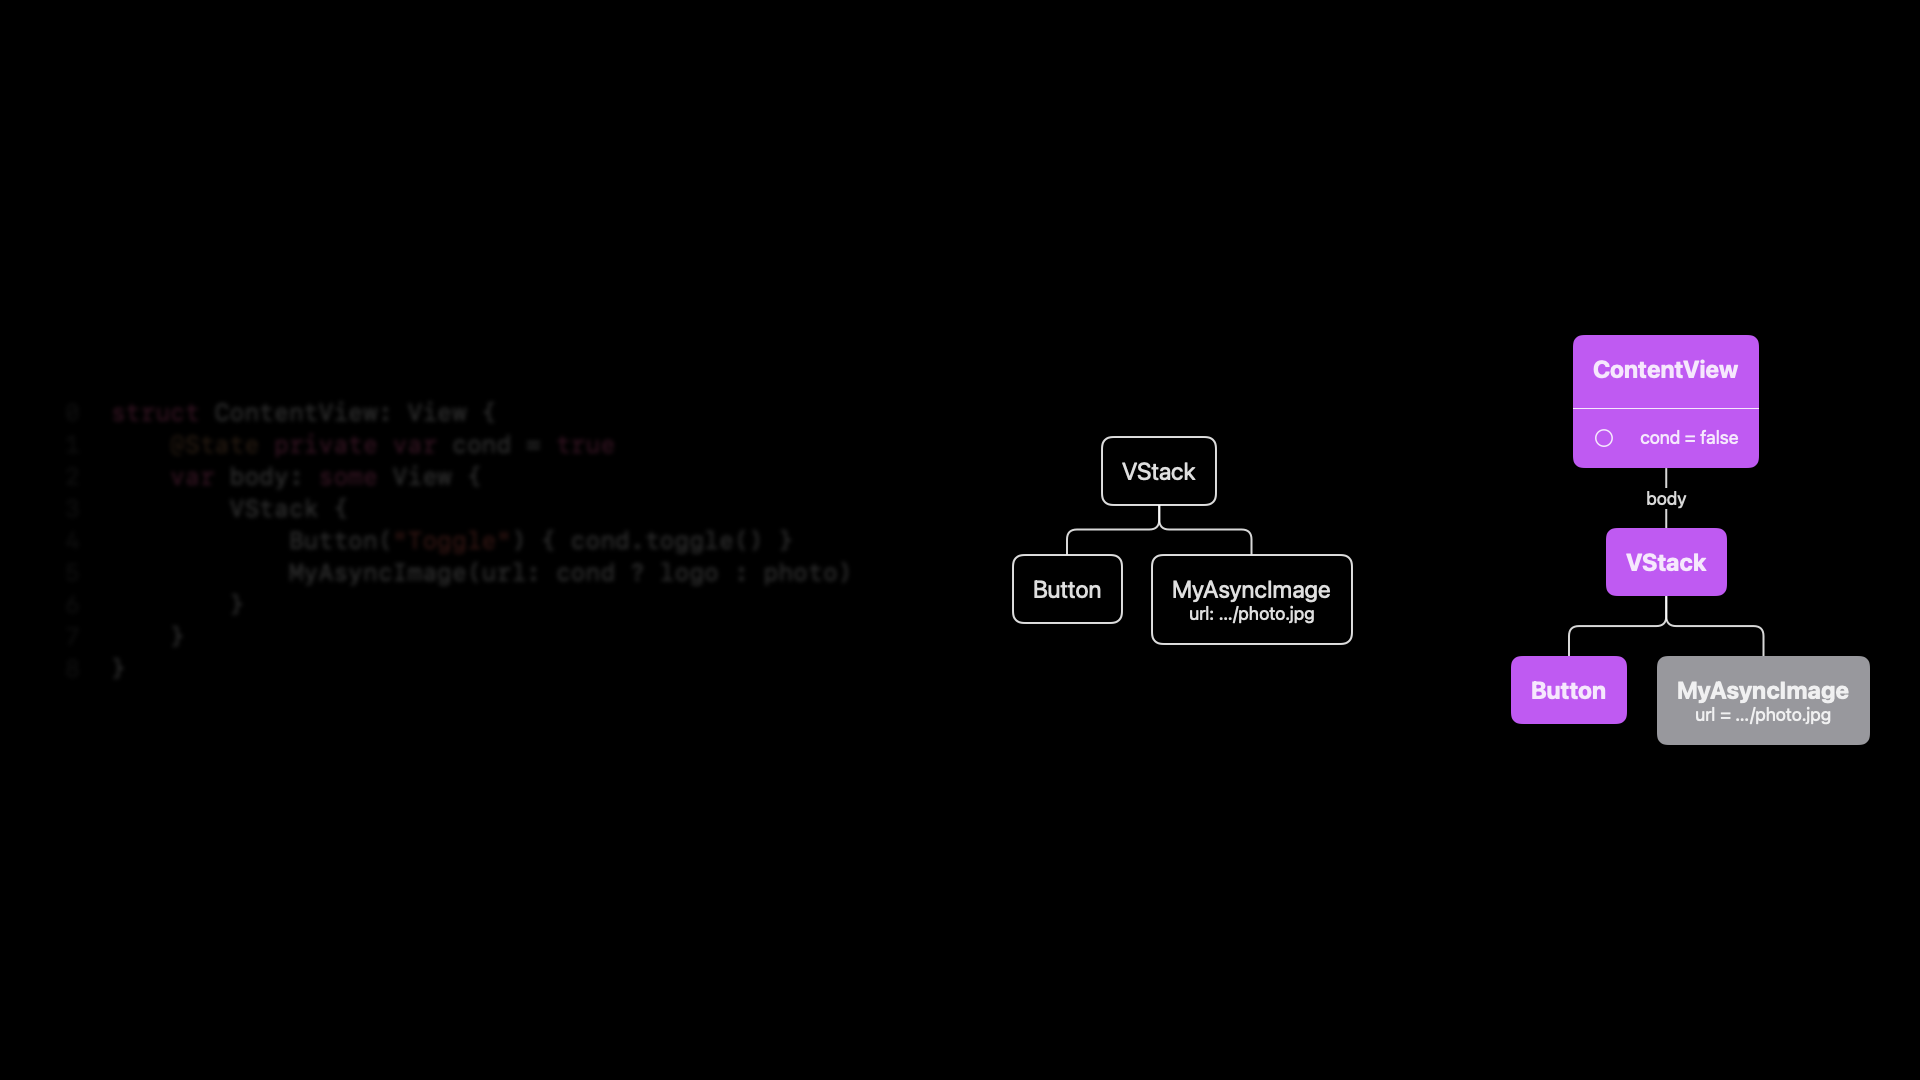
I’m going to add a state property here, just a boolean, so that we can swap out between two images. I’ll add a VStack and a button. And then this button toggles the condition. And then based on that condition, we display either the logo or the photo.
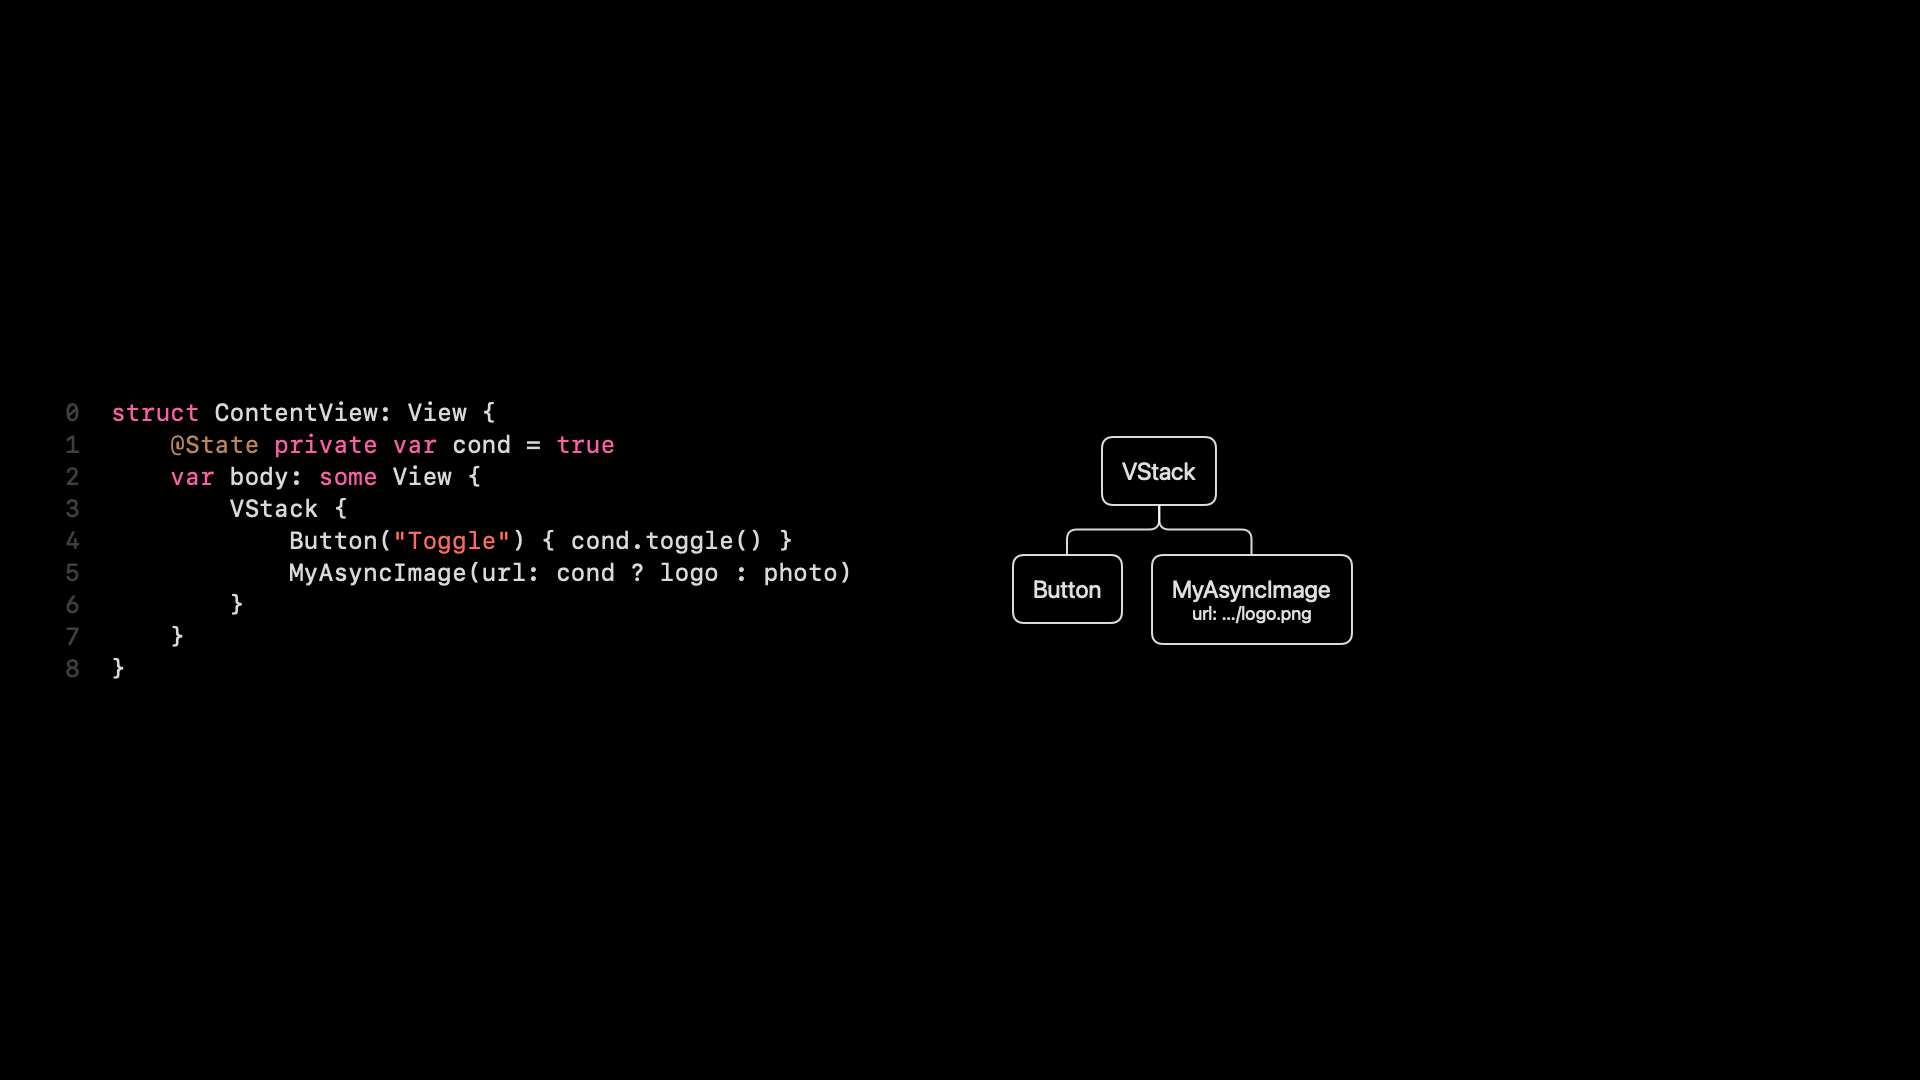
Now, when we run this, we get a view tree, of course. So we have our VStack with the button and the image. So it’s all fine.
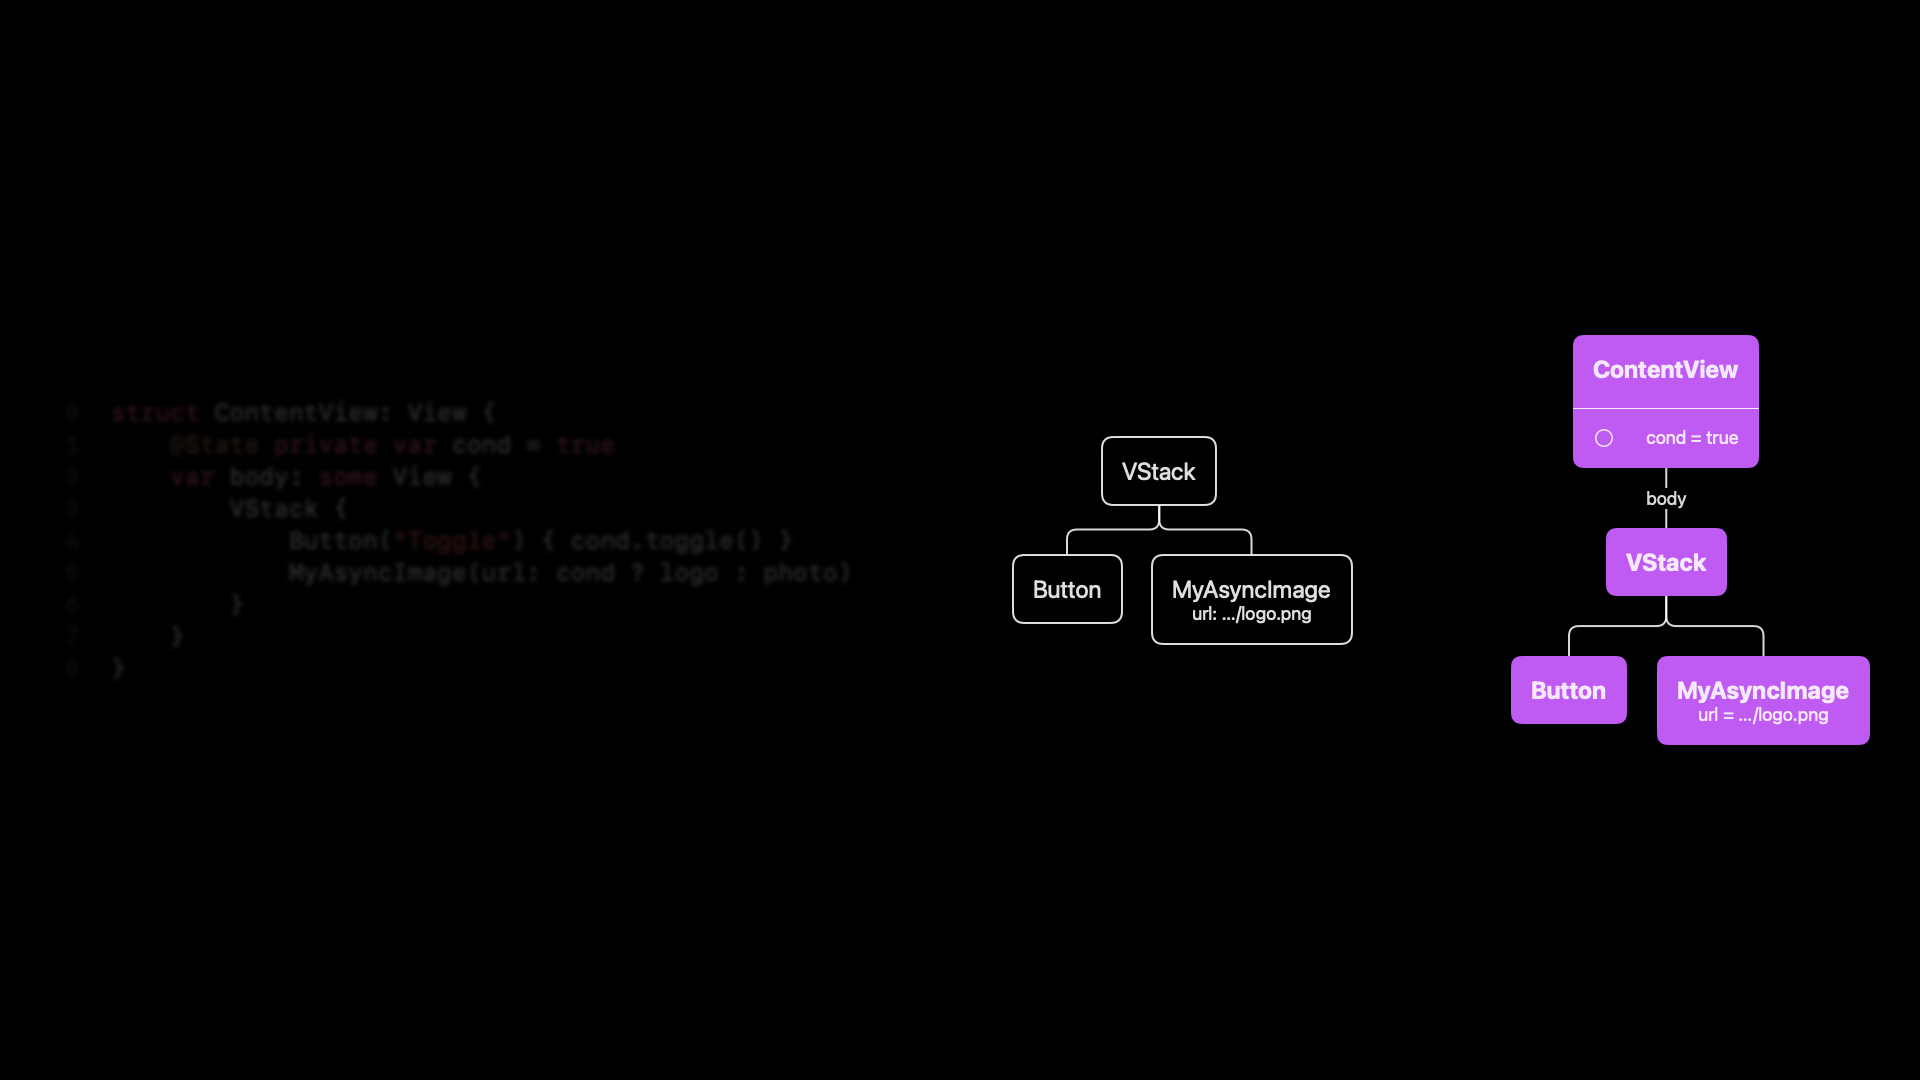
And we have a render tree. And initially, the condition will be true. And we have the same nodes as in the view tree.

So note that this condition, because it’s a state property, is now memory inside that render tree. So what happens next? So we have this render tree now, and it’s fine, and it’s good. And what happens when we change this condition? So let’s say it changes to false. It’s a bit subtle to see in the slide, but the condition is now false.
Whenever this happens, of course, SwiftUI invalidates the entire content view.
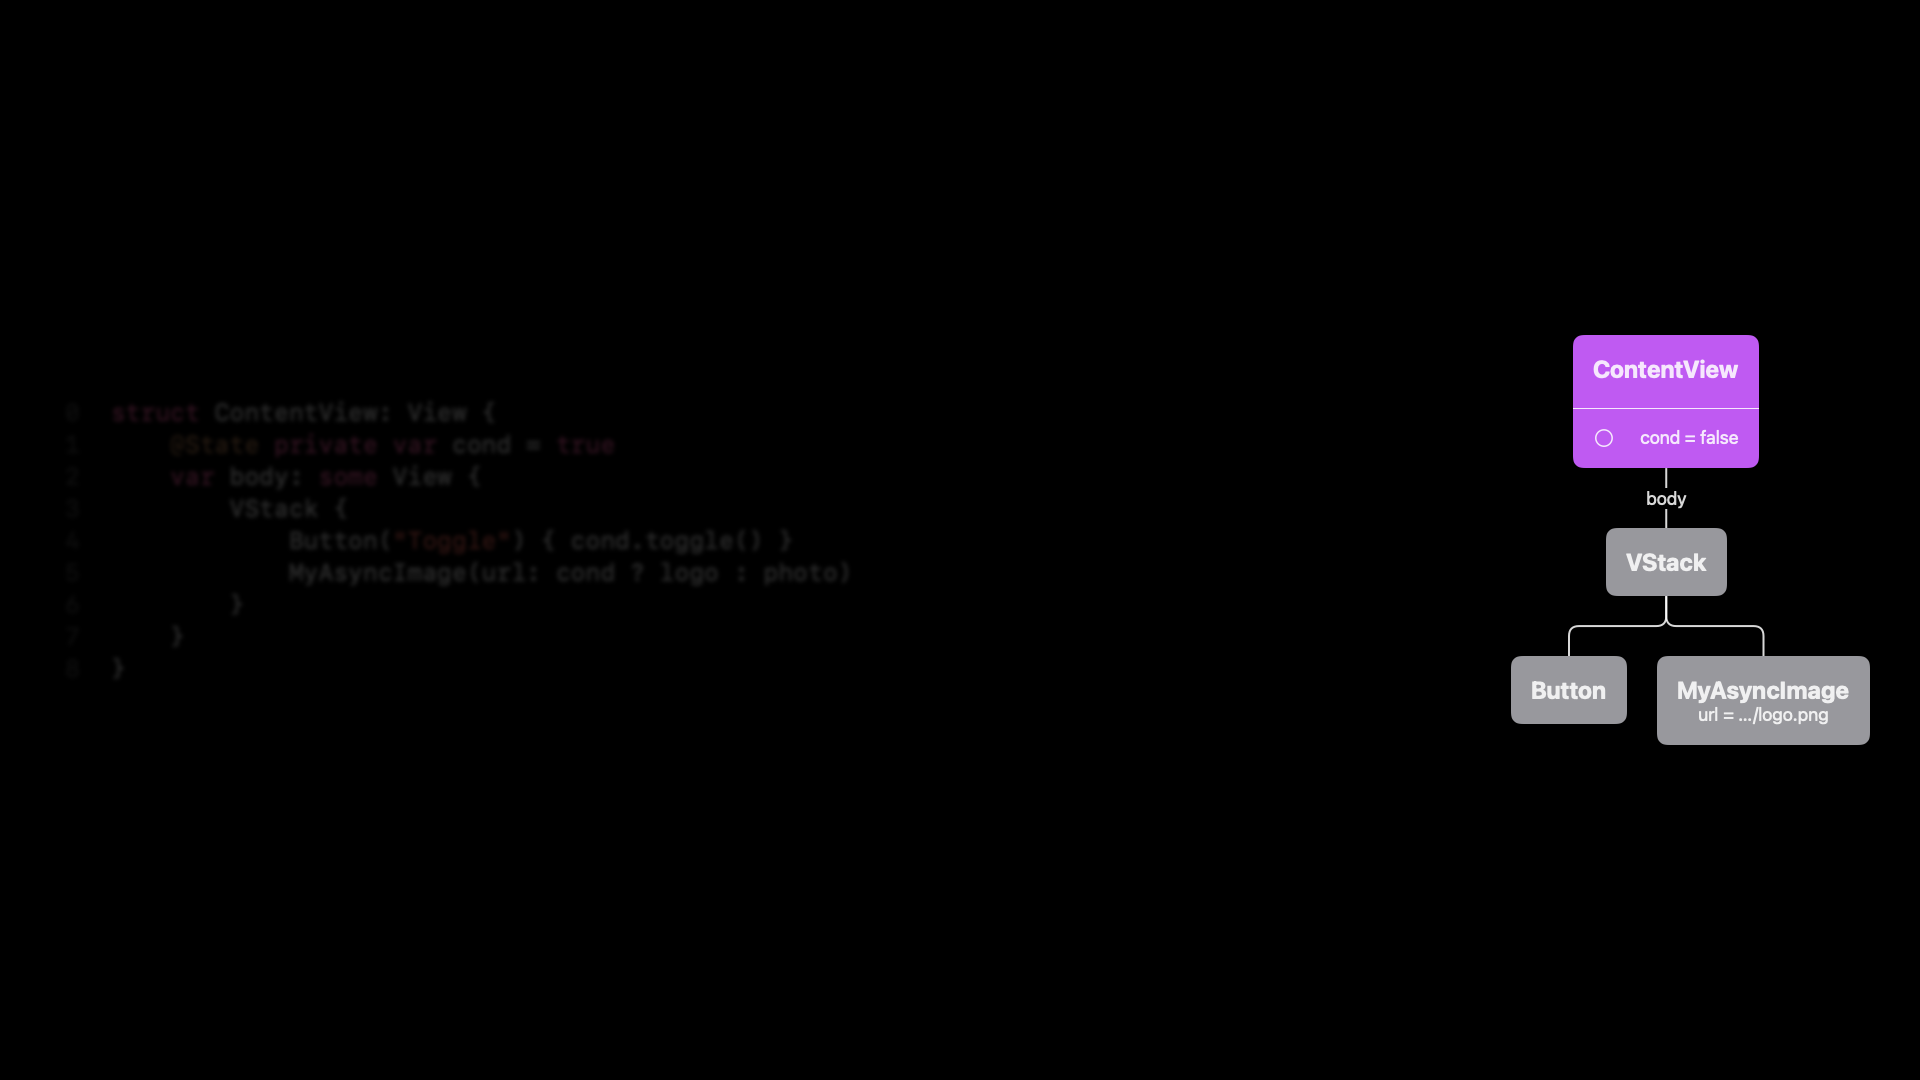
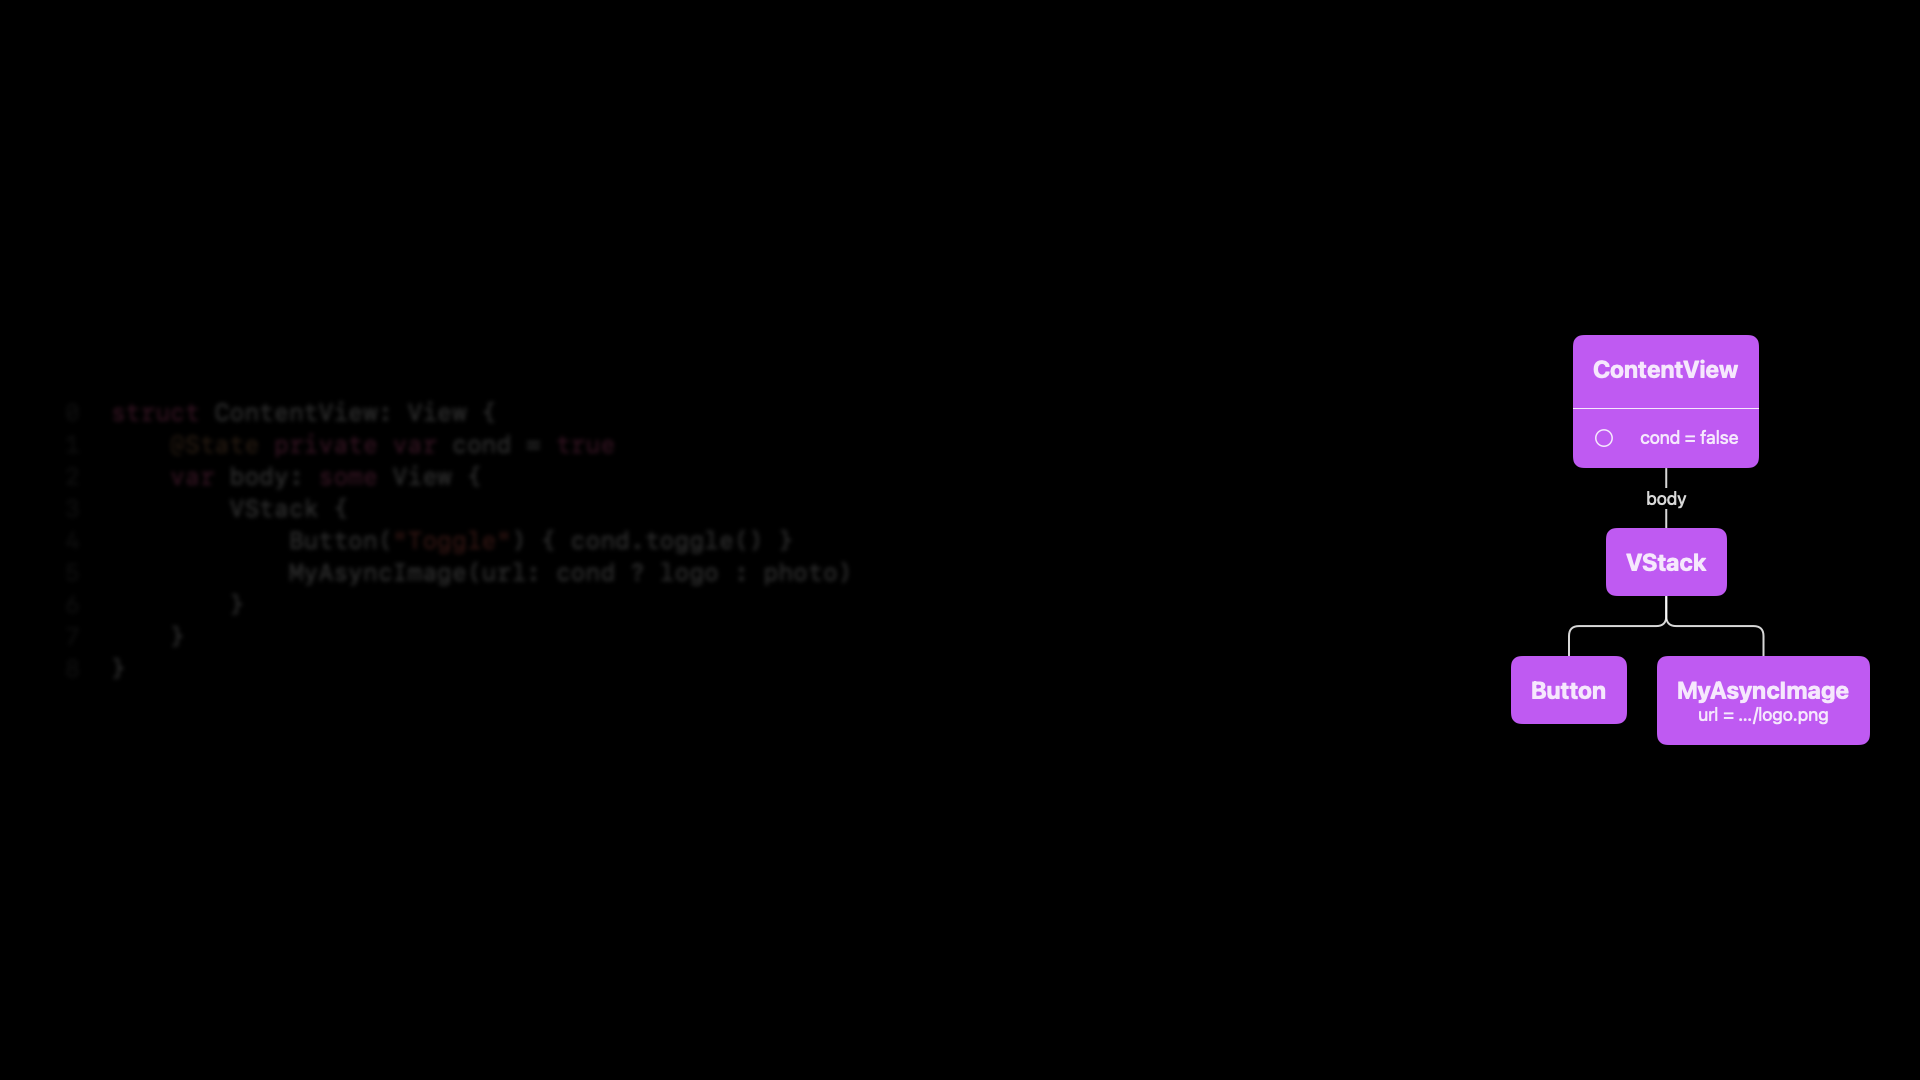
And so it needs to re-execute the code, come up with a new view tree. And now we can see there’s, again, a difference. In the view tree, it’s photo.jpg, whereas in the render tree, it’s logo.png.

SwiftUI can update the VStack and the button just fine. But of course, the MyAsyncImage is now invalid because it has a changed property.
We’re going to be re-executing that part. Before we do, let’s see what happens if we try to tap this button. It doesn’t look like anything is happening. And I can tap this as many times as I want. I tried this when practicing, of course. It doesn’t change. So we have a problem.
![]()
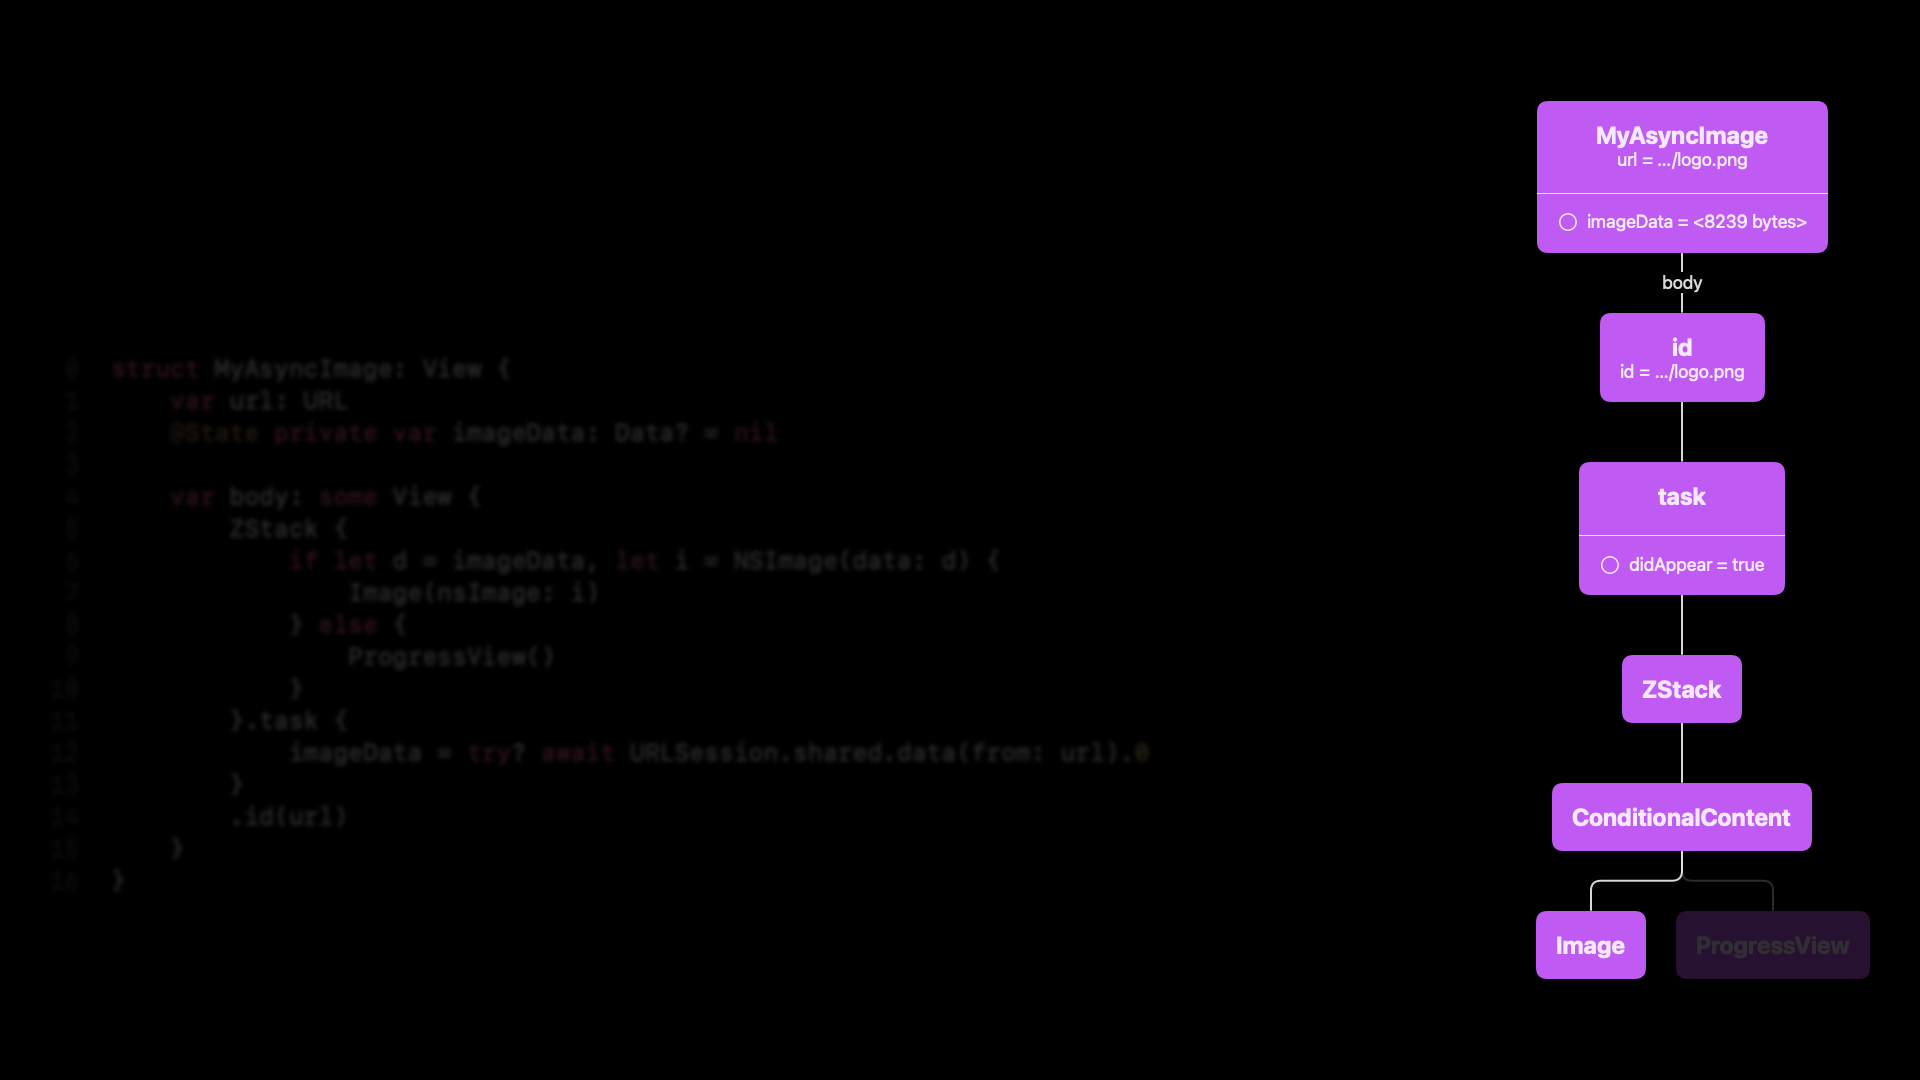
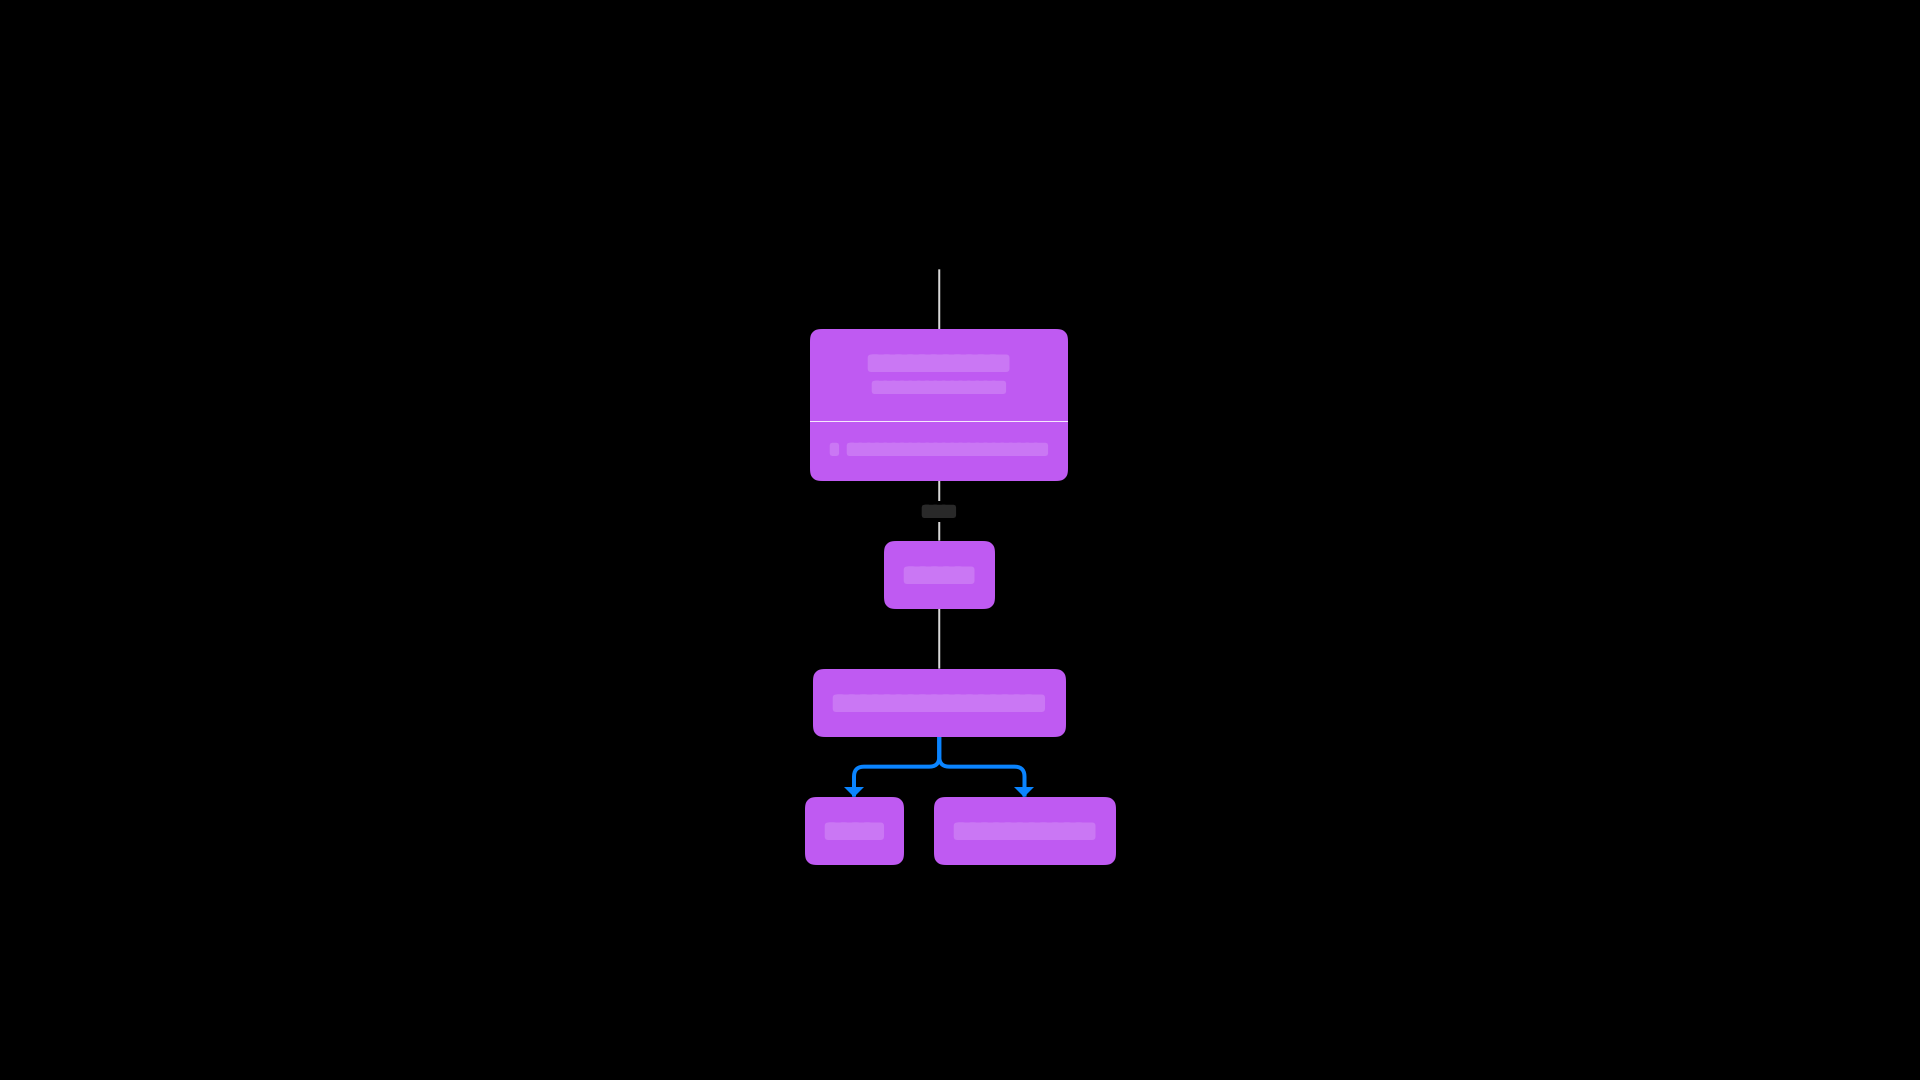
The problem is the implementation of our MyAsyncImage. So this is where we ended up with. I know it’s a bit much, but this is what we wrote in the previous slide.
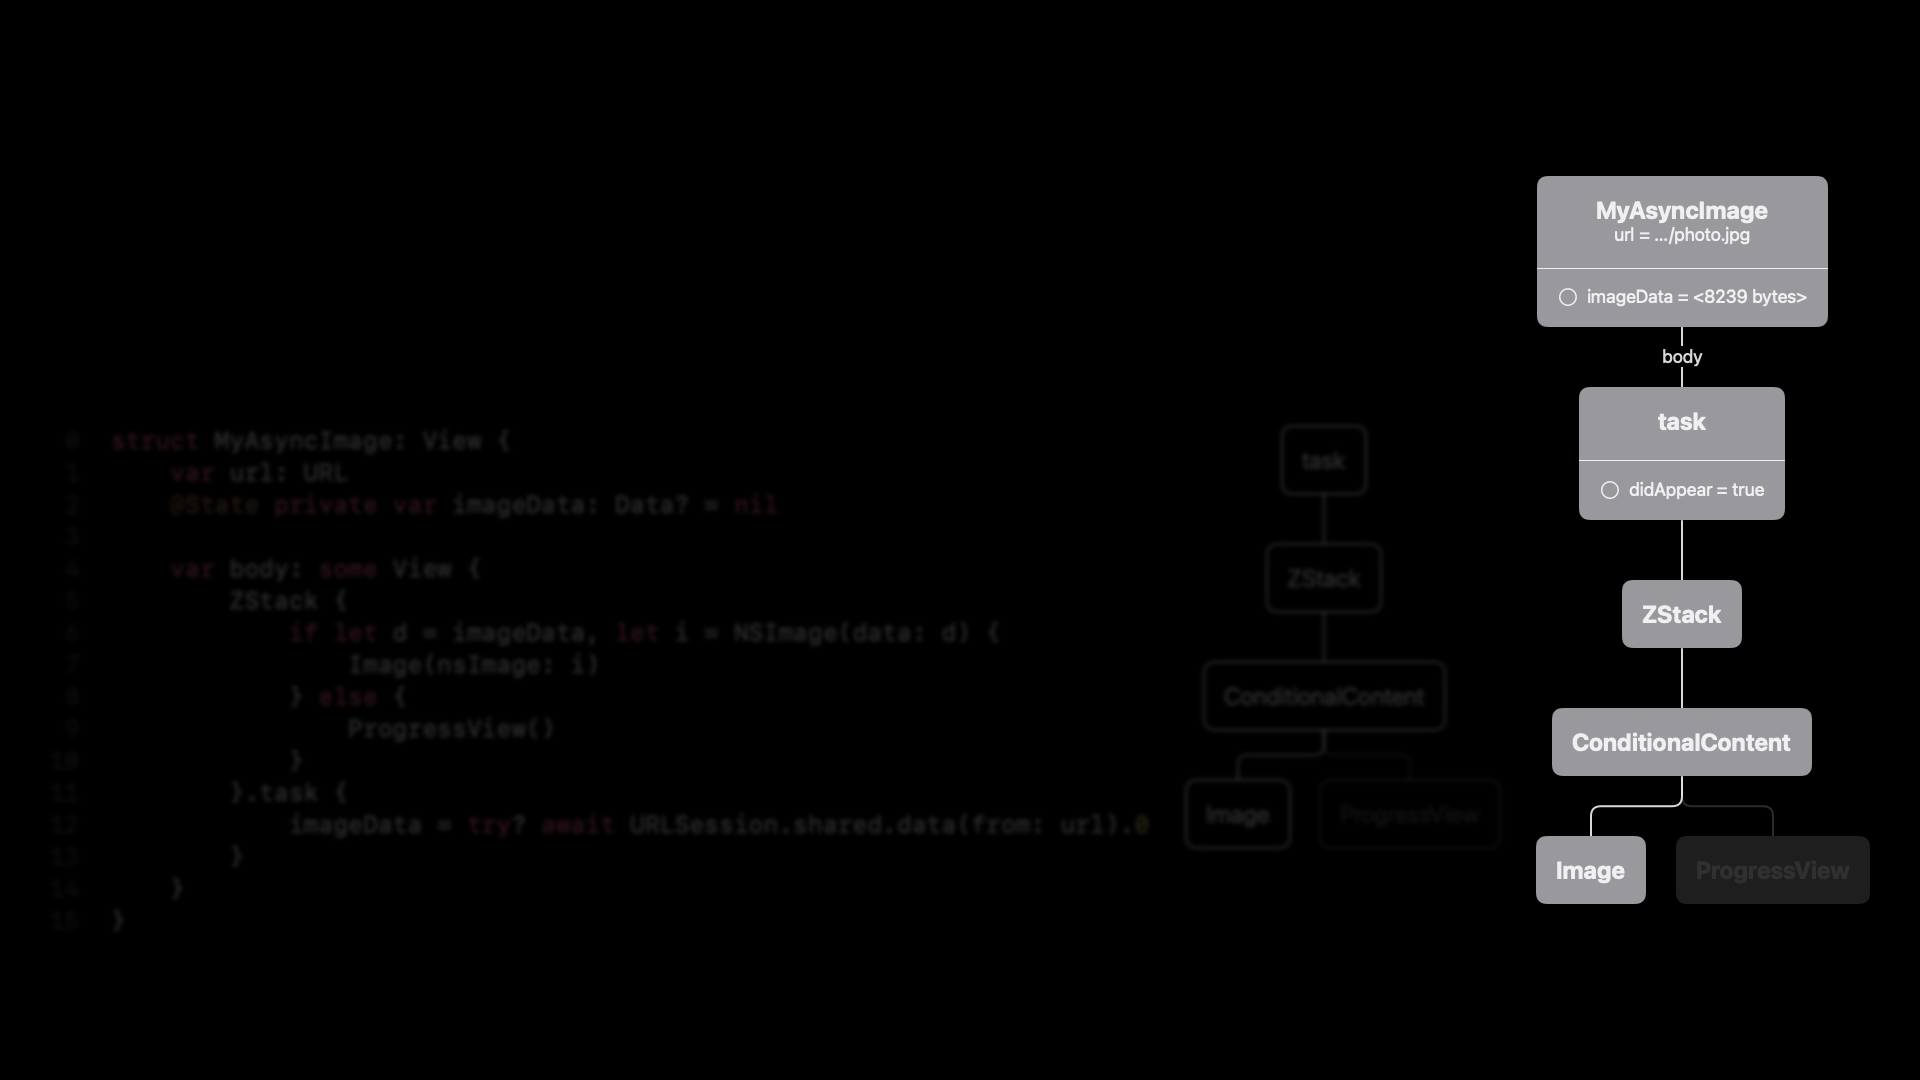
Here we have our MyAsyncImage. It now has this changed URL property and this image data. So that’s the old data, right, the 8,000 bytes. The task had already appeared. SwiftUI knows to re-execute the body. It looks at this code that we wrote earlier.
It executes it, creates a new task, a new ZStack, a new condition of content, and a new image.
The thing that it doesn’t do is re-execute our task . The task node is just updated with the previous value, but it doesn’t re-execute this task for us because it only updates the render tree from the new view tree, and it doesn’t execute this task. So it never starts loading that photo data.
This is a bit problematic. And we need a way to force SwiftUI to start reloading that data.
This is where the problem is. We have a dependency here. We have a URL dependency here that is actually dependent on the URL property in our struct. And whenever you have a dependency like this in an onAppear or in a task, you potentially have a problem. if you’re doing code review, pay extreme attention to these kinds of dependencies. The problem, I think, is even worse because it looked like our code was doing just fine, right? Like our initial implementation of MyAsyncImage seemed to work. Like there’s no obvious bugs at first. Only when we used it differently, it stopped working. And so I think that’s very problematic.
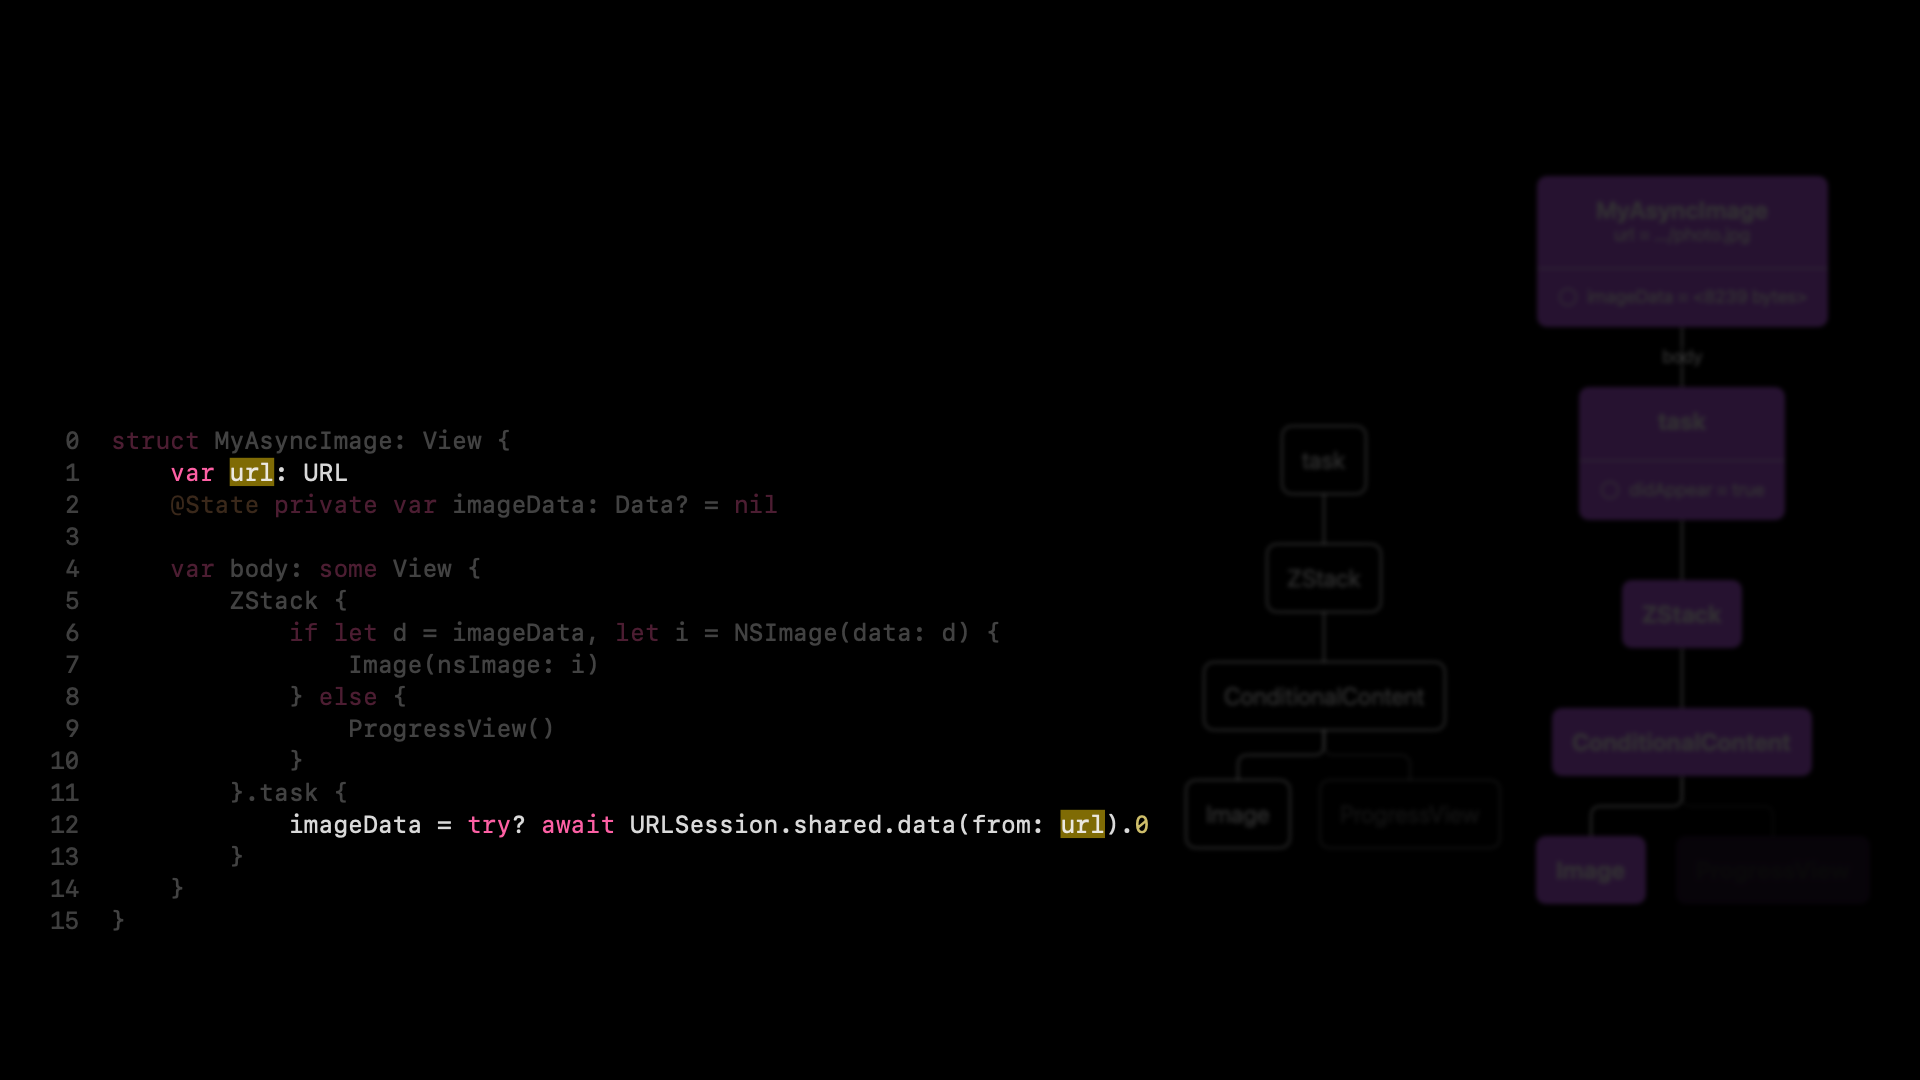
The reason is that we have this dependency, and we need to do something about that. One thing we could do is actually add an identity modifier, and I’ll add the URL as the identity.
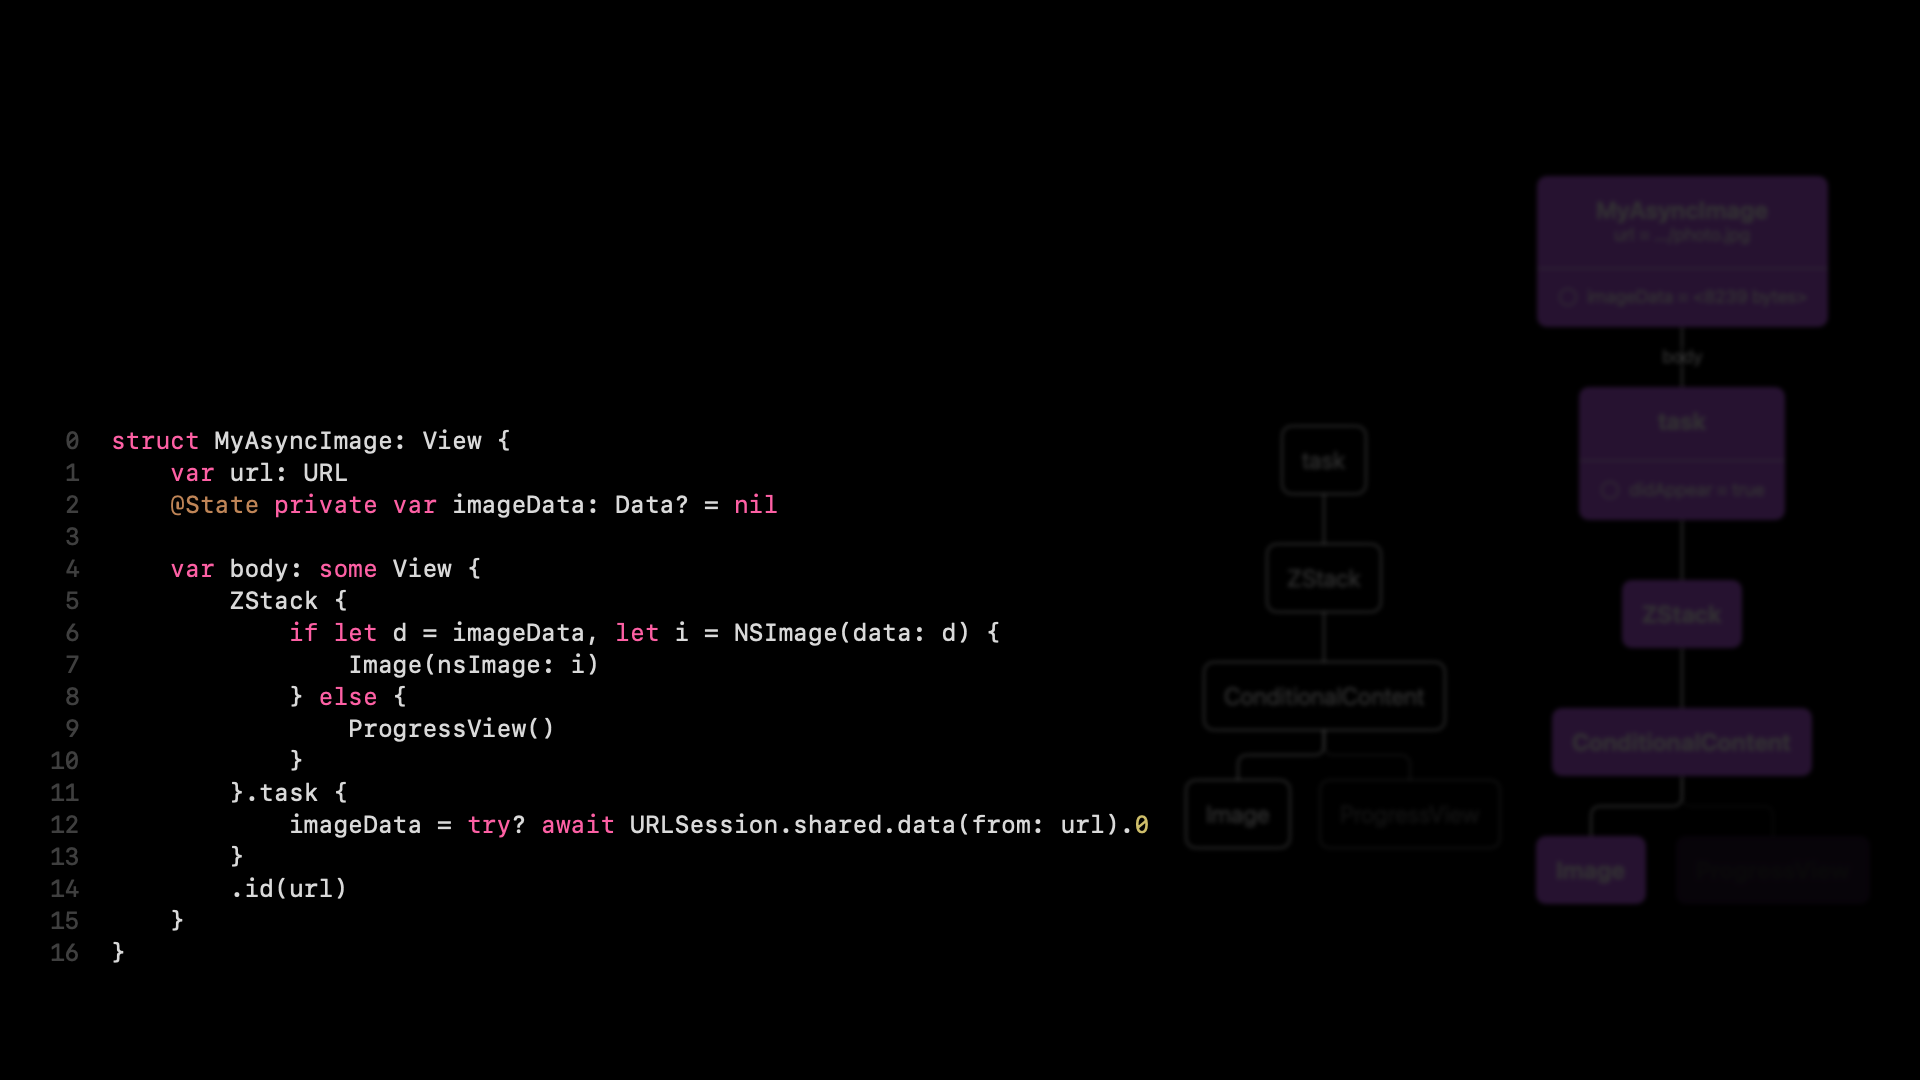
That will create a new root node in our view tree.

Now have this identity. And the same for the render tree.
The identity is now kept in the render tree. And SwiftUI knows if this ever changes, it needs to do something.
We displayed our logo, we have the data loaded, and we have the logo.png as our identity. And now we’re going to change to photo.jpg.

Our URL changes to photo.jpg, which means the view tree is invalidated.

And this is where it gets a little bit weird. SwiftUI constructs a new view tree with the new identity. And we can see the difference, right? In the render tree, it’s logo.png, whereas in the view tree, it’s photo.jpg.
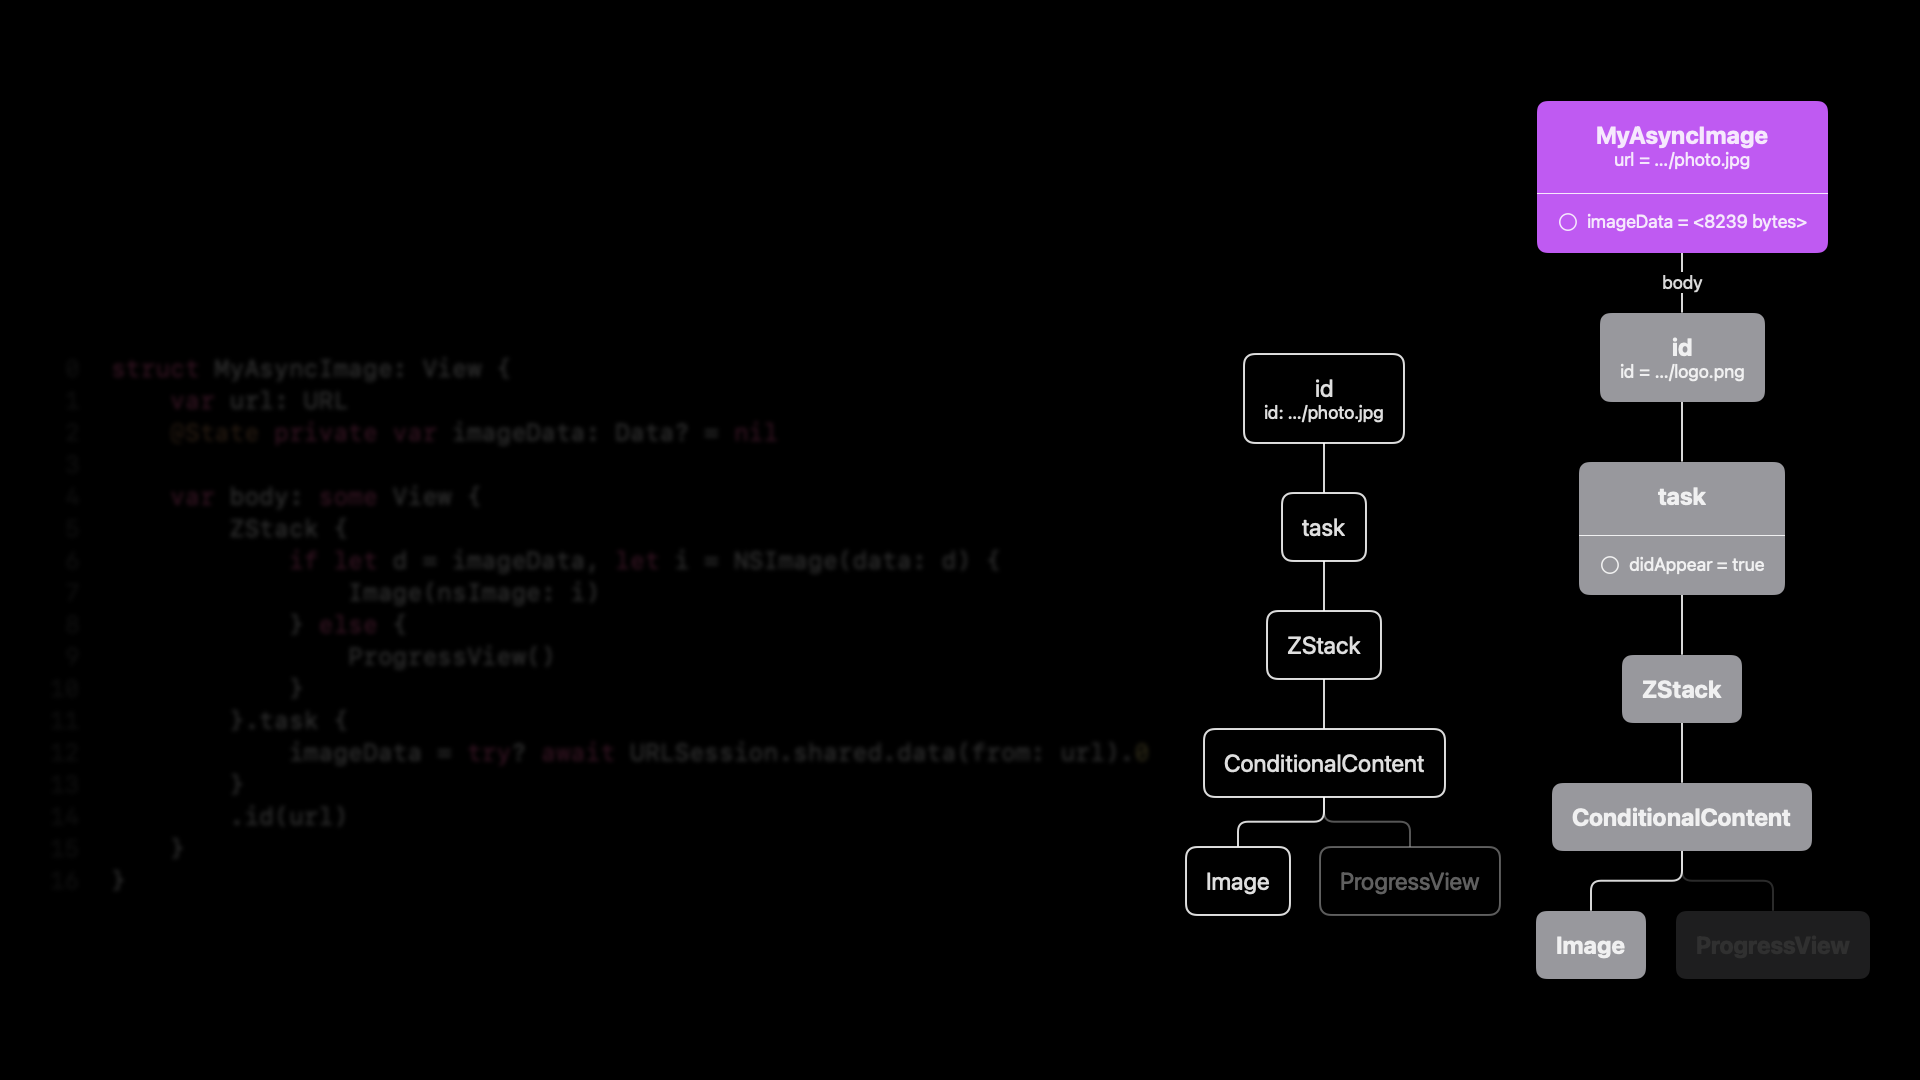
What happens next is pretty “brute force”. SwiftUI removes all of the nodes in the render tree, everything. This includes any associated state they had, any animations that were running, everything. And so you can really think of this as removing all the subviews in UIKit and any state that they have associated. And these objects are completely gone.
The good thing is that, after they’re removed, SwiftUI adds them back again, but as fresh instances. And now our task has the didAppear set to false.

So that means that when this view first appears on screen– so let’s say the rendering is complete and the view appears on screen– it will start a new task. So we can see the didAppear is now true. The task has been created.

And when it runs, it loads the data. It updates image data, which is now 66 kilobytes.
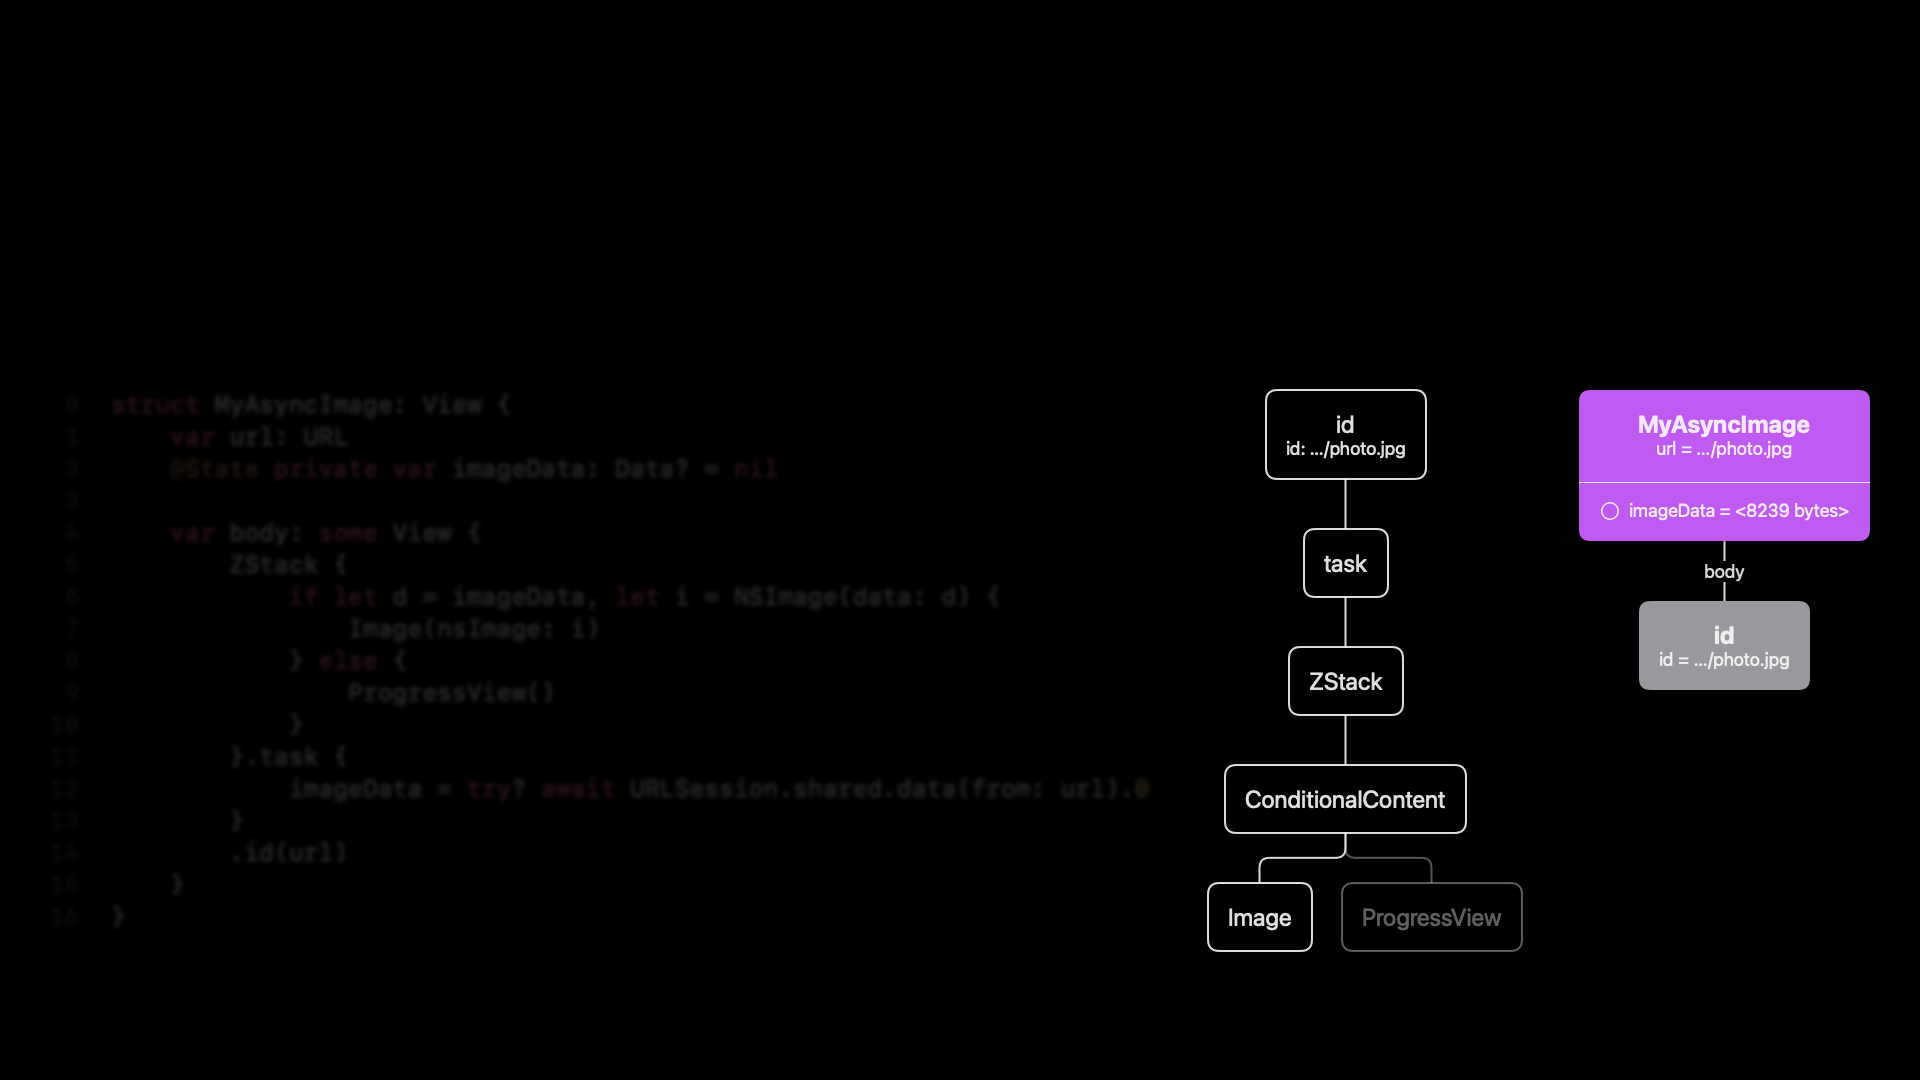
Because the property changed, the render tree is now invalidated, and we need to construct a new view tree.

And then SwiftUI constructs a new view tree the same ID in this case, the task and the ZStack and conditional content are the same. What’s hard to see here is that we now have loaded the new image and we can display that.
SwiftUI will update our render tree with this new image and all is good. Let’s see if this works.
We have our logo that we load. And if we tap the button, it starts loading the photo. And if we tap the button again, it starts loading the logo and so on. So it seems like now we’re good. One of the problems, of course, is this identity modifier. It’s not nice to destroy all these nodes. It feels wasteful, and we should do better than that. So let’s take a small step back.
If we would have used onAppear, you can use exactly the same technique. You would have had the same problem that you depend on the URL, and you can use the same technique to make onAppear work. But for onAppear, there is a simpler solution. You can use onChange(of:). And I always use these two in combination, onAppear and onChange(of:).
onAppear runs when my view first appears, and onChange(of:) whenever this URL changes. In fact, this is so popular that people have been writing extensions that combine the two, so onAppear and onChange(of:). And in fact, even Apple saw this. And as of iOS 17, we can write onChange(of:initial:).
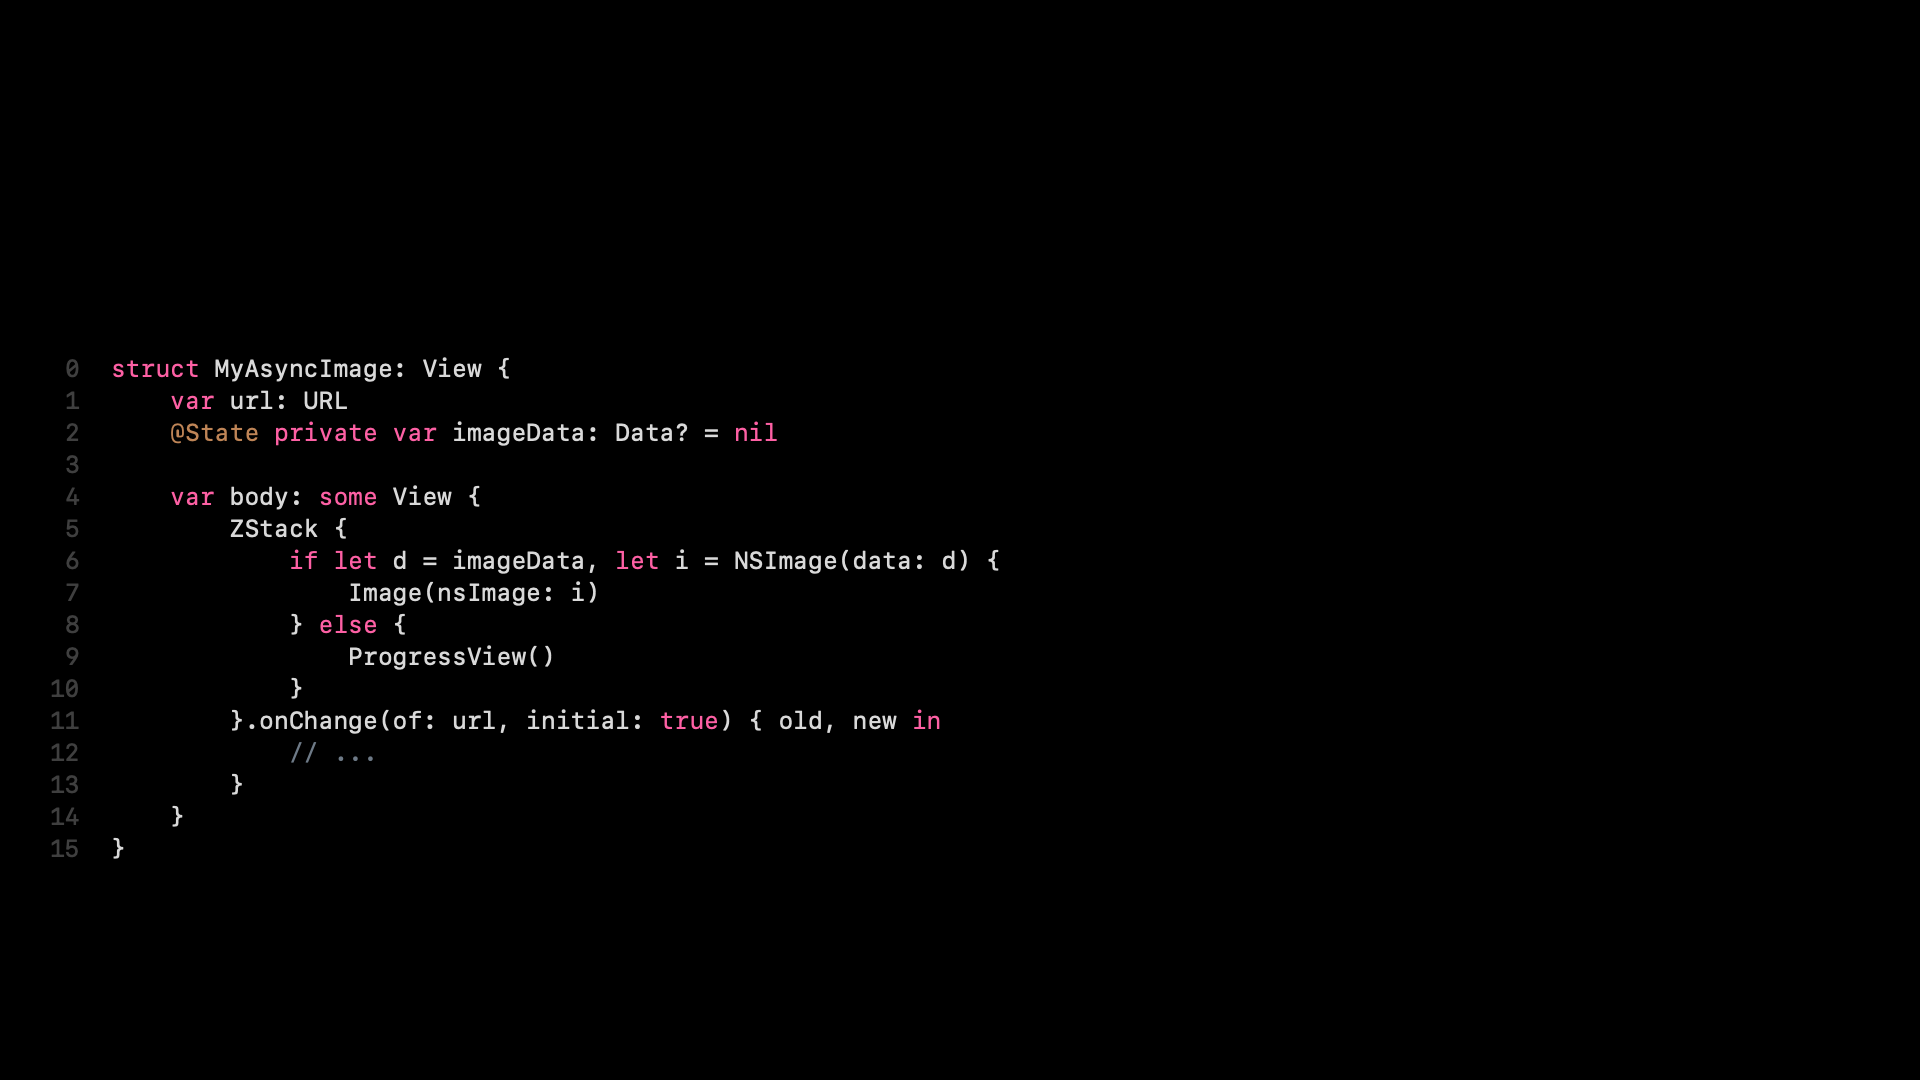
And that will basically combine both of these two calls at once. Unfortunately, it’s iOS 17 only and macOS 14. But you can easily write this yourself. Now, we were stuck with our task.
For tasks, there’s also a very simple solution. And we can actually move this identity into the task and give the task identity. So we can call a different version of the task modifier and pass in the identity.

What that will do is any time this URL changes, it will re-execute the task without having to destroy that entire render tree.
So we can check that this works. So here we have our render tree. It’s all photo.jpg. And now we can look at the simulator, see that this still works, our updated version. So yeah, it seems fine.
There’s one more problem with this code, and that has to do with a different subsystem of SwiftUI. If we turn on the blueprint 1 mode of the simulator, we can see that this photo stretches beyond the simulator. It’s much wider, and we want to display the entire photo.

And this is problematic. It looked fine at first, but we want to display that entire photo. And to understand this, we need to look into the layout system. And the first layout slide is a bit boring, because most of these modifiers don’t do anything.

But the concept here, when we’re talking about SwiftUI layout, is that SwiftUI proposes sizes to views, and then views report their own size back. And they can do anything they want with this proposal. They can conform to that. They can do their own thing or partly take the proposal into account. So in this case, we’re going to be proposing the entire safe area to our MyAsyncImage node, because let’s say that’s the root node of our render tree.

The MyAsyncImage node is layout agnostic, as are most of these modifiers here. And so it’s going to pass on a value unchanged to the identity.
The identity is going to pass a value unchanged to the task, to the ZStack, to the conditional content. Finally, the conditional content is going to pass that value to our image node.

So it’s going to propose 390⨉763 to our image node. And this is where it gets interesting. image node takes that proposal, and it says, well, I only need 265⨉80.

So that’s going to be my size. It’s going to propose that all the way back up. And as these nodes are all layout agnostic, it will go all the way to the body and to the MyAsyncImage.

And the MyAsyncImage will propose this size or report this size back to its parent.

And then SwiftUI sort of takes care of centering that size within the safe area. To understand this a little bit better, I want to focus on the image nodes, because these are the interesting ones.

Let’s see what happens when we propose a bunch of different sizes to the image node. Let’s propose the safe area.
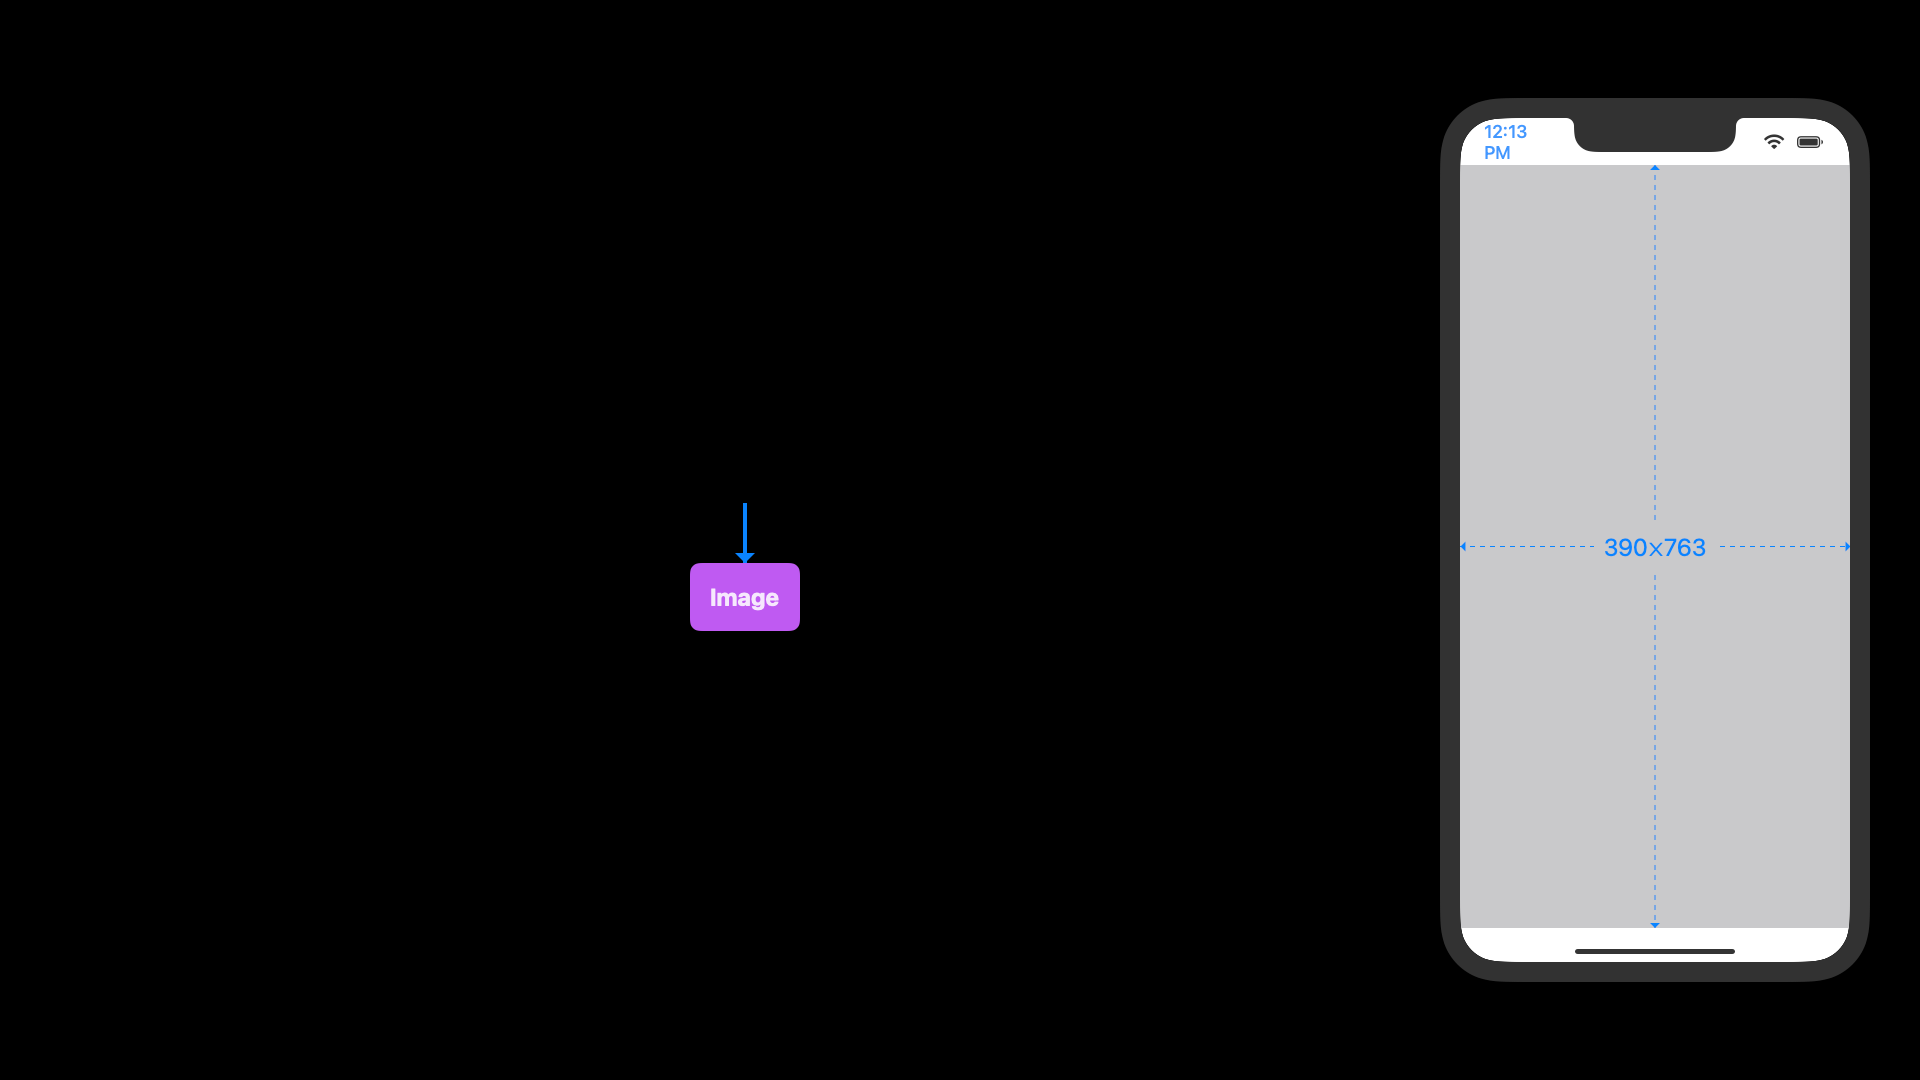
We saw this already. When we propose the safe area, the image node says, well, I’m just 265⨉80. So it almost ignores this, right?

When we propose 200⨉200…

The image node says, well, I was 265⨉80. So again, it seems like it ignores it. And then we have this special proposal. So we can propose nil⨉nil.

This means become your ideal size. For the auto layout people, this is the intrinsic content size. So you can propose nil⨉nil to a view to make it become its ideal size. When we do that, the image says, I’m 265⨉80.

So we’re a little bit stuck here, right?
There’s only one modifier image node that can change this. And it’s the resizable modifier. So let’s look at that. When we use this, it actually modifies the image node internally. So that’s why we have only a single node in the render tree here.
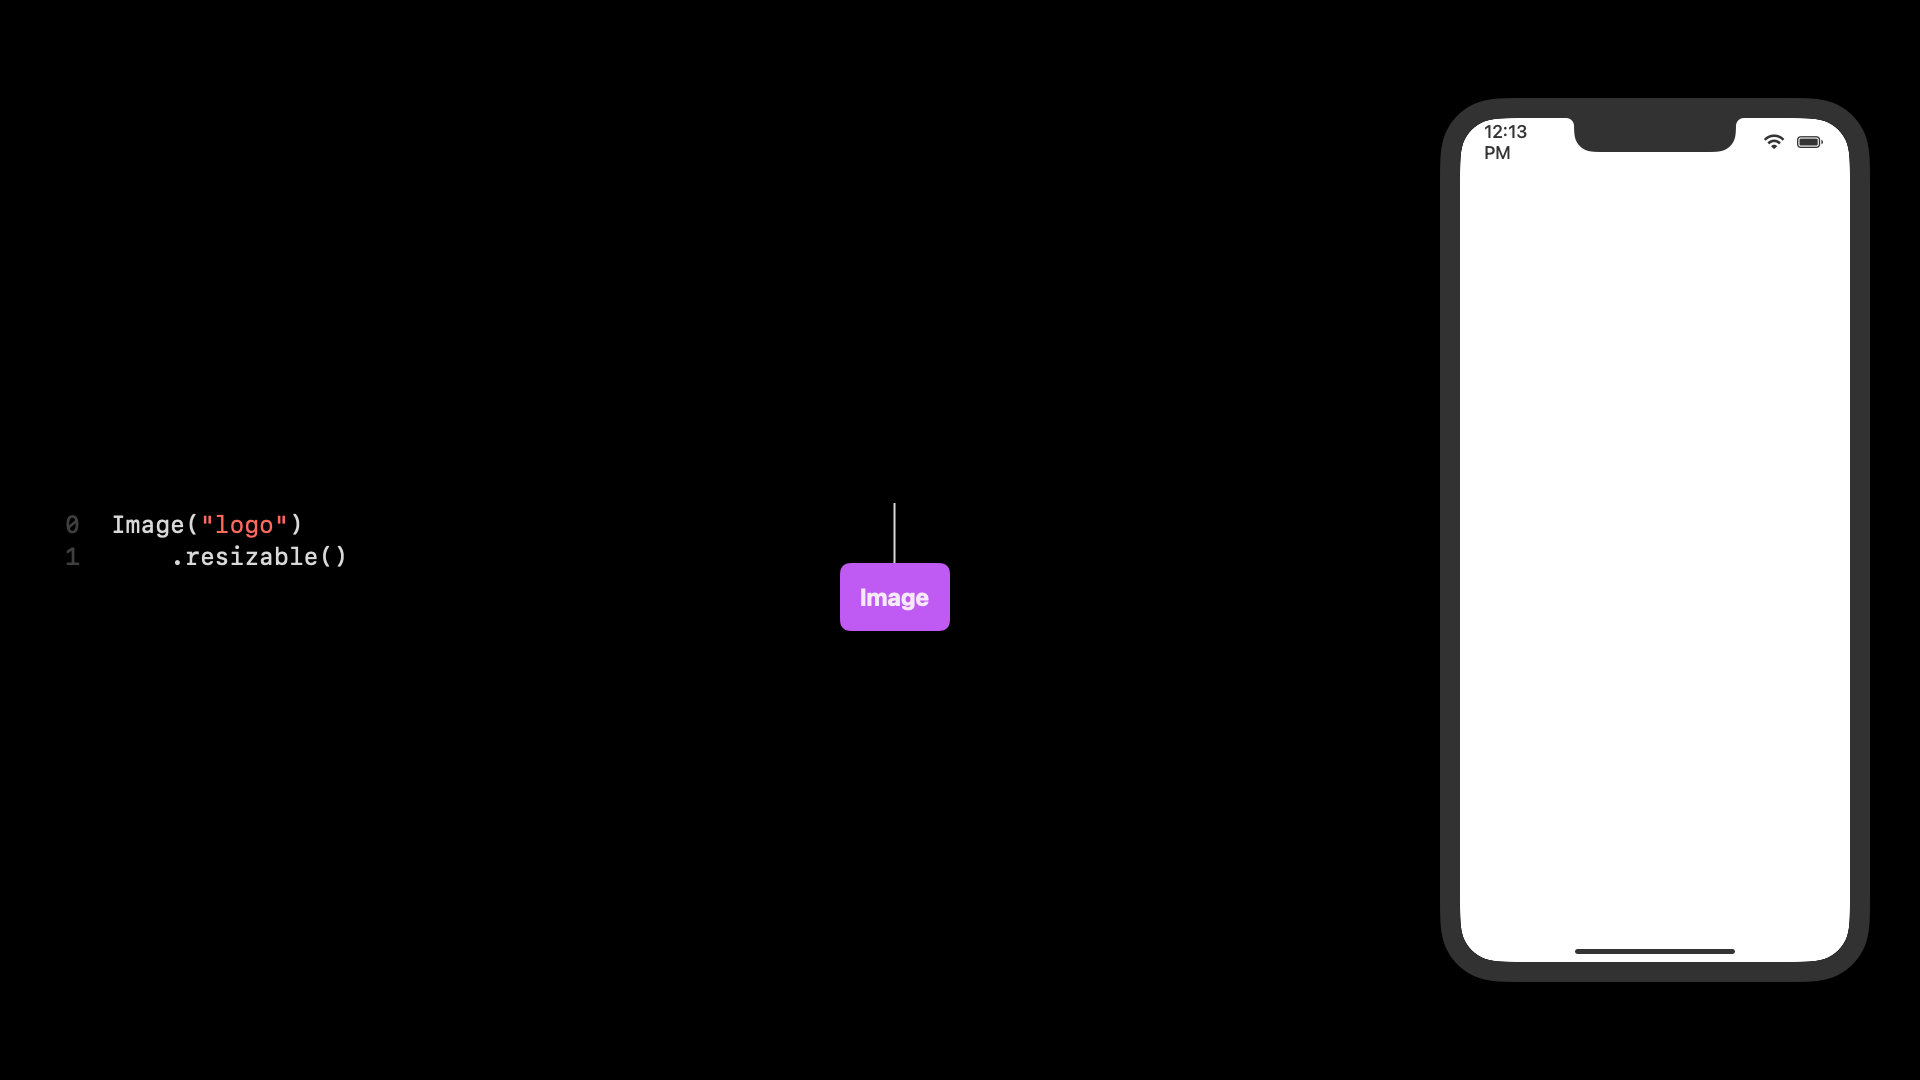
OK, let’s go through these steps again with the proposing and the reporting and see what happens now. When we propose the entire safe area, a resizable image says, OK, fine, I’ll take it.

That’s going to be my size. So if you ever need designers who want to have the logo bigger, this is your go-to. When we propose 200⨉200…

the image node is going to say, fine, I’ll take it. And it looks a little bit stretched, but it’s a lot better than what we had with the full safe area.

And when we propose nil⨉nil– let’s see.

When we propose nil⨉nil, the image node says, OK, I’m going to be 265⨉80.
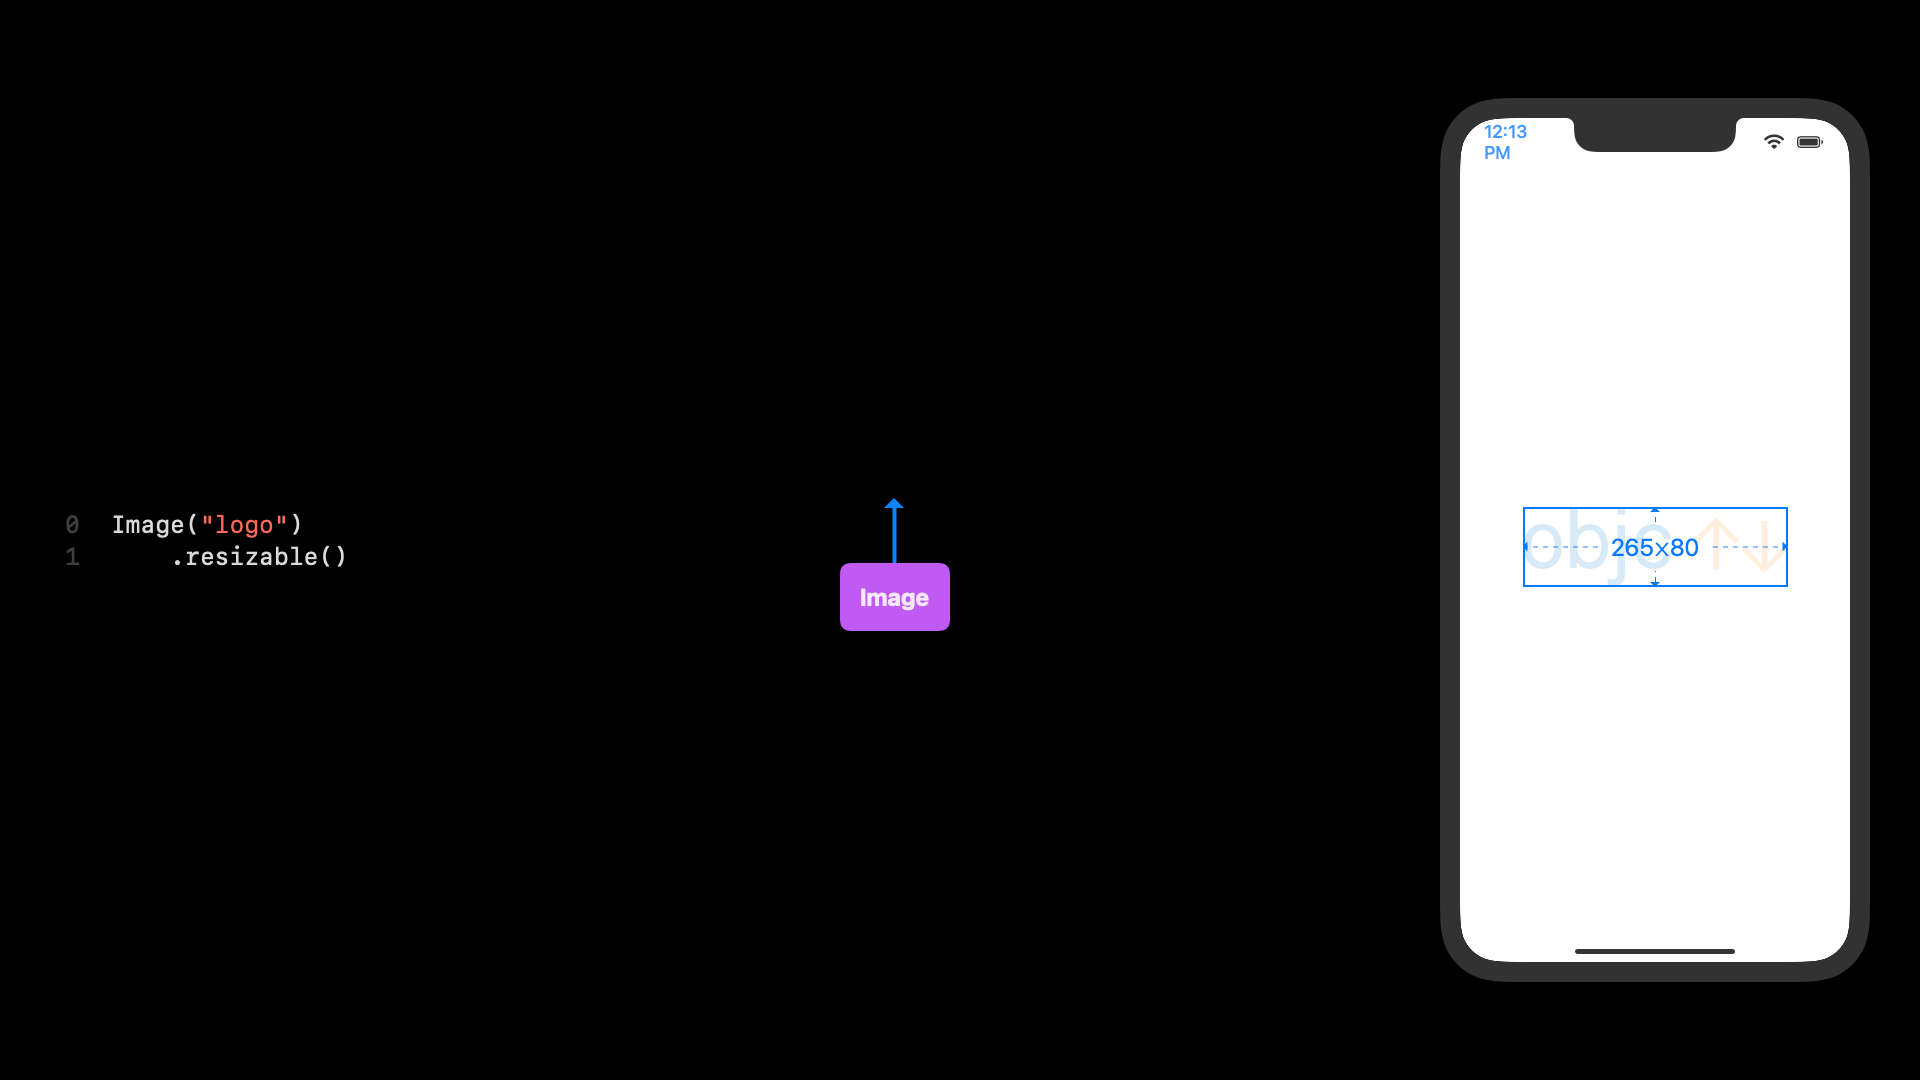
And this 265⨉80, it’s really the underlying bitmap size. And that’s why it’s reporting that. So then it renders at its original resolution. Now, there is no built-in way to images to do like aspect ratio resizing or anything like that.
There is a modifier in SwiftUI, but it works for any SwiftUI view. And it’s the aspectRatio modifier. And we can say aspectRatio(contentMode: .fits).
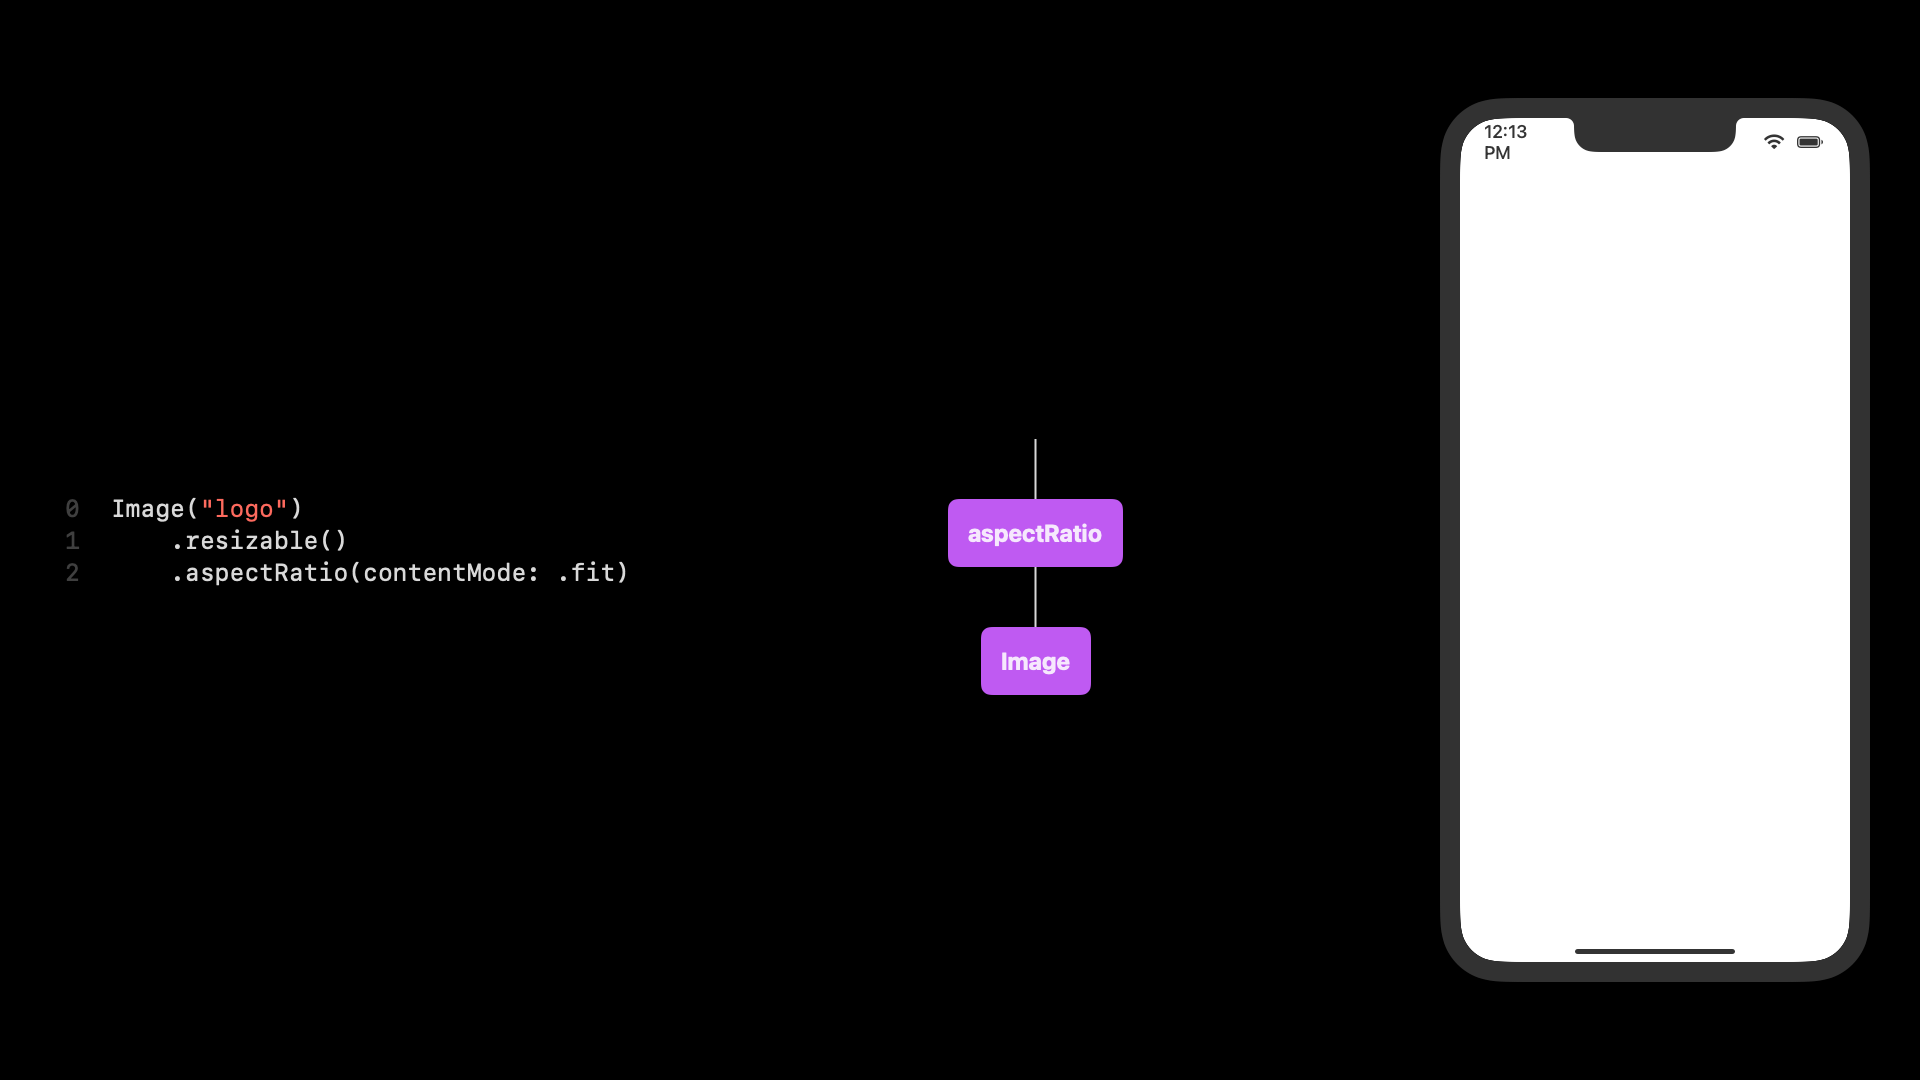
So this is the render tree that would look– that would be the tree for this code, right? And I think this is really cool how this works, because aspect ratio, as I said, is not tied to images specifically. So when we propose to the aspect ratio, Let’s say we propose the entire safe area.

Now it gets really cool, I think. So aspectRatio doesn’t know the underlying aspect ratio of the image. It needs to figure that out. And here’s what it’s doing: it’s going to propose nil⨉nil to the image.

The image says I’m 265⨉80.

Then the aspect ratio takes that 265⨉80, and it’s going to fit a rectangle inside the entire safe area, its proposal. It’s going to fit a rectangle with that same aspect ratio inside the safe area.

Then it’s going to propose the image again. So it’s proposing twice. You can see this has the same aspect ratio. And so now the image stretches all the way to the bounds of our screen with the correct aspect ratio.

I think this is really cool how this works, by proposing nil first. And let’s see what happens at different sizes. So if we had 200⨉200 as our proposal, the aspect ratio will do the same thing.

It doesn’t know the underlying aspect ratio because we didn’t specify it. It will propose nil⨉nil to the image.

The image says, well, my underlying size is 265⨉80.

Then the aspect ratio takes that aspect ratio, fits it inside the 200⨉200, and it proposes 200⨉60.
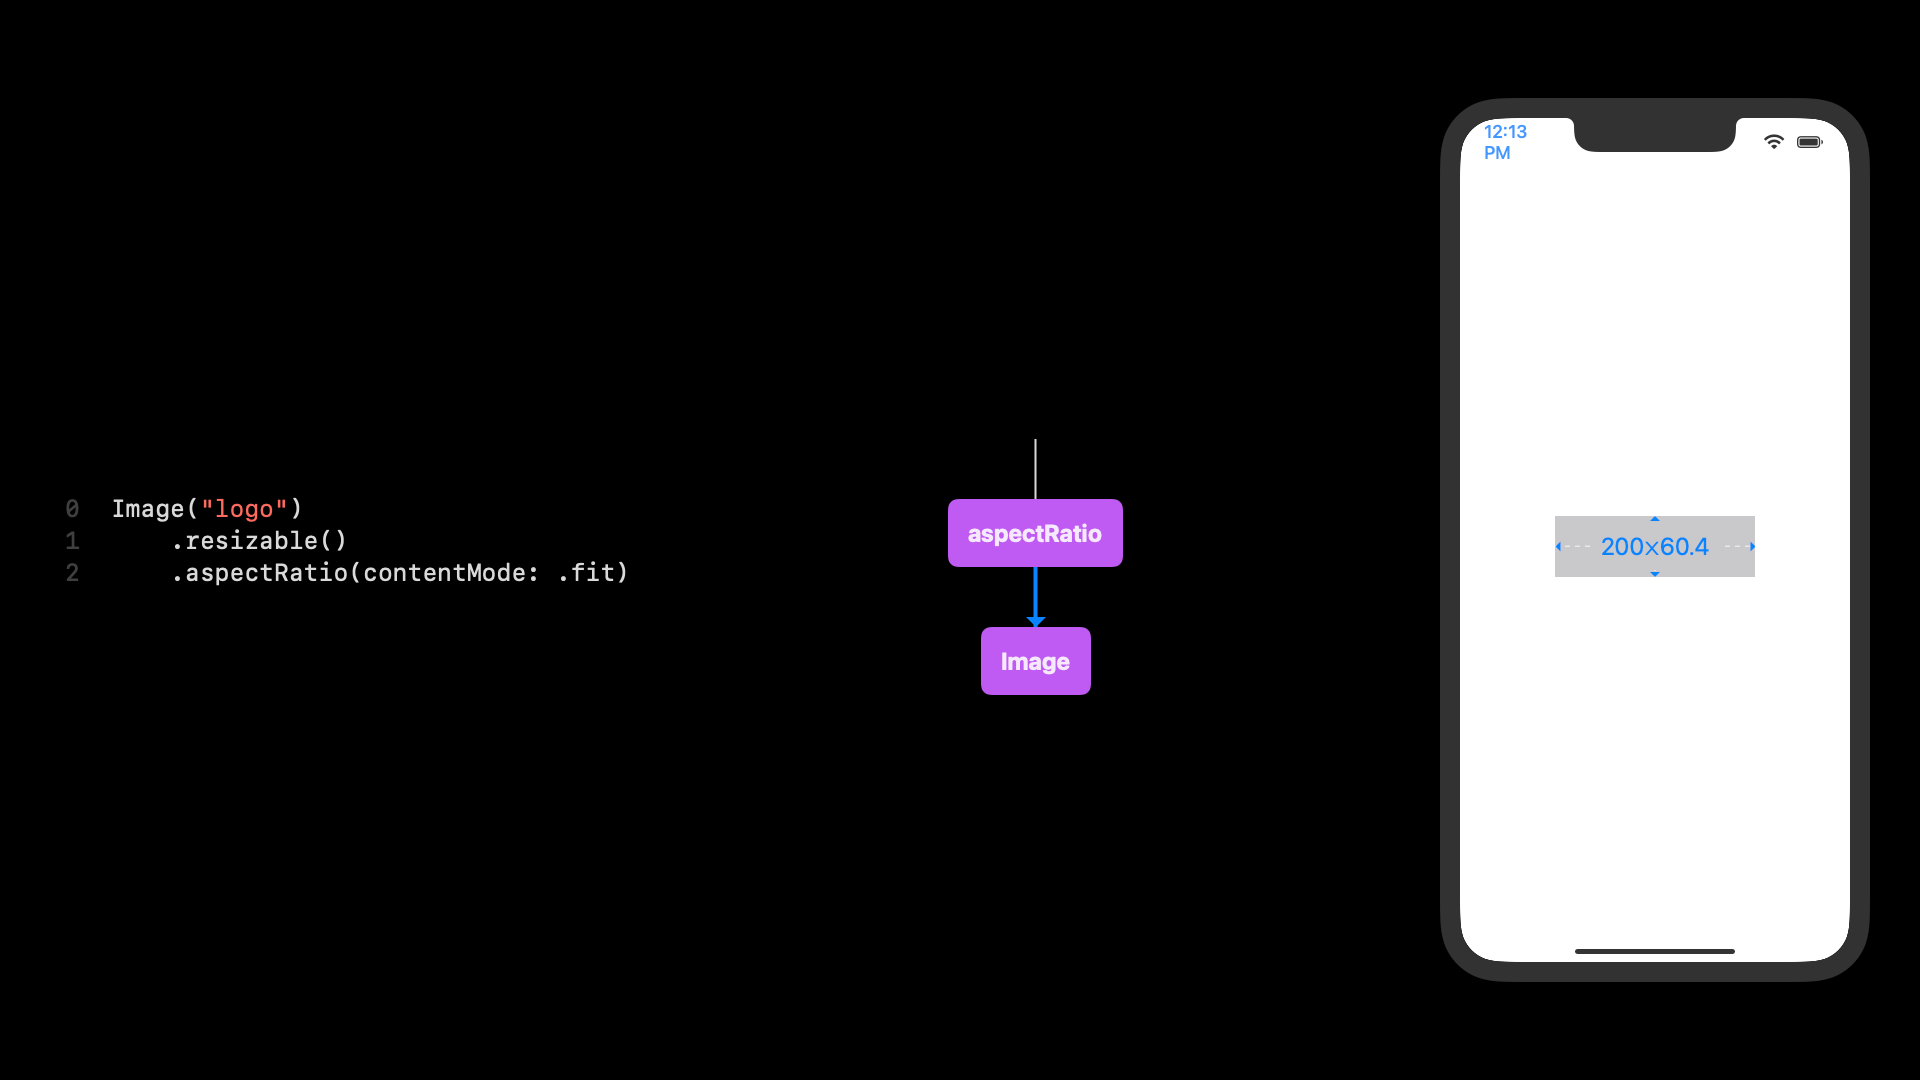
Now the image is done, and it can report its size back.

It’s this two-step proposing in case of the aspect ratio which I think is really cool. Now, let’s look at the photo, see what happens here.

We propose the safe area to our photo:

And aspect ratio needs to, again, propose nil⨉nil.

The image says: my size is 629⨉271. This, again, stretches beyond the bounds.
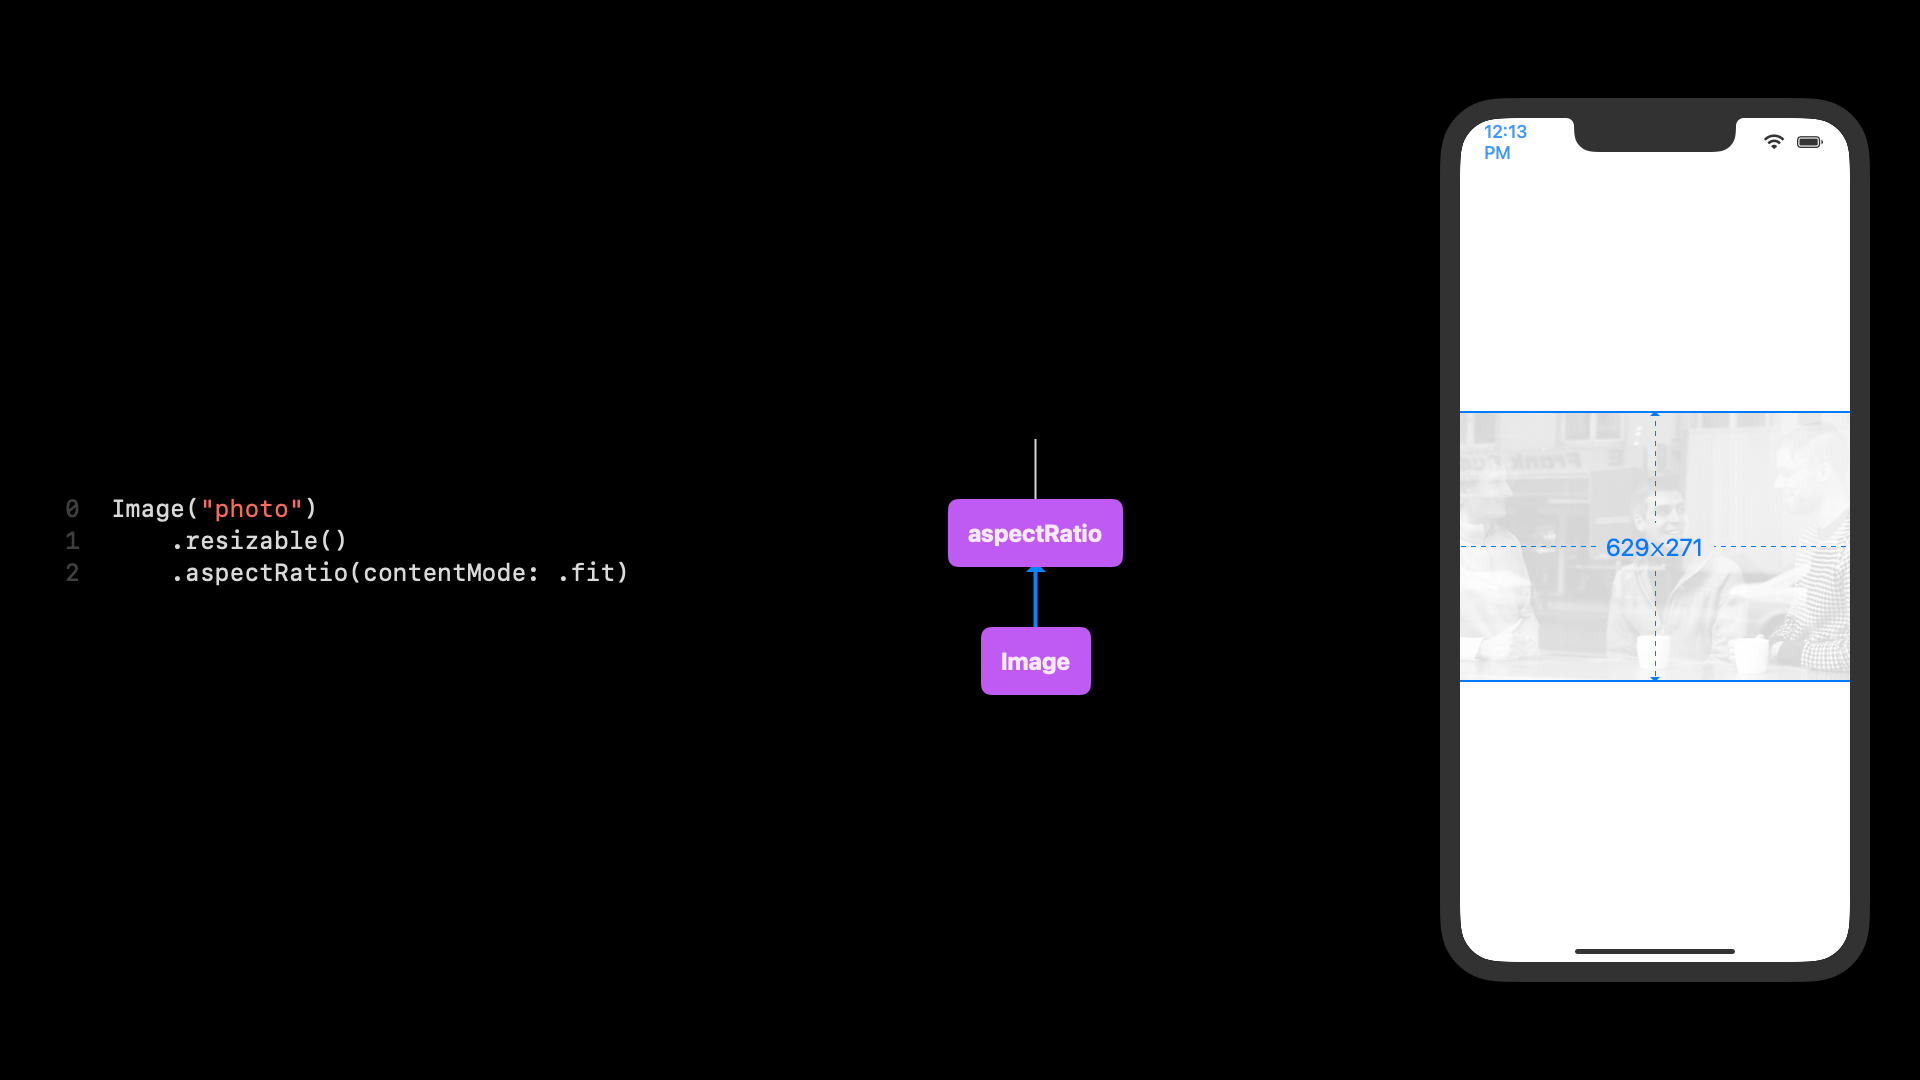
The aspect ratio then takes a rectangle with that same aspect ratio that fits within the safe area, and it proposes that to the image.

This way, we can get an image that displays the full image at the correct aspect ratio.

OK, we’re almost done. Now, this is the code we had that we ended up writing.
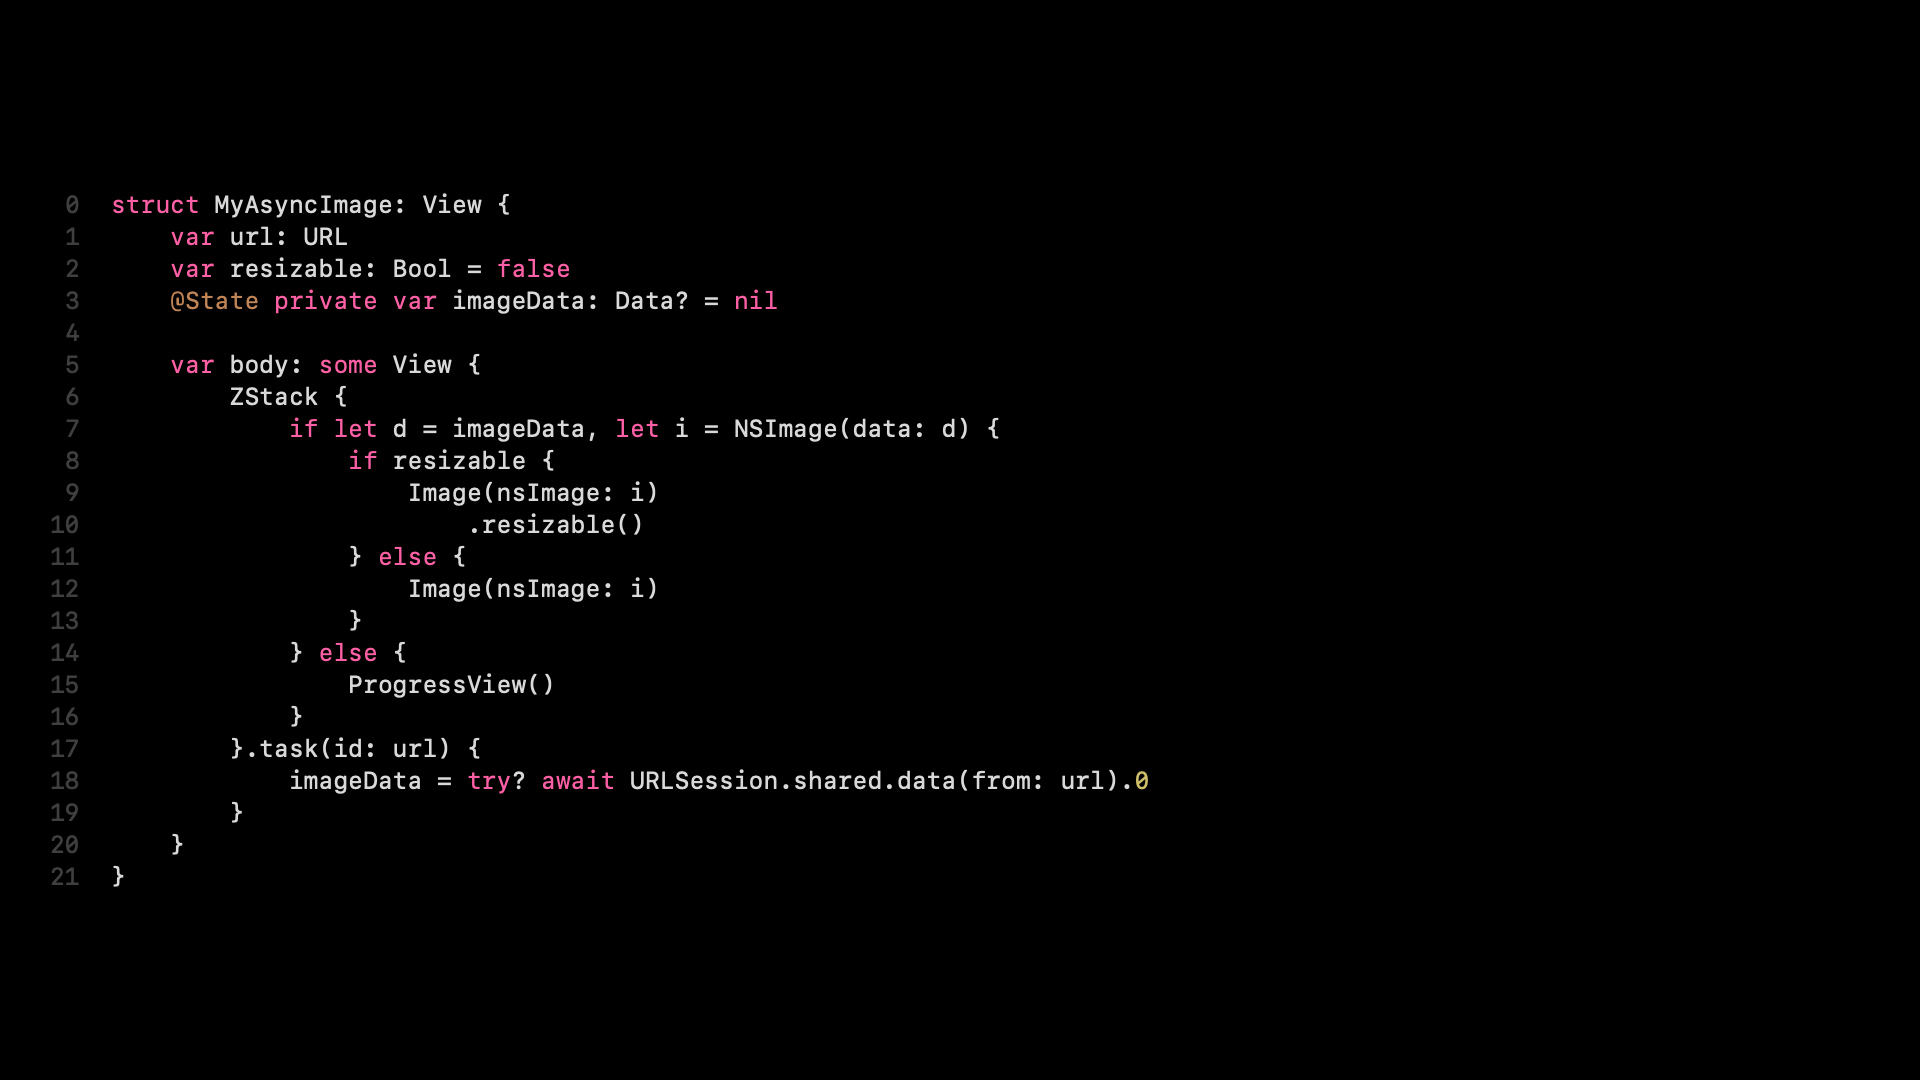
Now we need to build this aspect ratio code into our view. We can just add a resizable property and then modify our image code.
So we can just add an if else around this image code. And then in the case that is resizable, we create a resizable image. Unfortunately, this is the way we’d have to write it because the resizable modifier doesn’t take a boolean.
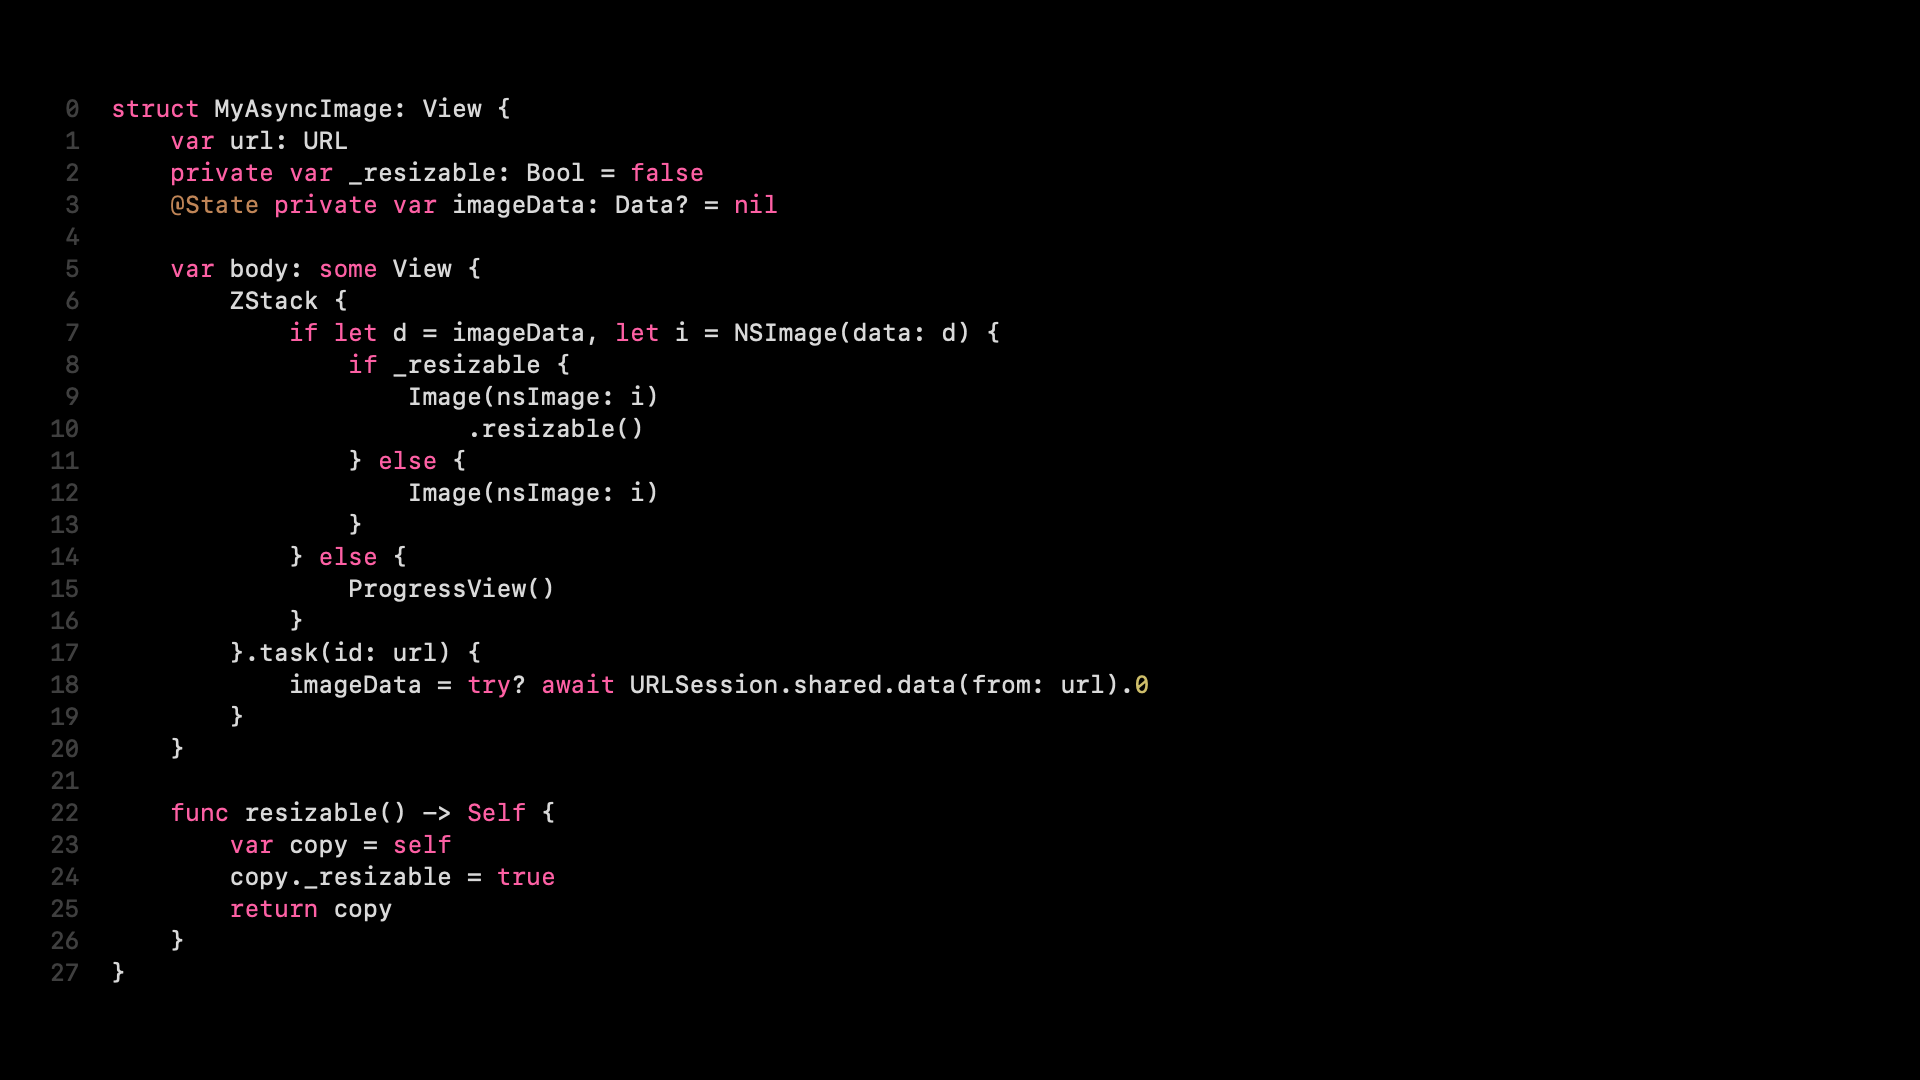
This is not very nice because now we need to initialize our image with a URL and that resizable boolean. And that doesn’t look the same way as the image initializer does, where you have the resizable modifier. But we can add that very easily as well. To do that, we can make our property private.

Then we can add an extension to the image and use the fact that views are value types. We can just create a copy of self, set the property to true, and return that copy without ever having to exposing this underscore resizable property.
So that’s how you can have that same API. And let’s update our content view for this. So this is the previous version, the one that’s broken layout-wise, which extends.

Now we can change the code a little bit. We can add the resizable modifier and the aspect ratio. And we can already see that it stretches all the way to the edges of the screen.
So if we tap it, it reloads, hopefully. And it stretches all the way to the edges of the screen. So now we’re done.
There is a lot more I wanted to talk about. And I think the most important concept here is understanding how the code translates into trees and how you can then use those trees for state management, for layout, and many other things.
One of the things I wanted to show is that maybe you feel like this nil proposal, that was a little bit weird, right? This nil proposal is everywhere, actually. A vertical scroll view has infinite space vertically. So it can stretch all the way beyond the bounds of the screen. And so what a vertical scroll view does is really cool. It proposes the width it got proposed, so let’s say 320 or something. And it proposes nil for the height, which means the view has to take that 320, but it can become any height it wants.
When we talk about stack layouts, it’s also very interesting what happens in terms of proposing and reporting. A stack proposes to its children, and it starts by proposing 0 for the width. Let’s say we have an HStack. The children all report their sizes for that zero. And so it does this for each one of the children.
Then it does the same thing again and proposes a very large size. And then for each child, it takes the difference of these two return values. And this is called the flexibility of a view. So it basically means, what is your size at zero? What is your size at a very large number? And this is going to be your flexibility, like your minimum width and your maximum width, in a sense.

And then SwiftUI takes all the subviews, and it reorders them according to flexibility.
And then it proposes again, and it starts with the least flexible view first, and then goes in that order. That’s why stack views mostly look right and do what you want.
I would have also liked to talk about the environment. The environment also works on these trees, on the render trees. And it’s all about information that flows down the render tree.
This is at least how I imagine this always. So the environment passes values from the parent to the child and then all the way down. So it’s only information that flows down.

If you ever heard about preferences, this is sort of the thing that comes with the environment but in the other direction. With preferences, information flows up the view tree. So children propagate information to their parents.

They combine that information, and any preference value can be read by an ancestor. Again, to understand what’s happening there, it’s very important to understand these trees.
There is a lot more that has to do with all these trees. If you want to know more about it, you can actually read our book. It’s almost done. We did a complete rewrite. I think this book is really fun to read, and it goes into all the details that you cannot possibly cover in a 30-minute talk.
If you have any questions, please feel free to reach out. Thank you!
-
Blueprint mode doesn’t actually exist, the entire simulator is fake (it’s just a SwiftUI view). ↩